Hub: Order Import
Introduction
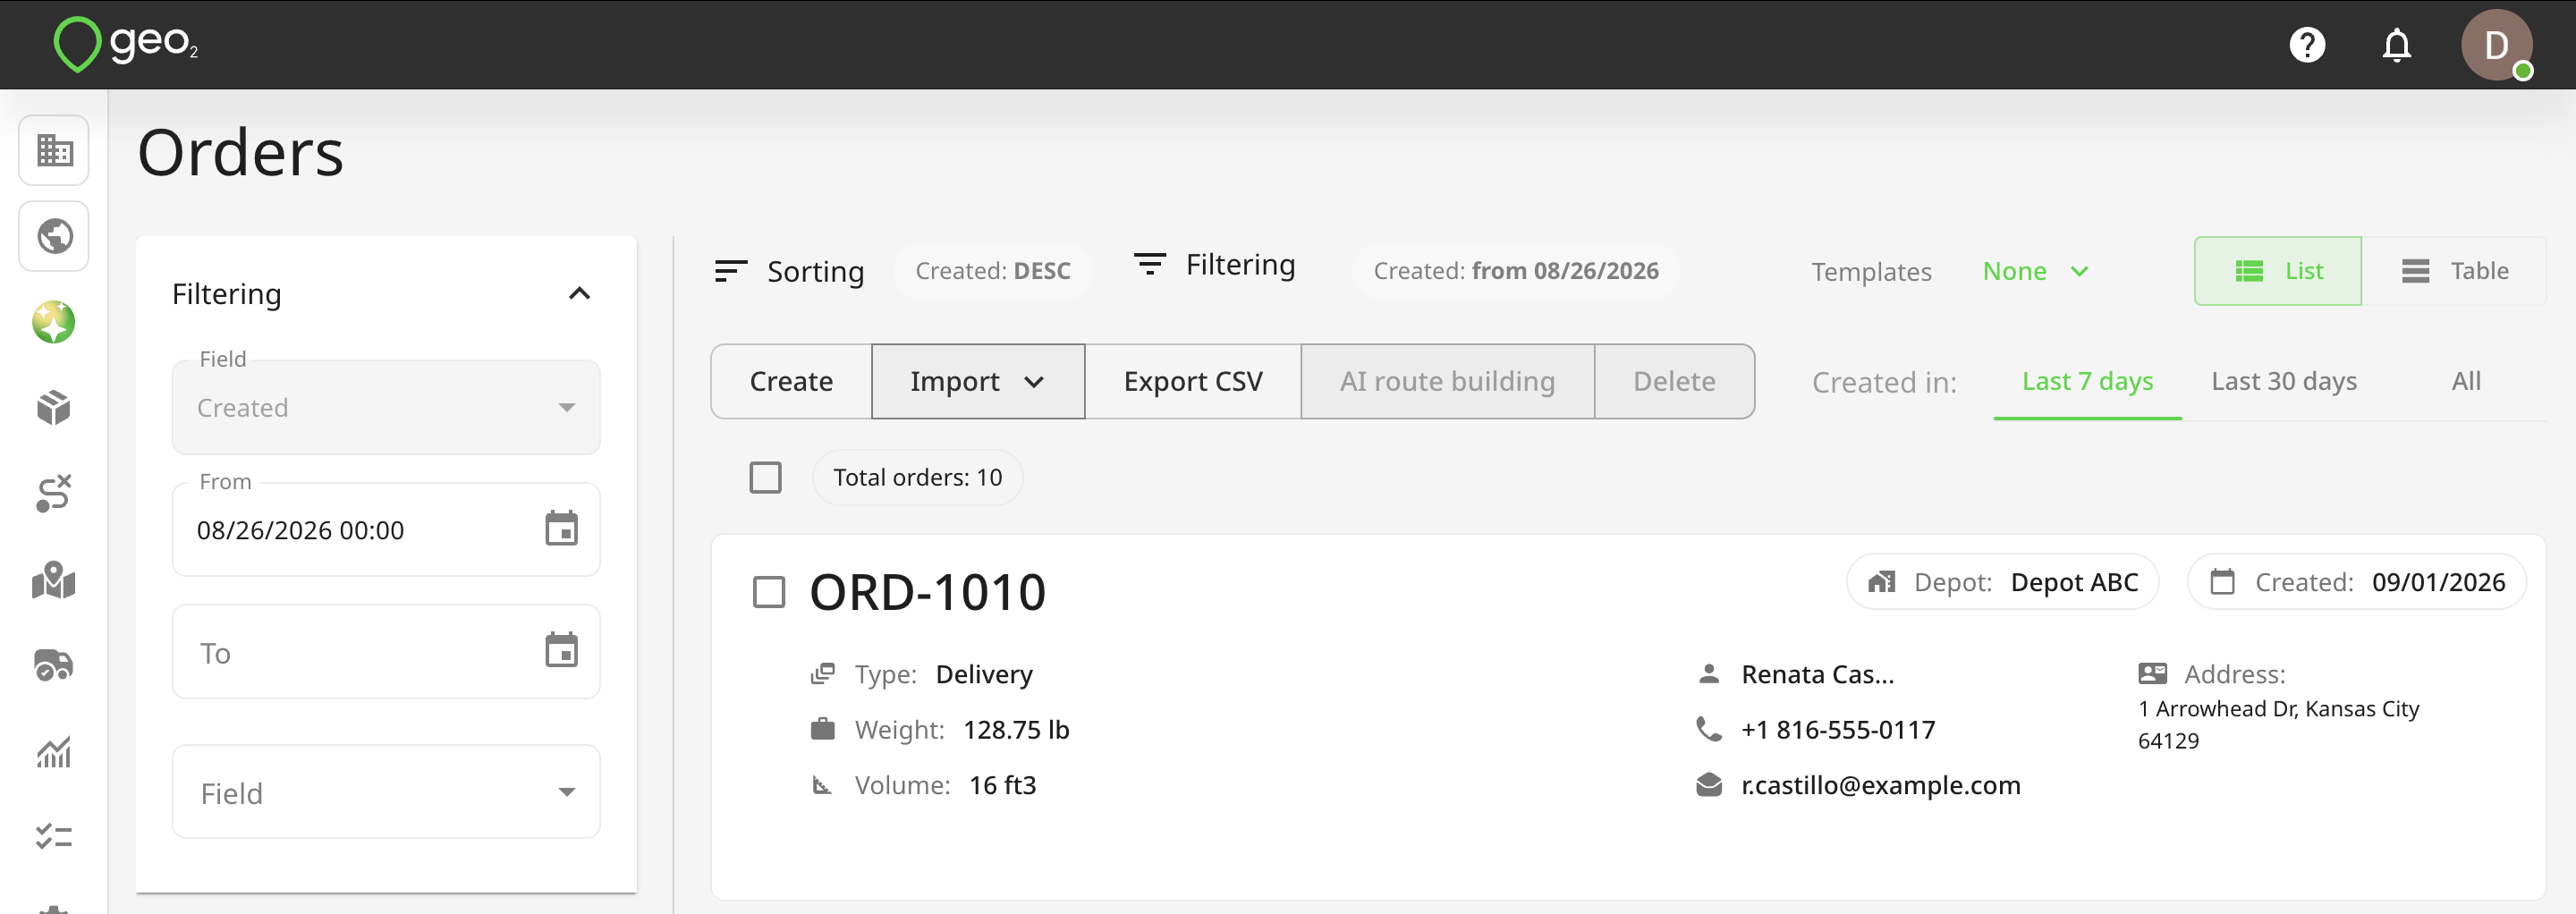
You can import multiple orders at once from the Orders page in Hub. Orders can be imported from spreadsheets (.csv, .tsv, .xls, .xlxs, .xml, or .txt file) or from images and PDF files. To import orders:
- On the Orders page, select
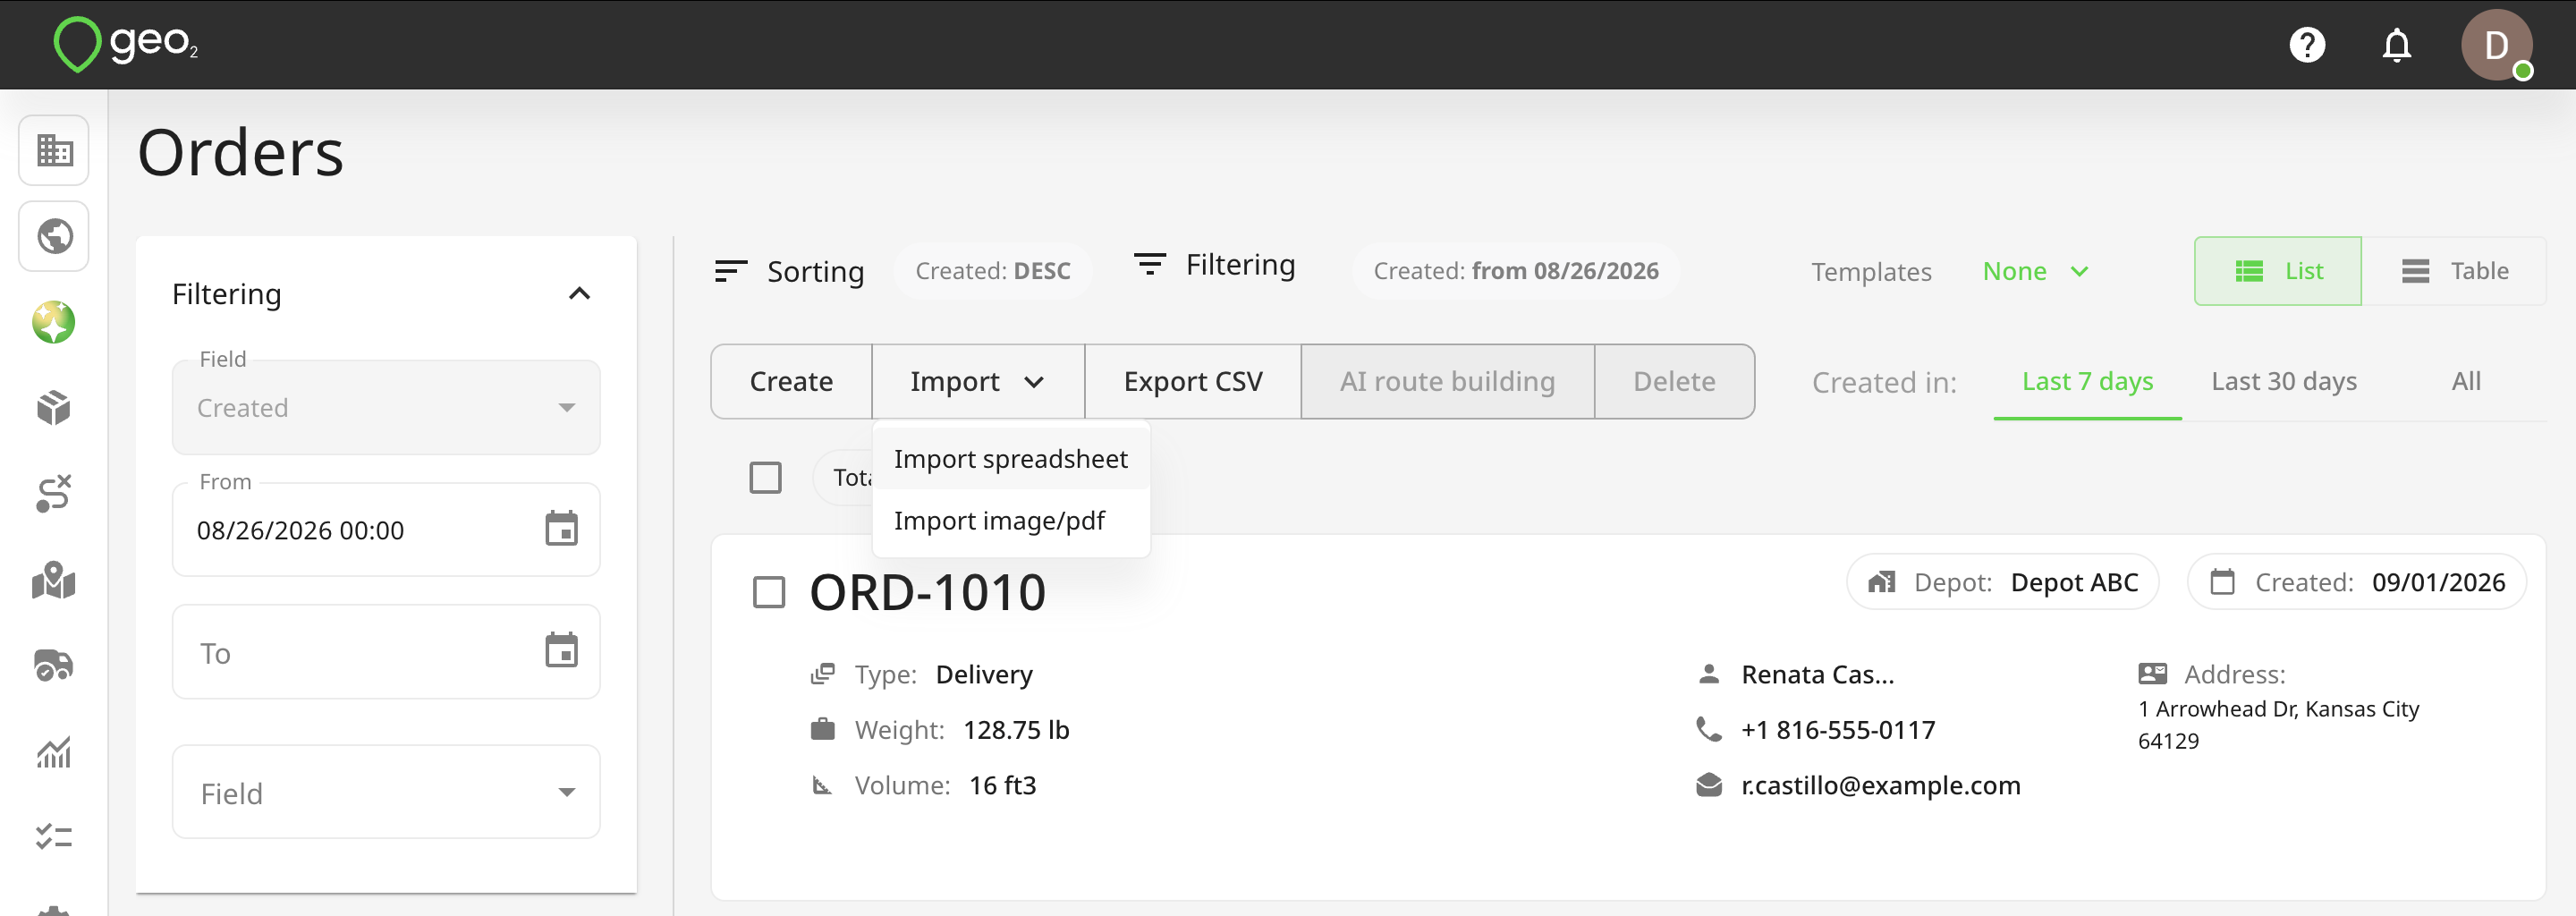
Import. - Choose the import type:
Import spreadsheet— for .csv, .tsv, .xls, .xlxs, .xml, or .txt fileImport image/PDF— for photos and PDF documents
Import Spreadsheet
You can import order data into Geo2 Hub from a spreadsheet using two methods:
- Upload your spreadsheet file with column mapping
- Manually paste or type your data into the table.
Upload Spreadsheet File with Column Mapping
Learn how to quickly import your spreadsheet file with column mapping in Hub https://www.youtube.com/watch?v=fJL8BpnLE8A
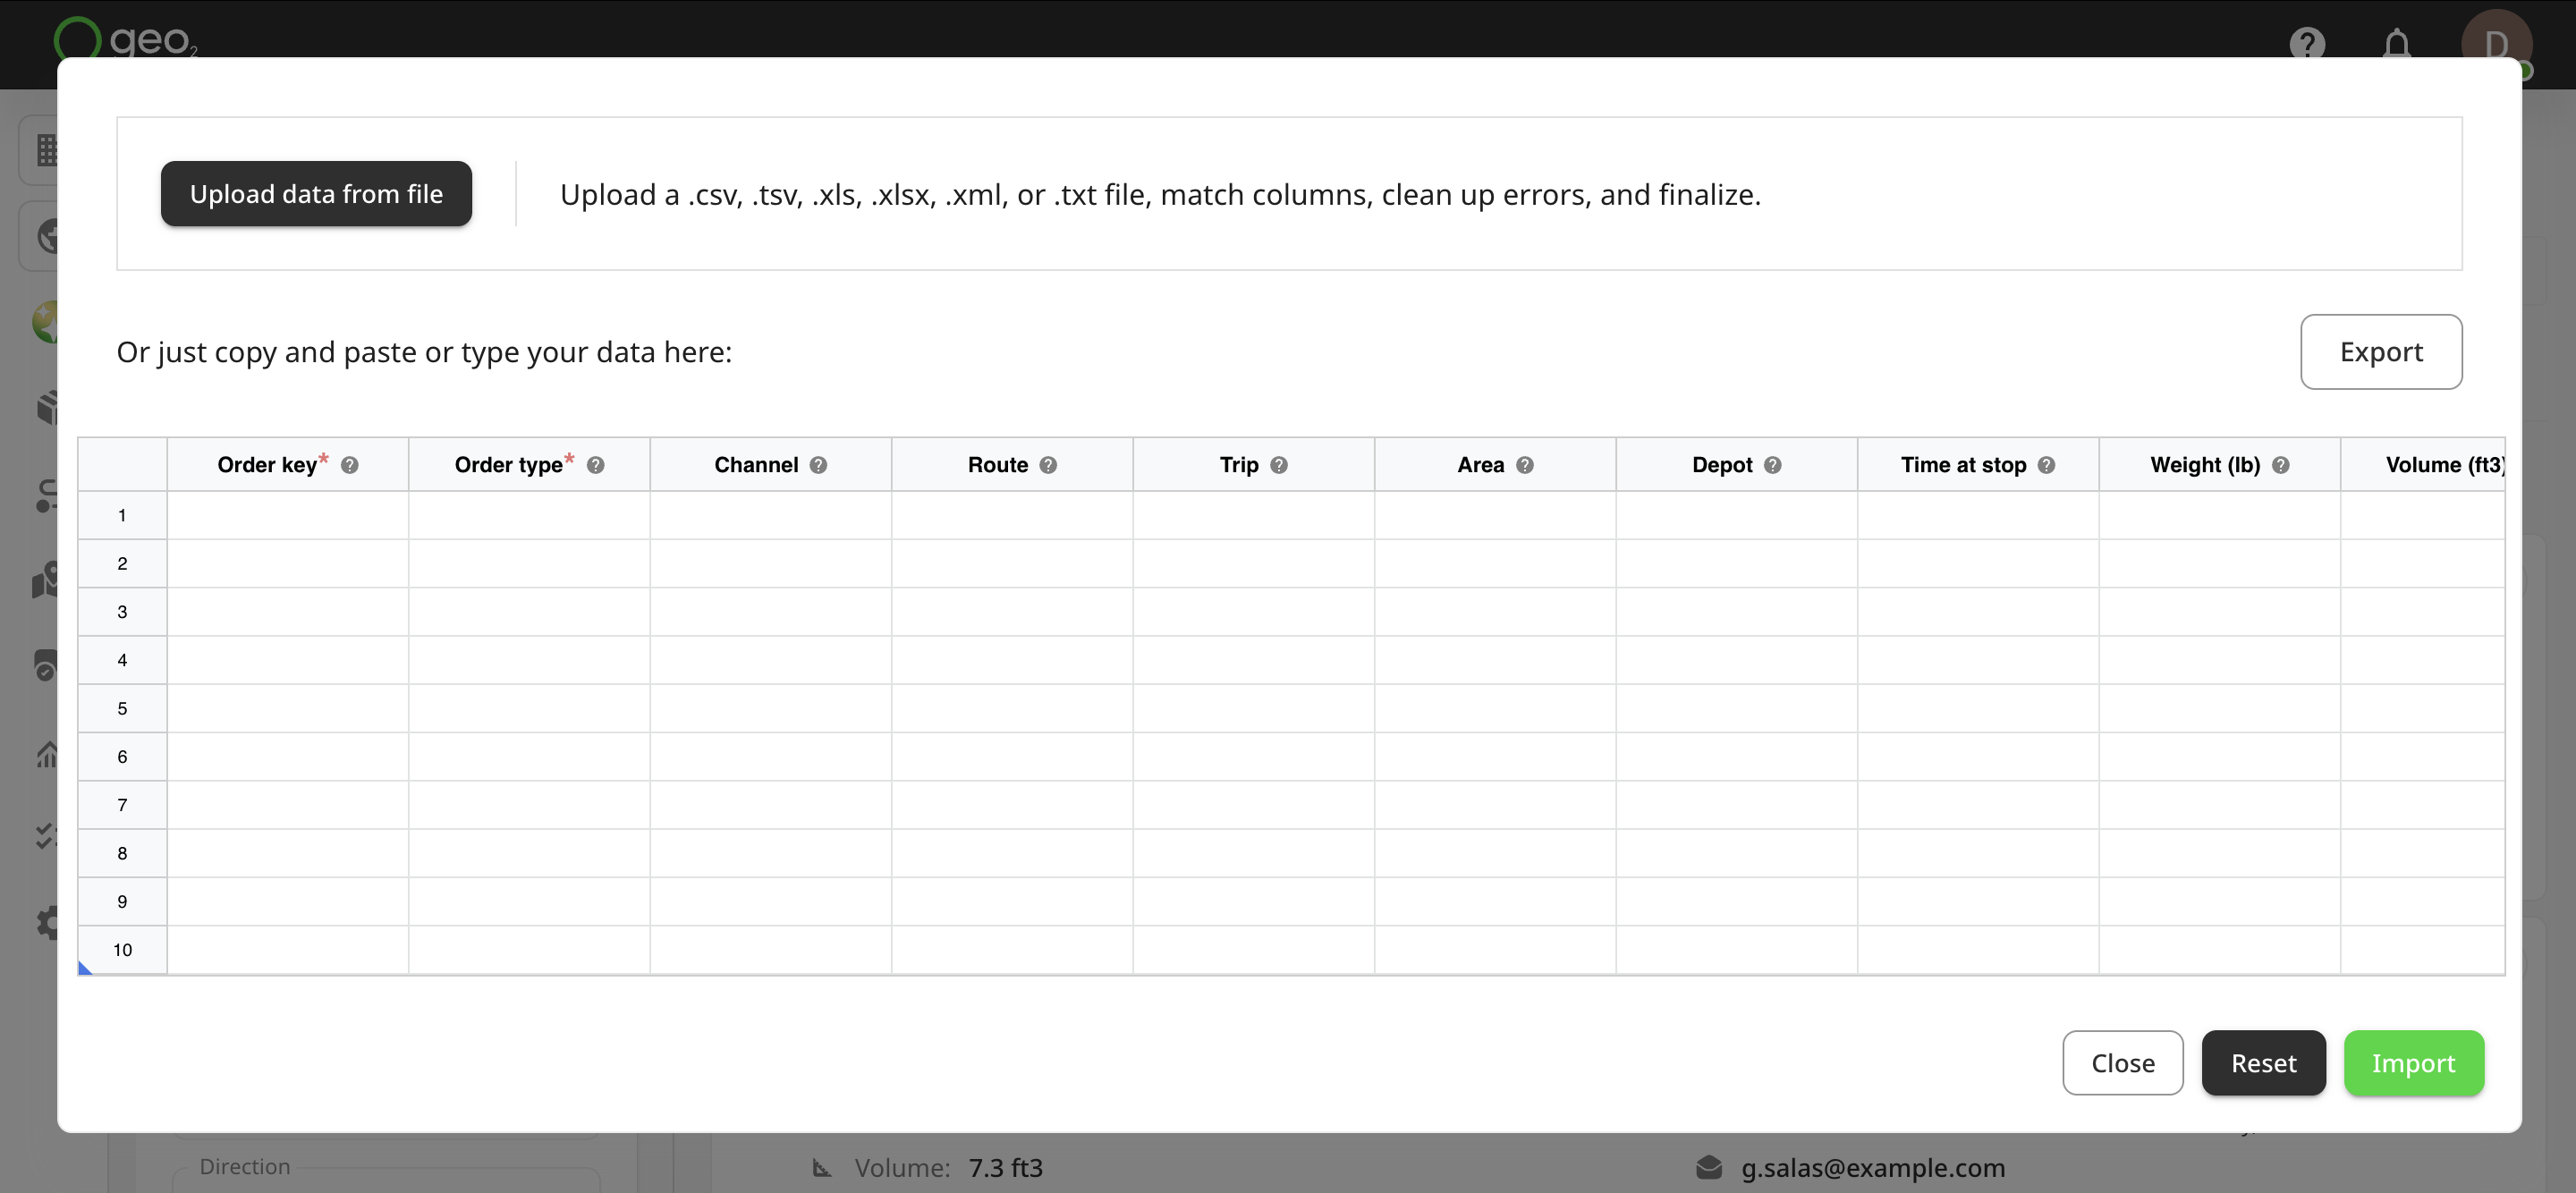
Press the Upload data from file button at the top of the Import spreadsheet in Hub. Upload a .csv, .tsv, .xls, .xlxs, .xml, or .txt file. After uploading, the Map your data columns dialog will be displayed where you can match your spreadsheet columns to Hub’s data fields. Required fields are marked with an asterisk ( * ) but you can skip them at this step and add data later.
On the dialog, you will see 4 columns:
| Column Heading | Description |
|---|---|
| Your file column | Displays the column headers from your uploaded file that the system will attempt to match with known fields. |
| Your sample data | Shows a preview of the data in each column from your uploaded file to help with identifying what each field contains. |
| Destination column | Lets the user select or confirm which system field the uploaded column should map to. |
| Matching result | Indicates how well the system matched each column, including match strength and confidence percentage. |
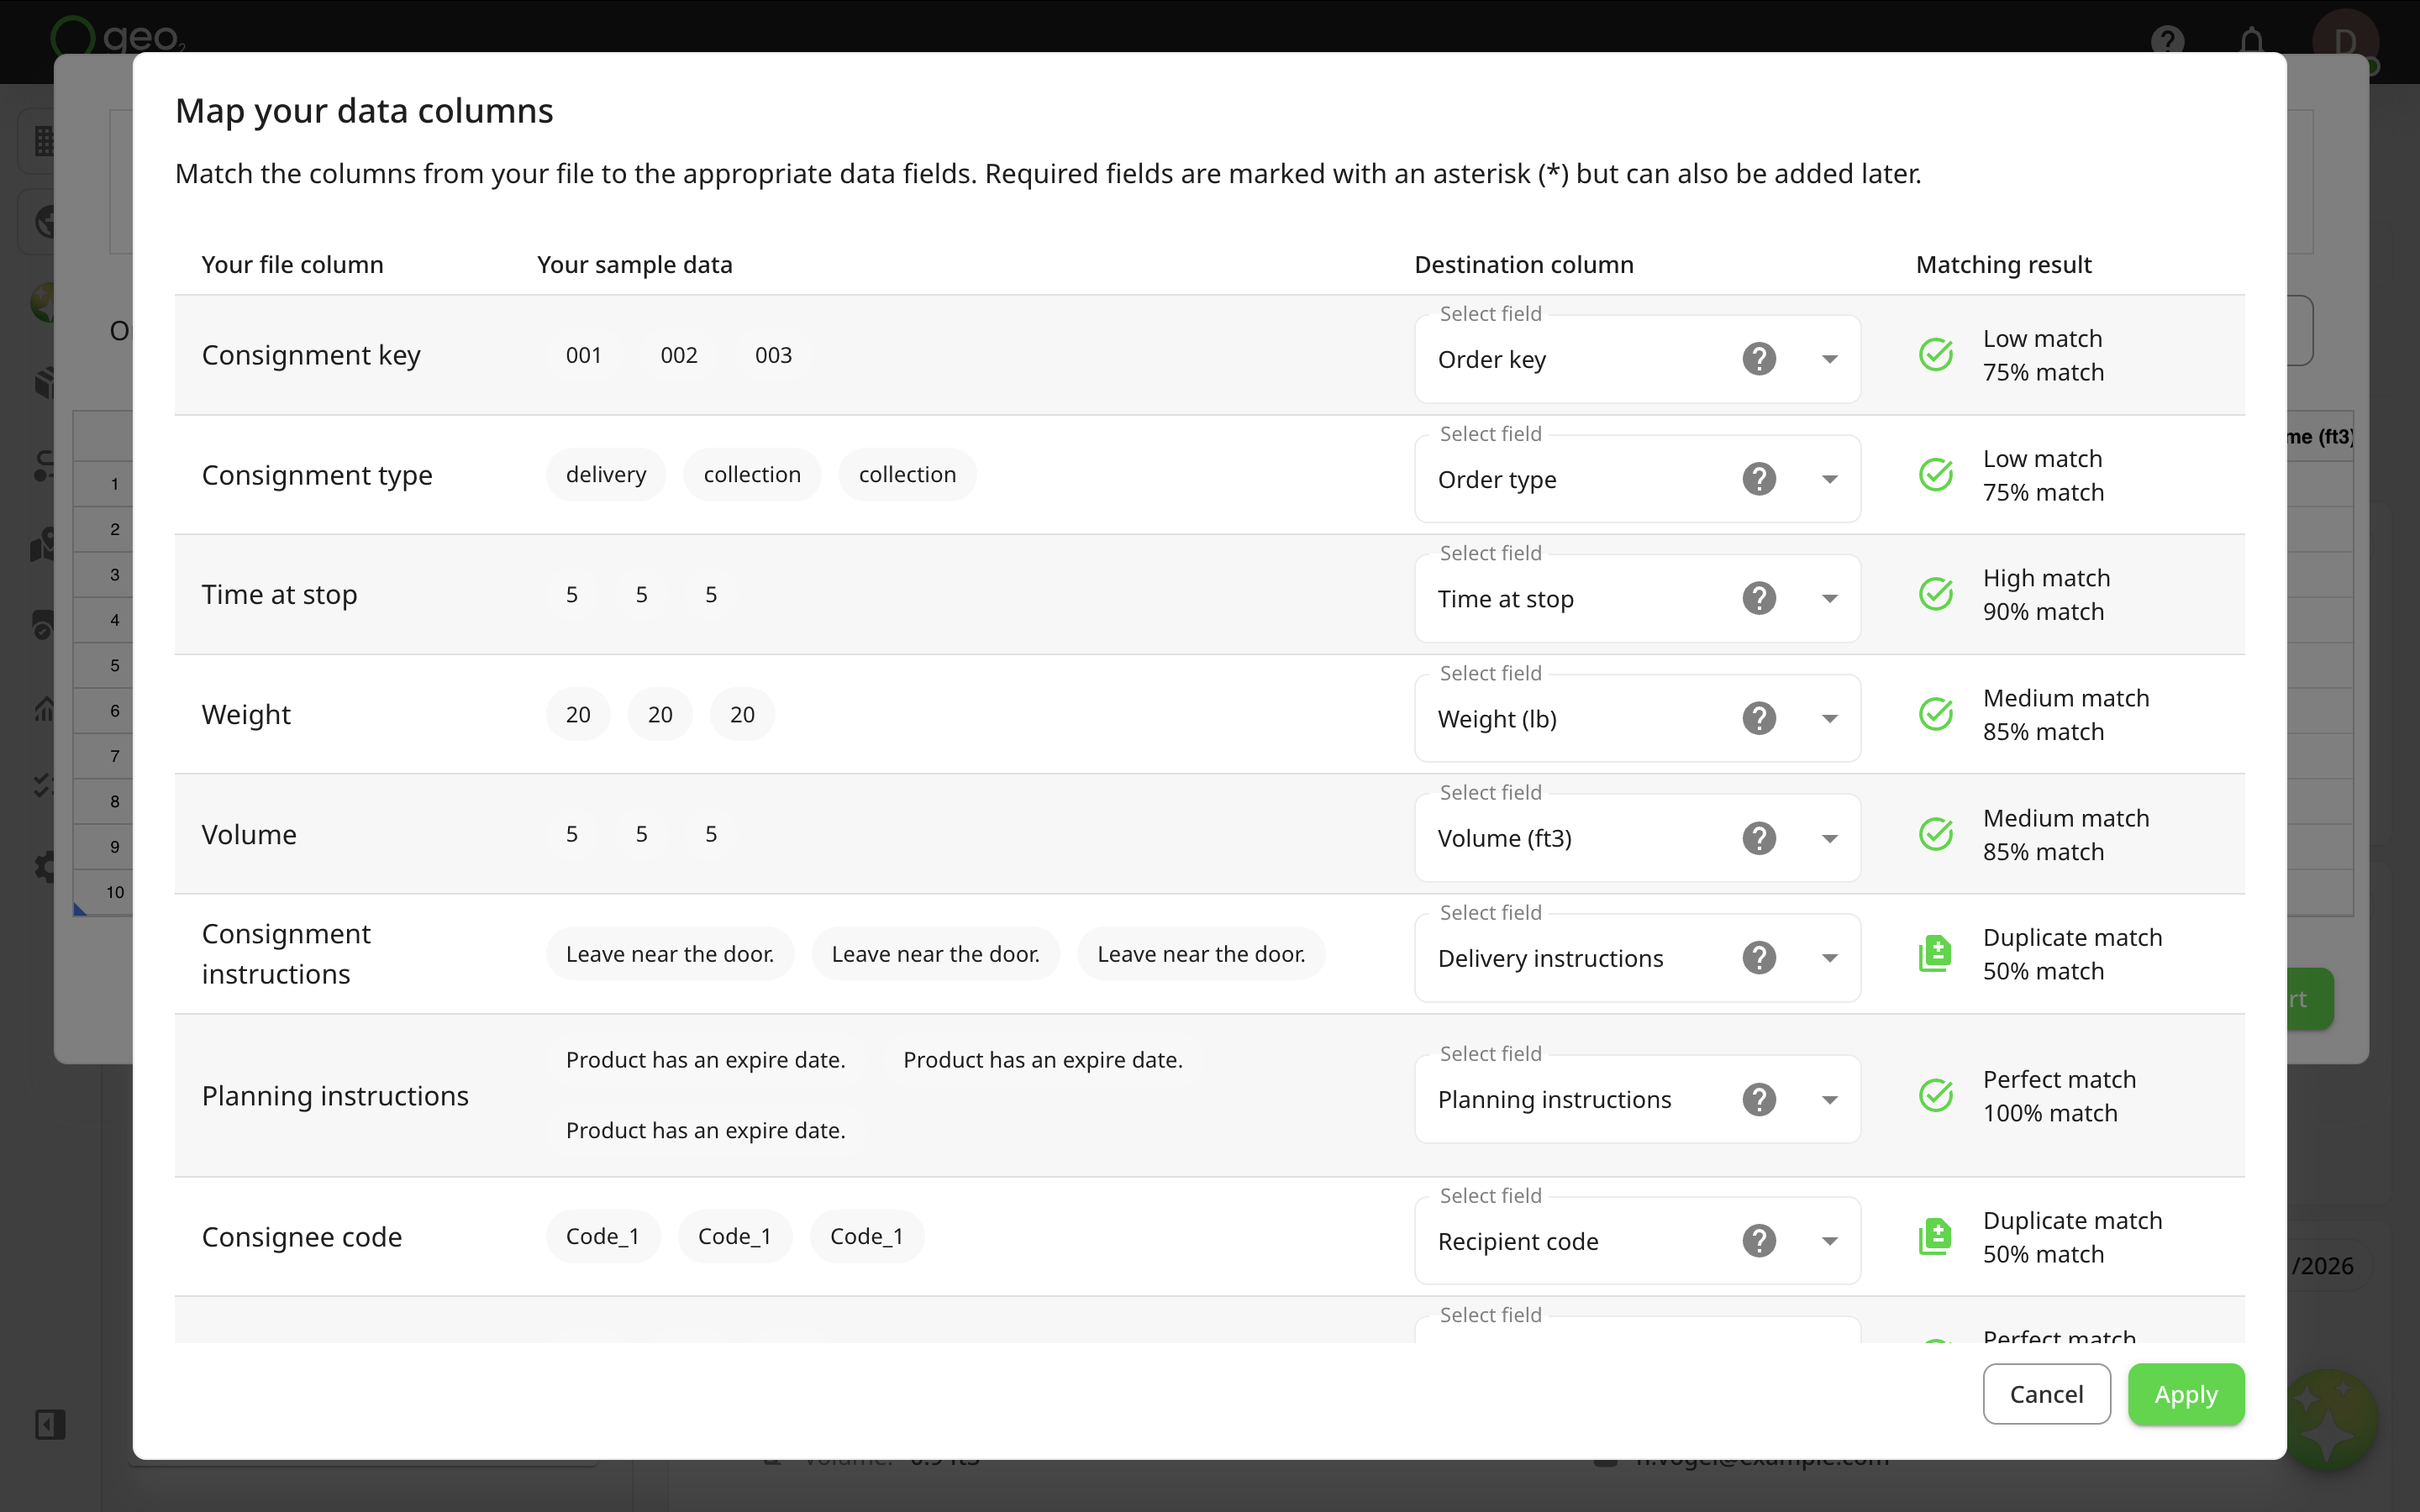
The system will attempt to auto-match fields like Route, Depot, Time at stop, etc. Matches are clearly marked with a green tick for perfect or high matches, while unmatched columns are shown with a yellow warning icon. You can adjust matches or choose to skip fields, including required ones, these can be added later.
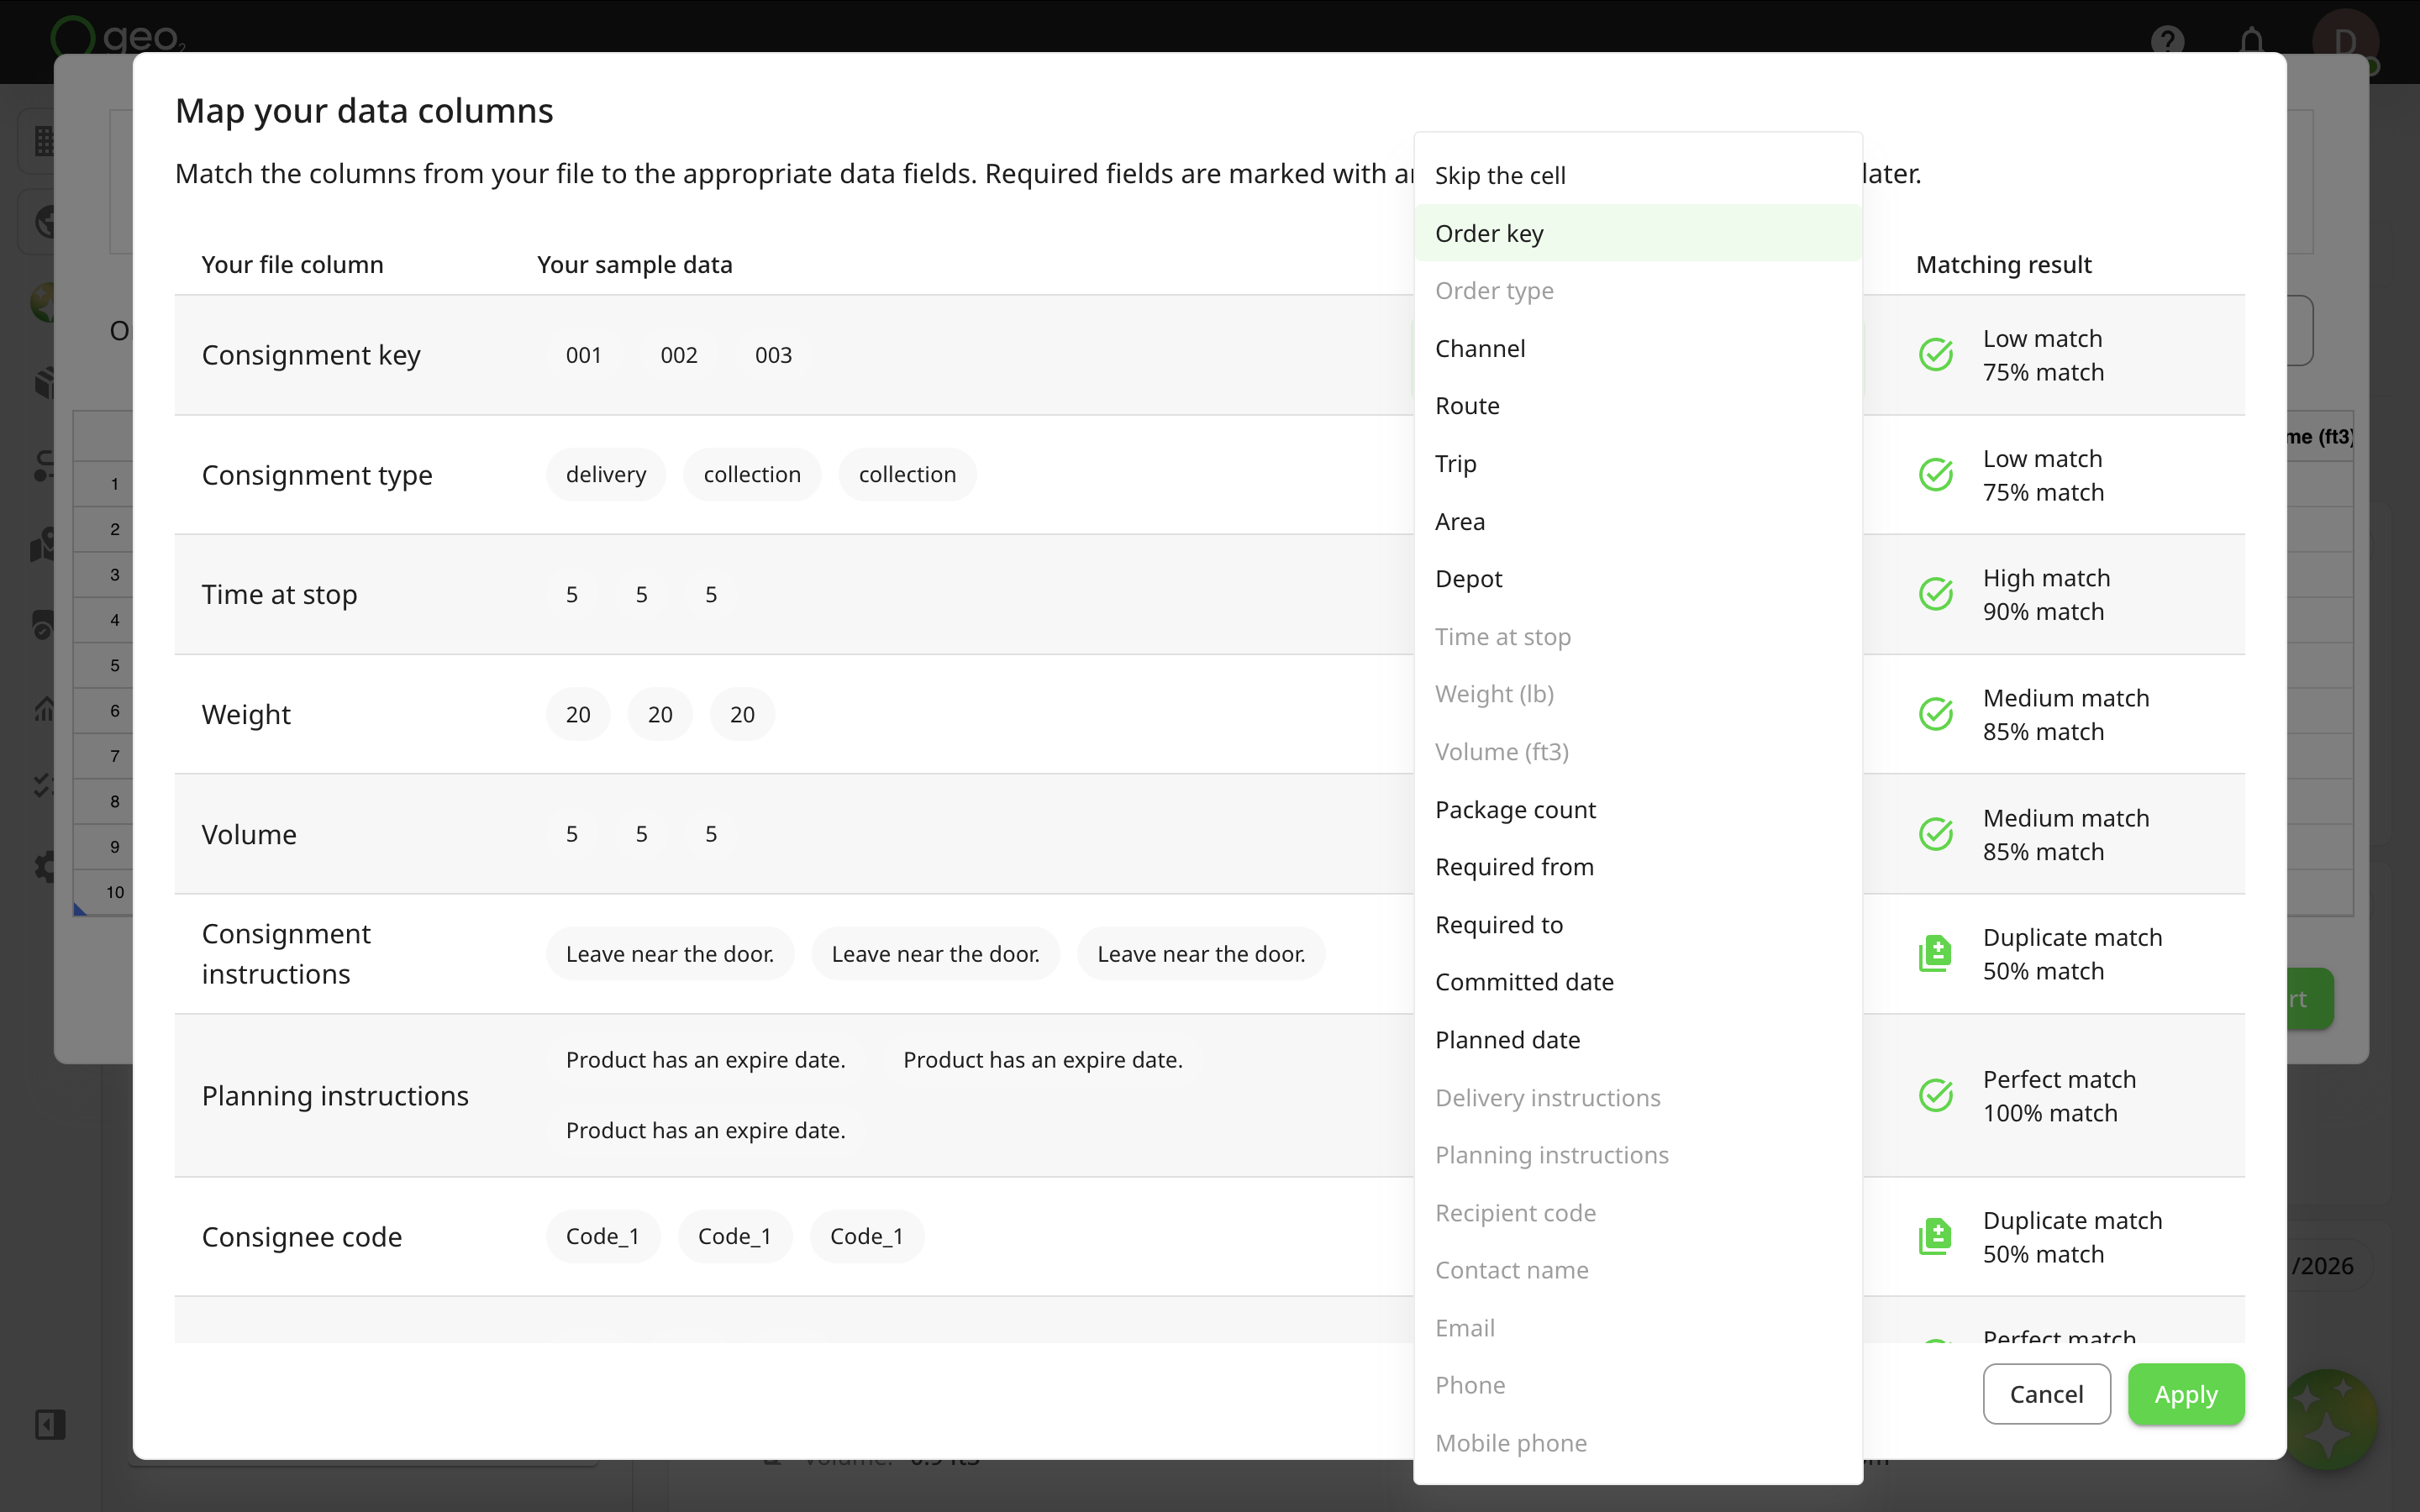
Tooltips are available to help clarify each data point.
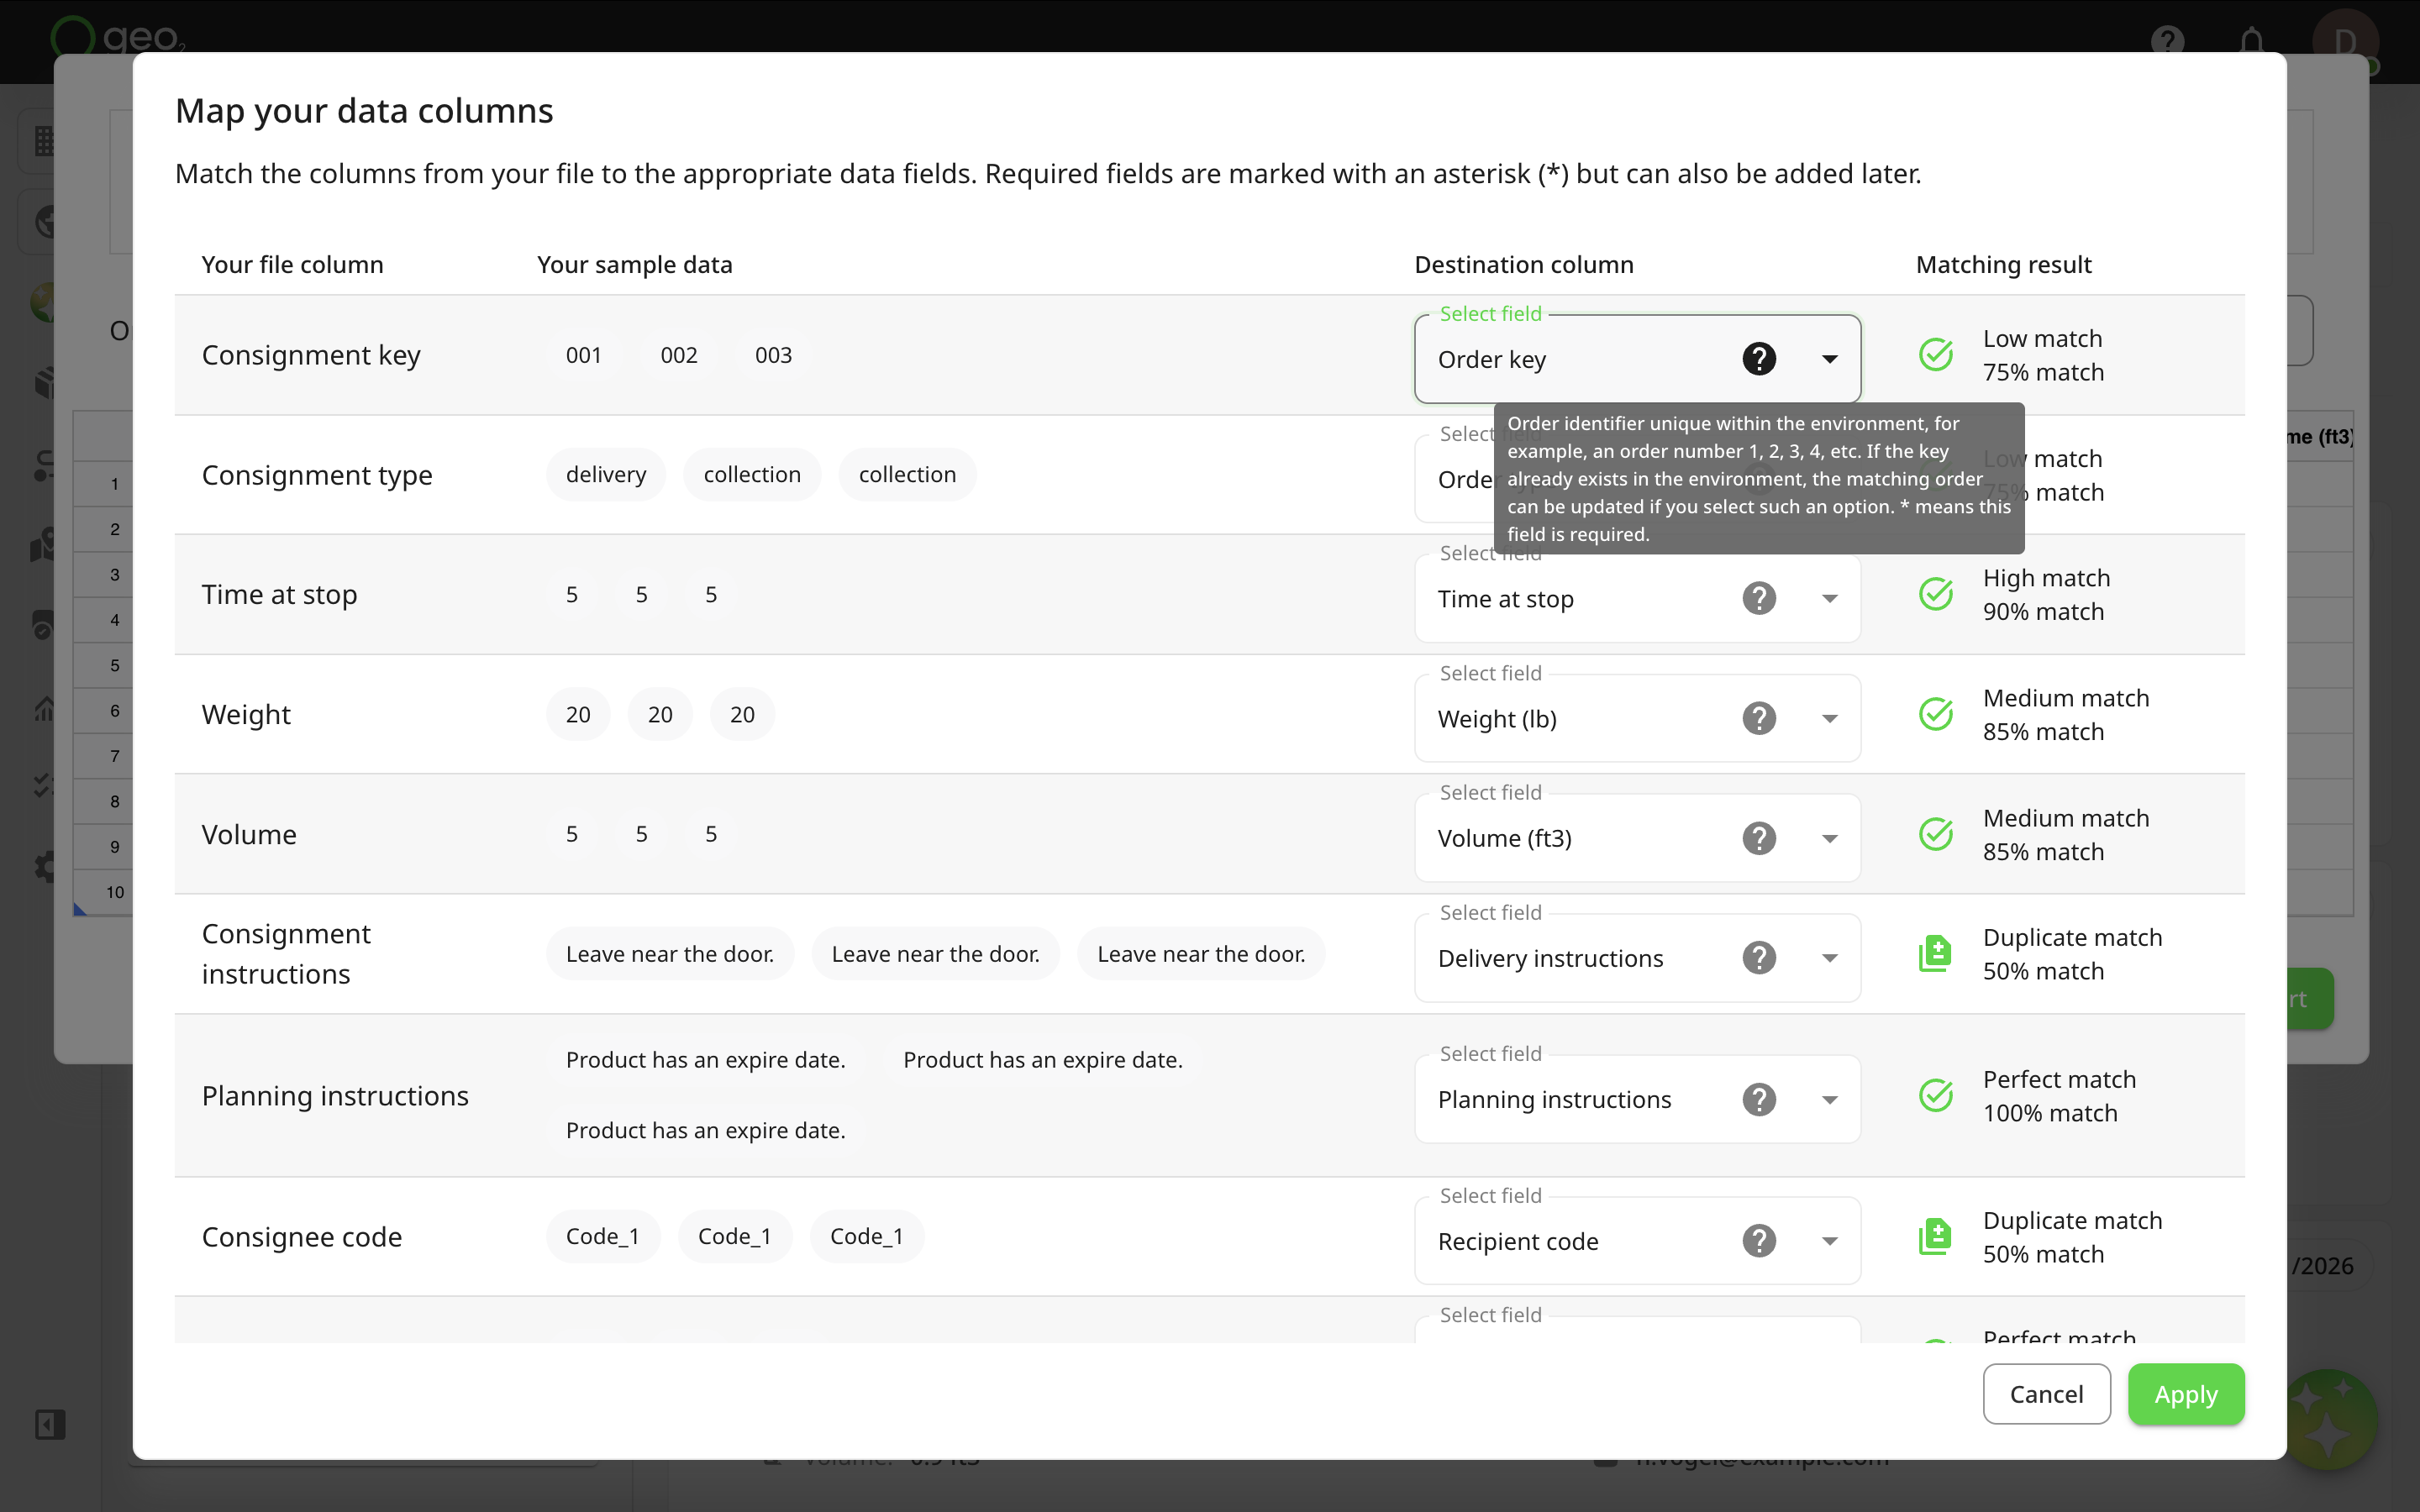
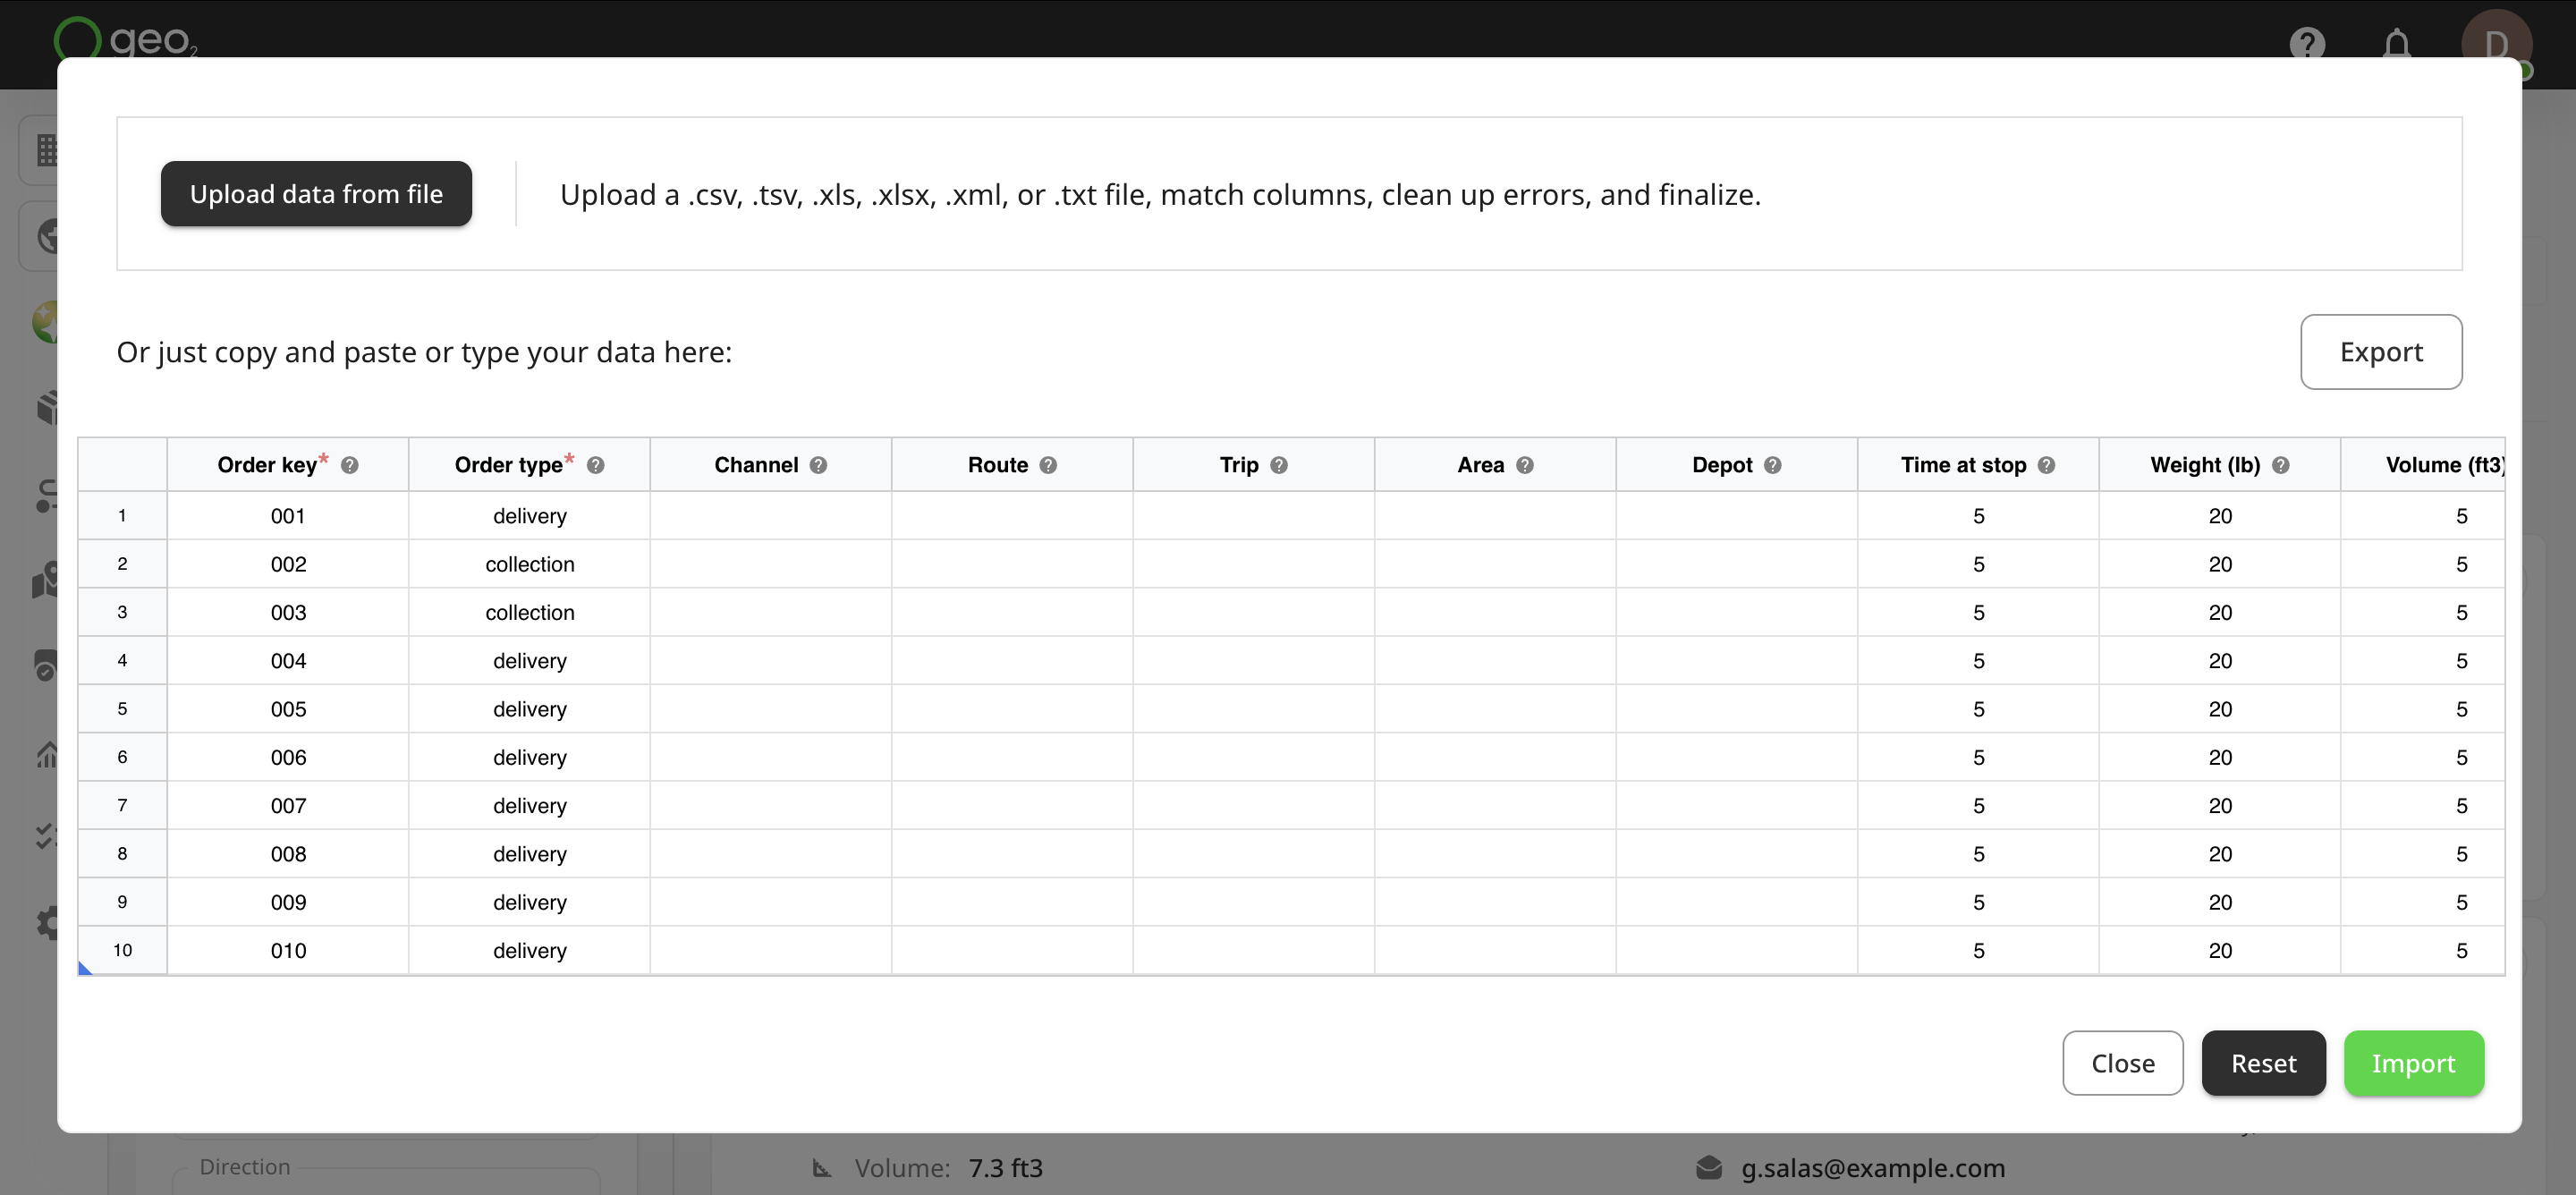
Once everything is mapped correctly, click Apply. Your data will appear in the table, where you can review, edit, or fix any errors before finalizing.
Manually Type or Paste Data
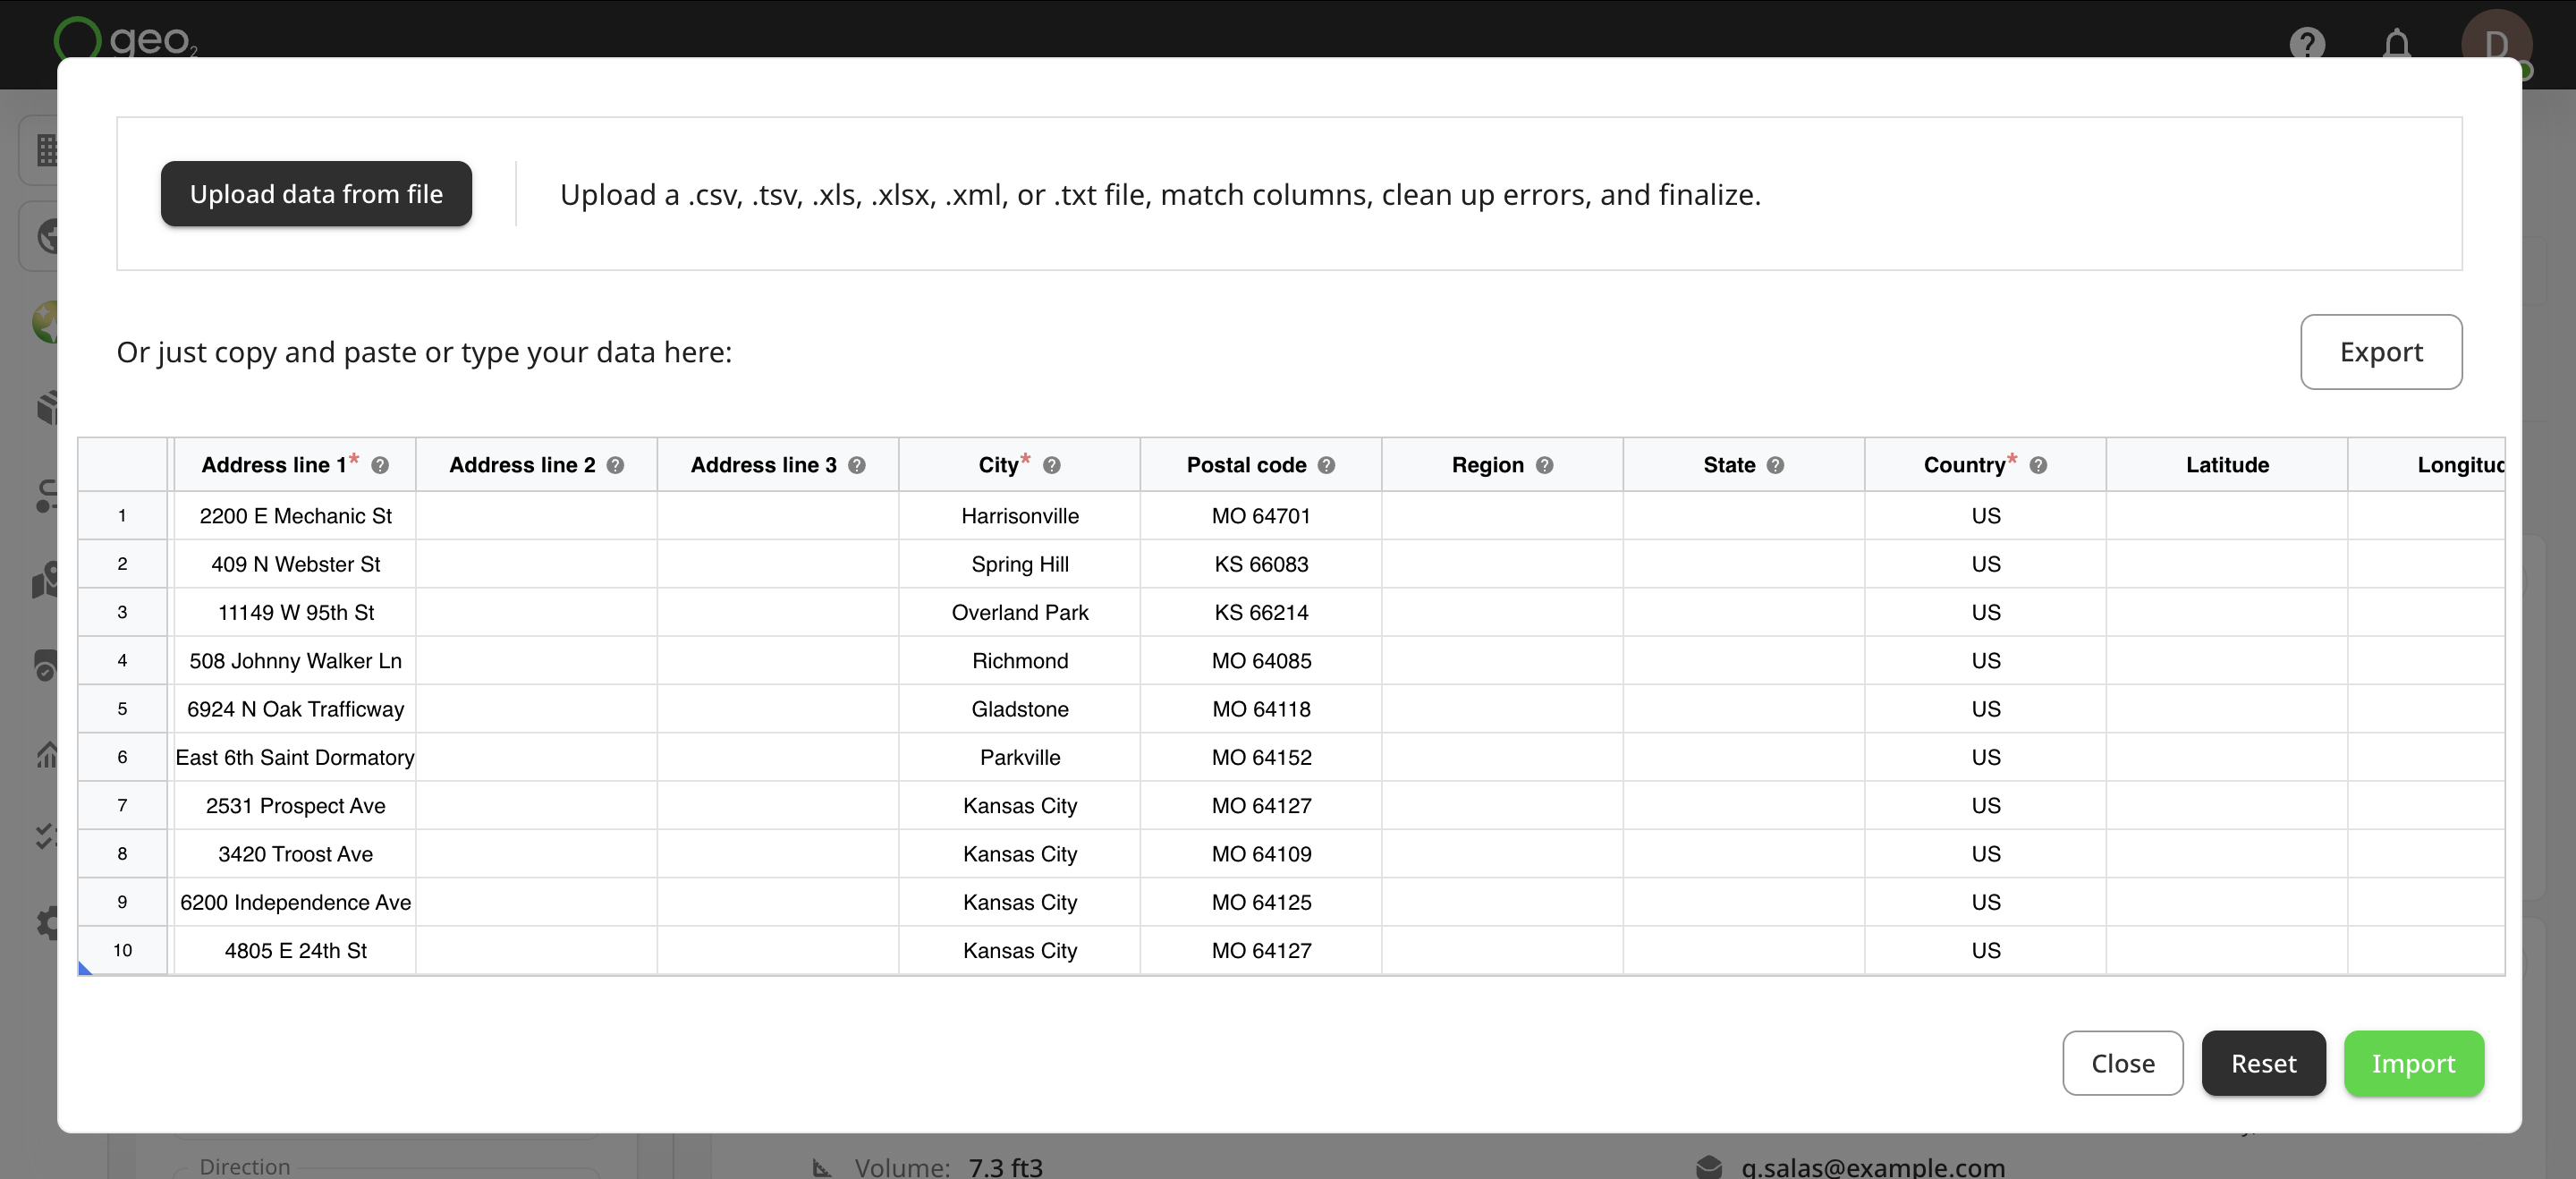
The spreadsheet interface column headings guide you on the type of data expected in each column. Hover over a column title to see a tooltip with additional details and explanations. If you have prepared the data in another spreadsheet, you can copy and paste them in.
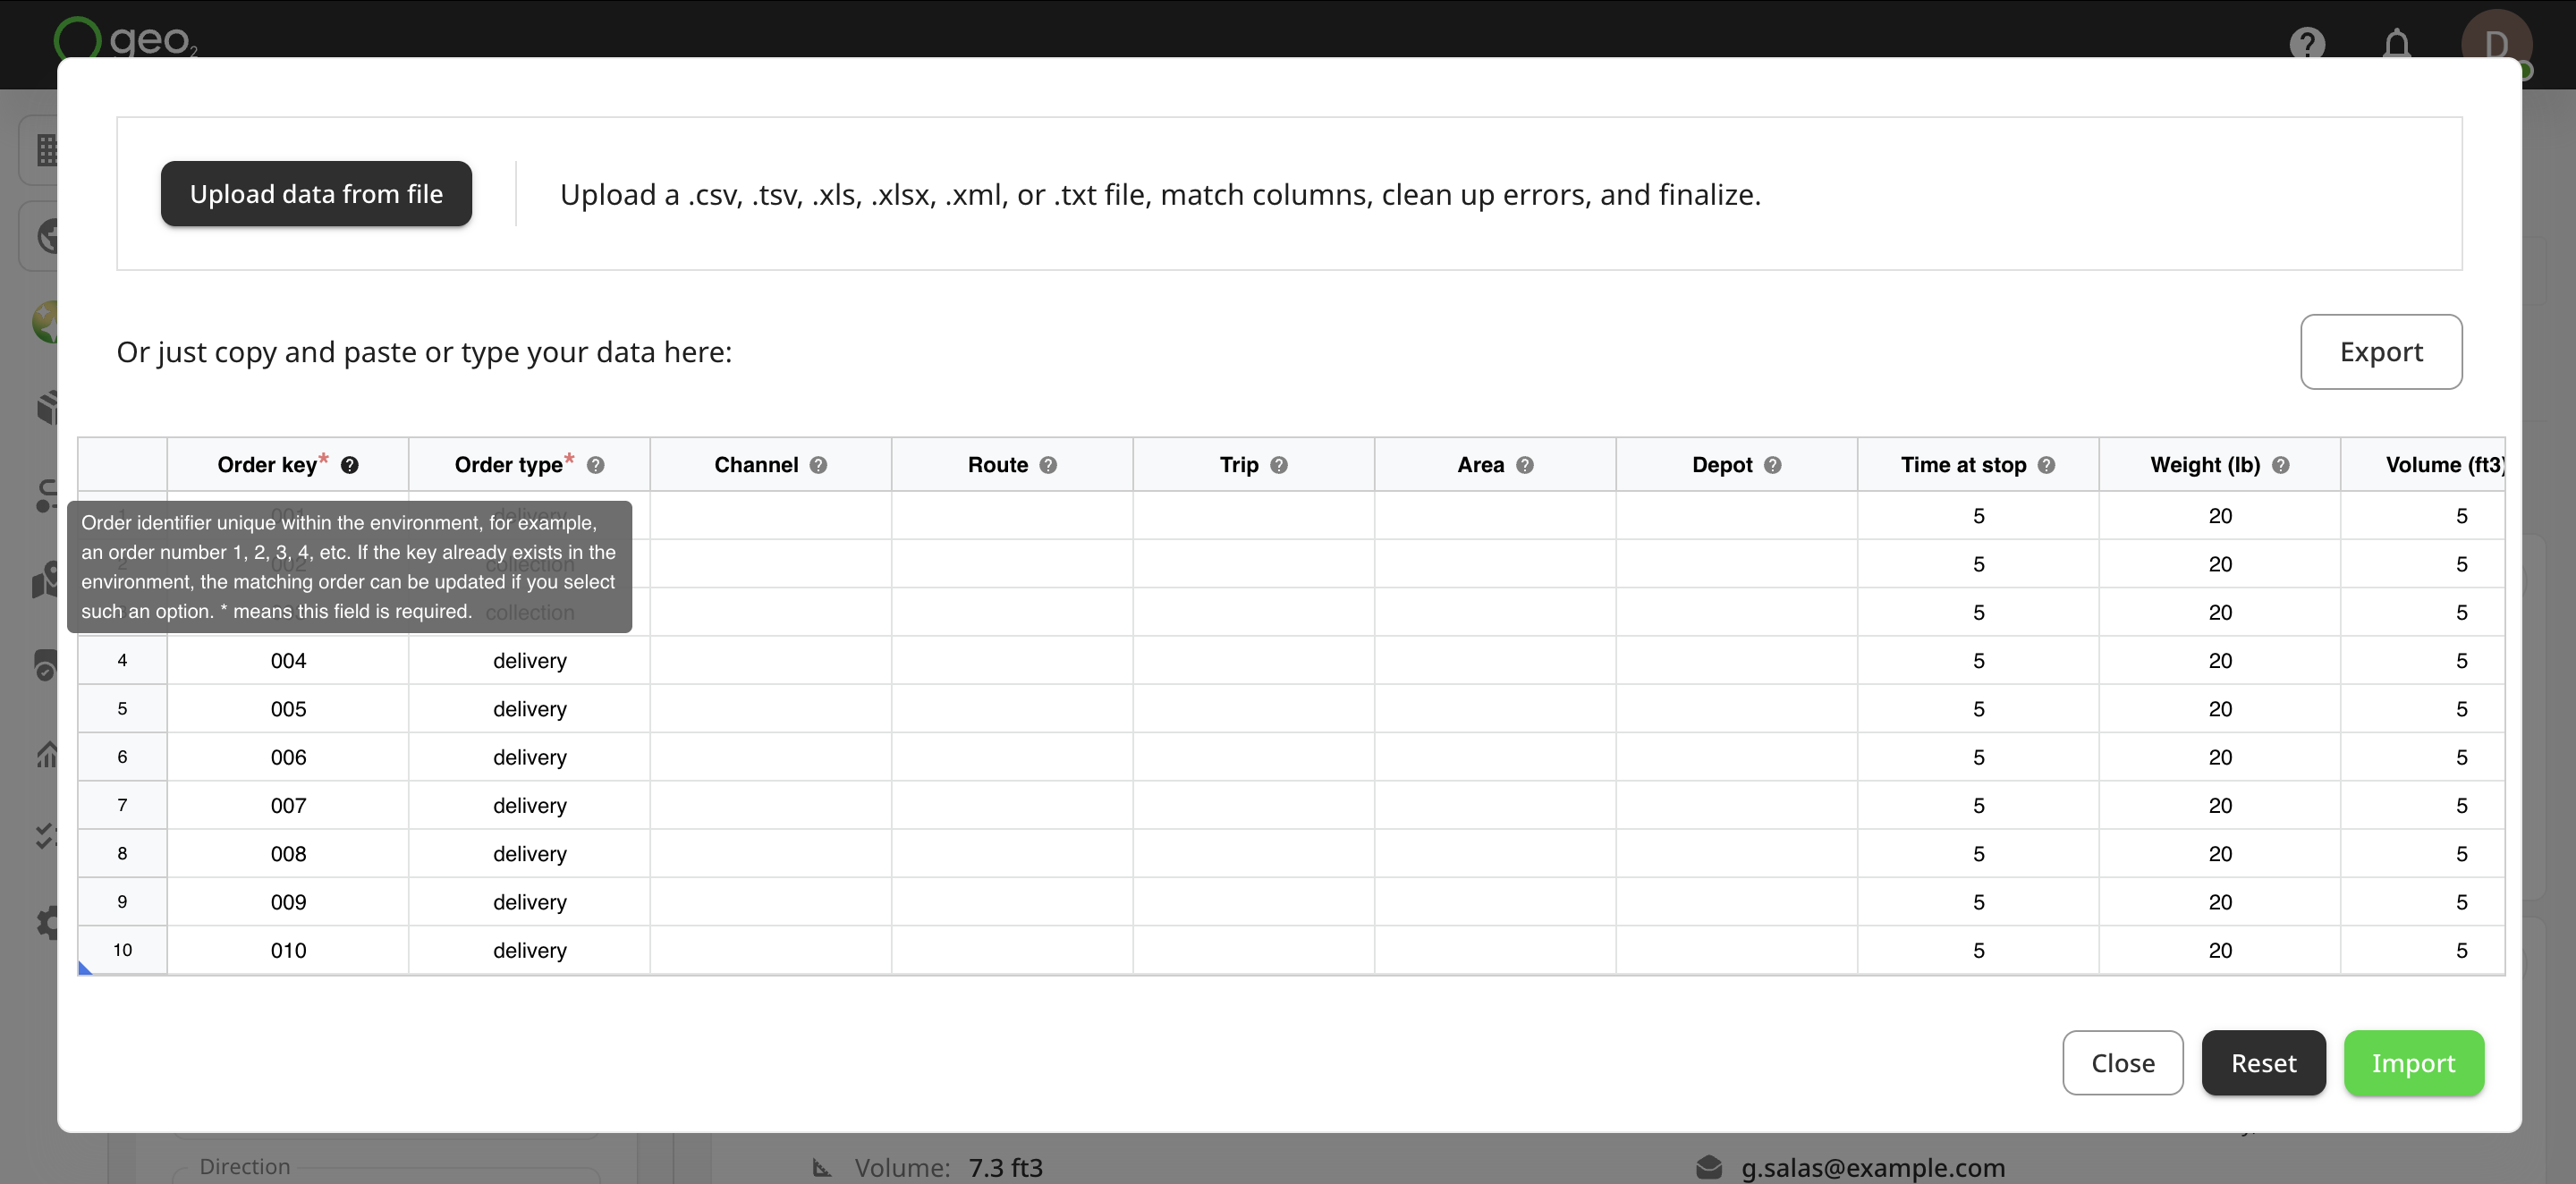
The limit for the import of orders is 500. You cannot paste more into the spreadsheet. The last eight columns for the recipient address are important for successful geo-coding. Required fields are highlighted with an asterisk ( * ) near their names.
| Column Heading | Data Type | Details | Mandatory |
|---|---|---|---|
| Order key | String | Order identifier unique within the environment, for example, an order number like 1, 2, 3, 4 or a combination of date and number like like 202506111. If the key already exists in the environment, the matching order can optionally be updated. | Y |
| Order type | Pre-defined string option | Type of order - delivery or collection. | Y |
| Channel | String unique identifier | Tag that lets you classify delivery methods. Provide a channel key from the options defined in Settings → Environment → Hub: Channels Settings. You can create channels such as “Own fleet”, “Courier DHL”, etc. | N |
| Route | String unique identifier | Route identifier unique within the environment. It can be today's date and number like 202506111 or a route number like 1, 2, 3, 4, etc. It must exist in the environment if you do not choose the route generation option. Learn more about Hub: Order Import. | N |
| Trip | Numerical | Route property which you can use to indicate, for example, the order of routes for the same vehicle on the day, with the first route of the day being 1, a subsequent one being 2, etc. | N |
| Area | String unique identifier | Tag that lets you identify depots, orders and routes by user-defined geographical regions. Provide an area key from the options defined in Settings → Environment → Hub: Areas Settings. You can create areas such as “Greater LA”, “NYC – Manhattan”, “Rural Iowa”, “Florida Coastal”, etc. | N |
| Depot | String unique identifier | Optional start and end points for routes. Provide a depot key from options defined in Settings → Environment → Hub: Depots Settings. If you have not provided depot information, the default depot will be used for order creation. | N |
| Time at stop | String | Amount of time in minutes a driver will spend at a stop. For example, 10. If nothing has been specified, the default time at stop value will be taken from Settings → Environment → Hub: Routes Settings. | N |
| Weight | Numerical | Number to specify the total order weight in the weight units specified in Settings → Environment → Hub: Display Preferences Settings. For example, 50. | N |
| Volume | Numerical | Number to specify the total order volume in the volume units specified in Settings → Environment → Hub: Display Preferences Settings. For example, 2. | N |
| Planned packages | Numerical | Number of expected packages as part of an order. For example, 2. | N |
| Required from date | Date/time - format yyyy-MM-dd HH:mm, the 24-hour time portion HH:mm is optional | Date/time to indicate from when an order is required to be delivered/collected. You will see highlighted required from/to time with red and orange colours on stop cards on Route plan and Map view pages if the required time doesn't match the planned time. Red colour - if the difference between required and planned time is more than Hub: Routes Settings. Orange - if the difference between required and planned time is within delivery ETA tolerance. We do not highlight the required time if it's the same as the planned time. | N |
| Required to date | Date/time - format yyyy-MM-dd HH:mm, the 24-hour time portion HH:mm is optional | Date/time to indicate till when an order is required to be delivered/collected. | N |
| Committed date | Date/time - format yyyy-MM-dd HH:mm, the 24-hour time portion HH:mm is optional | Date/time to indicate a delivery/collection deadline that has been agreed with the recipient. You will see highlighted committed time with red and orange colours on stop cards on Route plan and Map view pages if the committed time doesn't match the planned time. Red colour - if the difference between committed and planned time is more than Hub: Routes Settings. Orange - if the difference between committed and planned time is within delivery ETA tolerance. We do not highlight the committed time if it's the same as the planned time. | N |
| Planned date | Date/time - format yyyy-MM-dd HH:mm, the 24-hour time portion HH:mm is optional | Date/time to indicate when the order is planned for inclusion in a route. It is affected by route optimization and calibration once an order is assigned to a route. Learn more about Hub: Routes. | N |
| Delivery instructions | String | Optional notes for drivers that are shown in the mobile app. For example, "leave with reception". | N |
| Planning instructions | String | Optional notes for transport planners that are shown on the stop card on Route plan and Map view pages and not shown in the mobile app. For example, "must be delivered by 11:00". | N |
| Recipient code | String | Recipient identifier such as customer code. If you deliver to the same recipient repeatedly, you can assign them a code and filter orders by code, for checking statistics, etc. It will also be displayed in the mobile app for drivers. | N |
| Contact name | String | Recipient contact name. For example, Jane Doe. | N |
| String | Recipient email address. It must be in a valid email format, for example, jane.doe@gmail.com. This email can be used for sending Hub: Public Tracking Settings and Hub: Proof of Delivery Settings. | N | |
| Phone | String | Recipient phone number. It must start with "+" and have from 5 to 16 digits. No spaces, brackets, or other special symbols. For example, +123456789. | N |
| Mobile phone | String | Recipient mobile phone number. Must start with "+" and have from 5 to 16 digits. No spaces, brackets, or other special symbols. For example, +123456789. This number can be used for sending SMS notifications with a public link to track an order. Learn more about Hub: Public Tracking Settings. | N |
| Company name | String | Recipient address - company name. For example, Balloon One. | N |
| Address line 1 | String | Recipient address - address line 1. For example, 1210 Grand Blvd. | Y |
| Address line 2 | String | Recipient address - address line 2. | N |
| Address line 3 | String | Recipient address - address line 3. | N |
| City | String | Recipient address - city. For example, Kansas City. | Y |
| Postal code | String | Recipient address - postal code. For example, MO 64106. | N |
| Region | String | Recipient address - region | N |
| State | String | Recipient address - state | N |
| Country | String | Recipient address - country. It must be provided as the two-letter ISO country code, for example, US for the United States. | Y |
| Latitude | Numerical | Geographic coordinate used for geocoding a recipient’s address. If coordinates are not provided fully or partially, a recipient’s address will be used instead for geocoding. | N |
| Longitude | Numerical | Geographic coordinate used for geocoding a recipient’s address. | N |
Once information is provided, press:
Closeto exit the spreadsheet interface with no actionResetto clear the spreadsheetImportto start the data import
Import Options
The import options are:
| Option | Functionality |
|---|---|
| Generate routes based on data of each order | If selected and a route key is not provided, it will be constructed from Trip, Area, Depot and Planned date. For example, for the planned date of 1st August 2022, depot 01, area NW and trip 1, the route name would be 20220801_01_NW_1. The following defaults will be applied to any unspecified values: Planned date - current date, Depot - default depot if it exists in Environment settings, Area - empty string, Trip - 1. So, if only depot 01 is set and today's date is 1st August 2022, the route key would be generated as 20220801_01_1 (area left out). The route will be created first. The order will then be assigned to the route. If a depot key is provided for orders, they are grouped by Planned date and Depot for creating a route. An order depot is populated to a route start and end points. If a depot key is not provided for orders, the default depot from Environment settings is used instead. If there is no default depot, orders are grouped only by Planned date, and for a newly created routes, “First stop location” is selected as a route start and “Last stop location” as a route end. If selected and route key (not yet existing) is provided, it will be used for newly created routes. The route will be created first. The order will then be assigned to the route. If a depot key is provided for orders, they are grouped by Planned date and Depot for creating a route. The first order depot in the list is populated to a route start and end points. Once a route is created, we check if the next order depot matches the route depot. If not, a separate route for this order is created using the same provided route key and different trip numbers. If a depot key is not provided for orders, the default depot from Environment settings is used instead. If there is no default depot, orders are grouped only by Planned date, and for a newly created routes, “First stop location” is selected as a route start and “Last stop location” as a route end. **If not selected: ** If a valid route key is specified against an order in the Route column, the order will be assigned to the route. If a route starts or ends at a depot, orders with depots must match: the delivery depot must align with the start, and the collection depot with the end. If the route depot is different to the order depot, the order is still created/updated, but there will be a warning that the order could not be assigned to the route due to a depot mismatch. Orders without assigned depots can be added to any route, and if a route does not use a depot as its start or end point, any order, with or without a depot, can be added. If the route key is not valid, the import of that order will error. |
| Existing orders will be updated (if any) | If an order with the same key already exists, update its data with those in the spreadsheet. If not selected, attempting to import an order with an existing key will fail. |
| Empty fields will clear existing order property values | If updating an order and a field value in the spreadsheet is empty, blank the existing order property even though it has some data in it. If not selected, an empty field value will not overwrite an existing order value. |
| Save these options as default | Remember this configuration of options for subsequent imports |
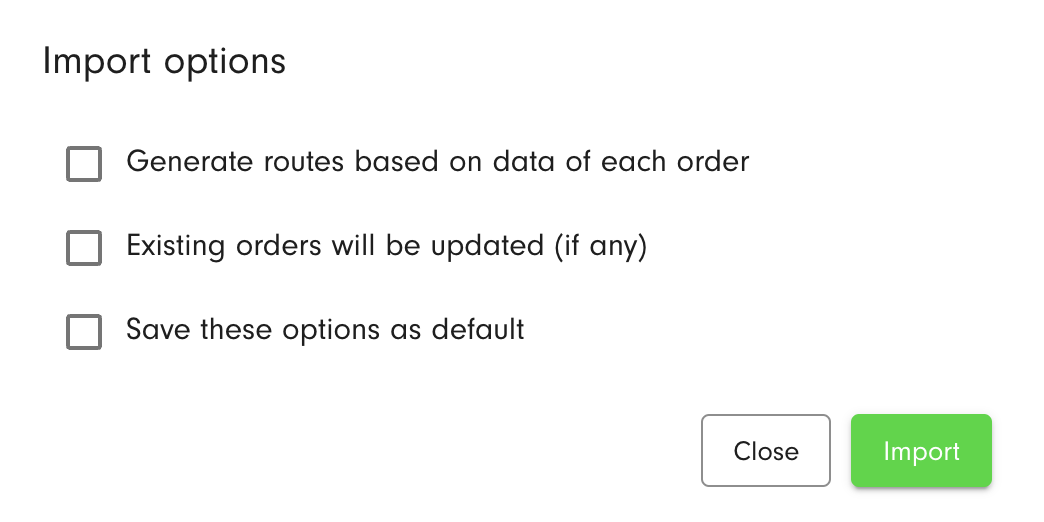
Click the Import button to import orders. The import process feeds back any errors that it encounters.
Orders will be imported and displayed in the Orders list.
Spreadsheet Example
You can also download the example of the spreadsheet with typed-in information for an order import.
Import image/PDF
You can add orders to Hub from photos, screenshots and PDF documents instead of typing them in or preparing a spreadsheet. The AI reads the files, pulls out the order details, and shows you everything it found so you can check it before anything is created.
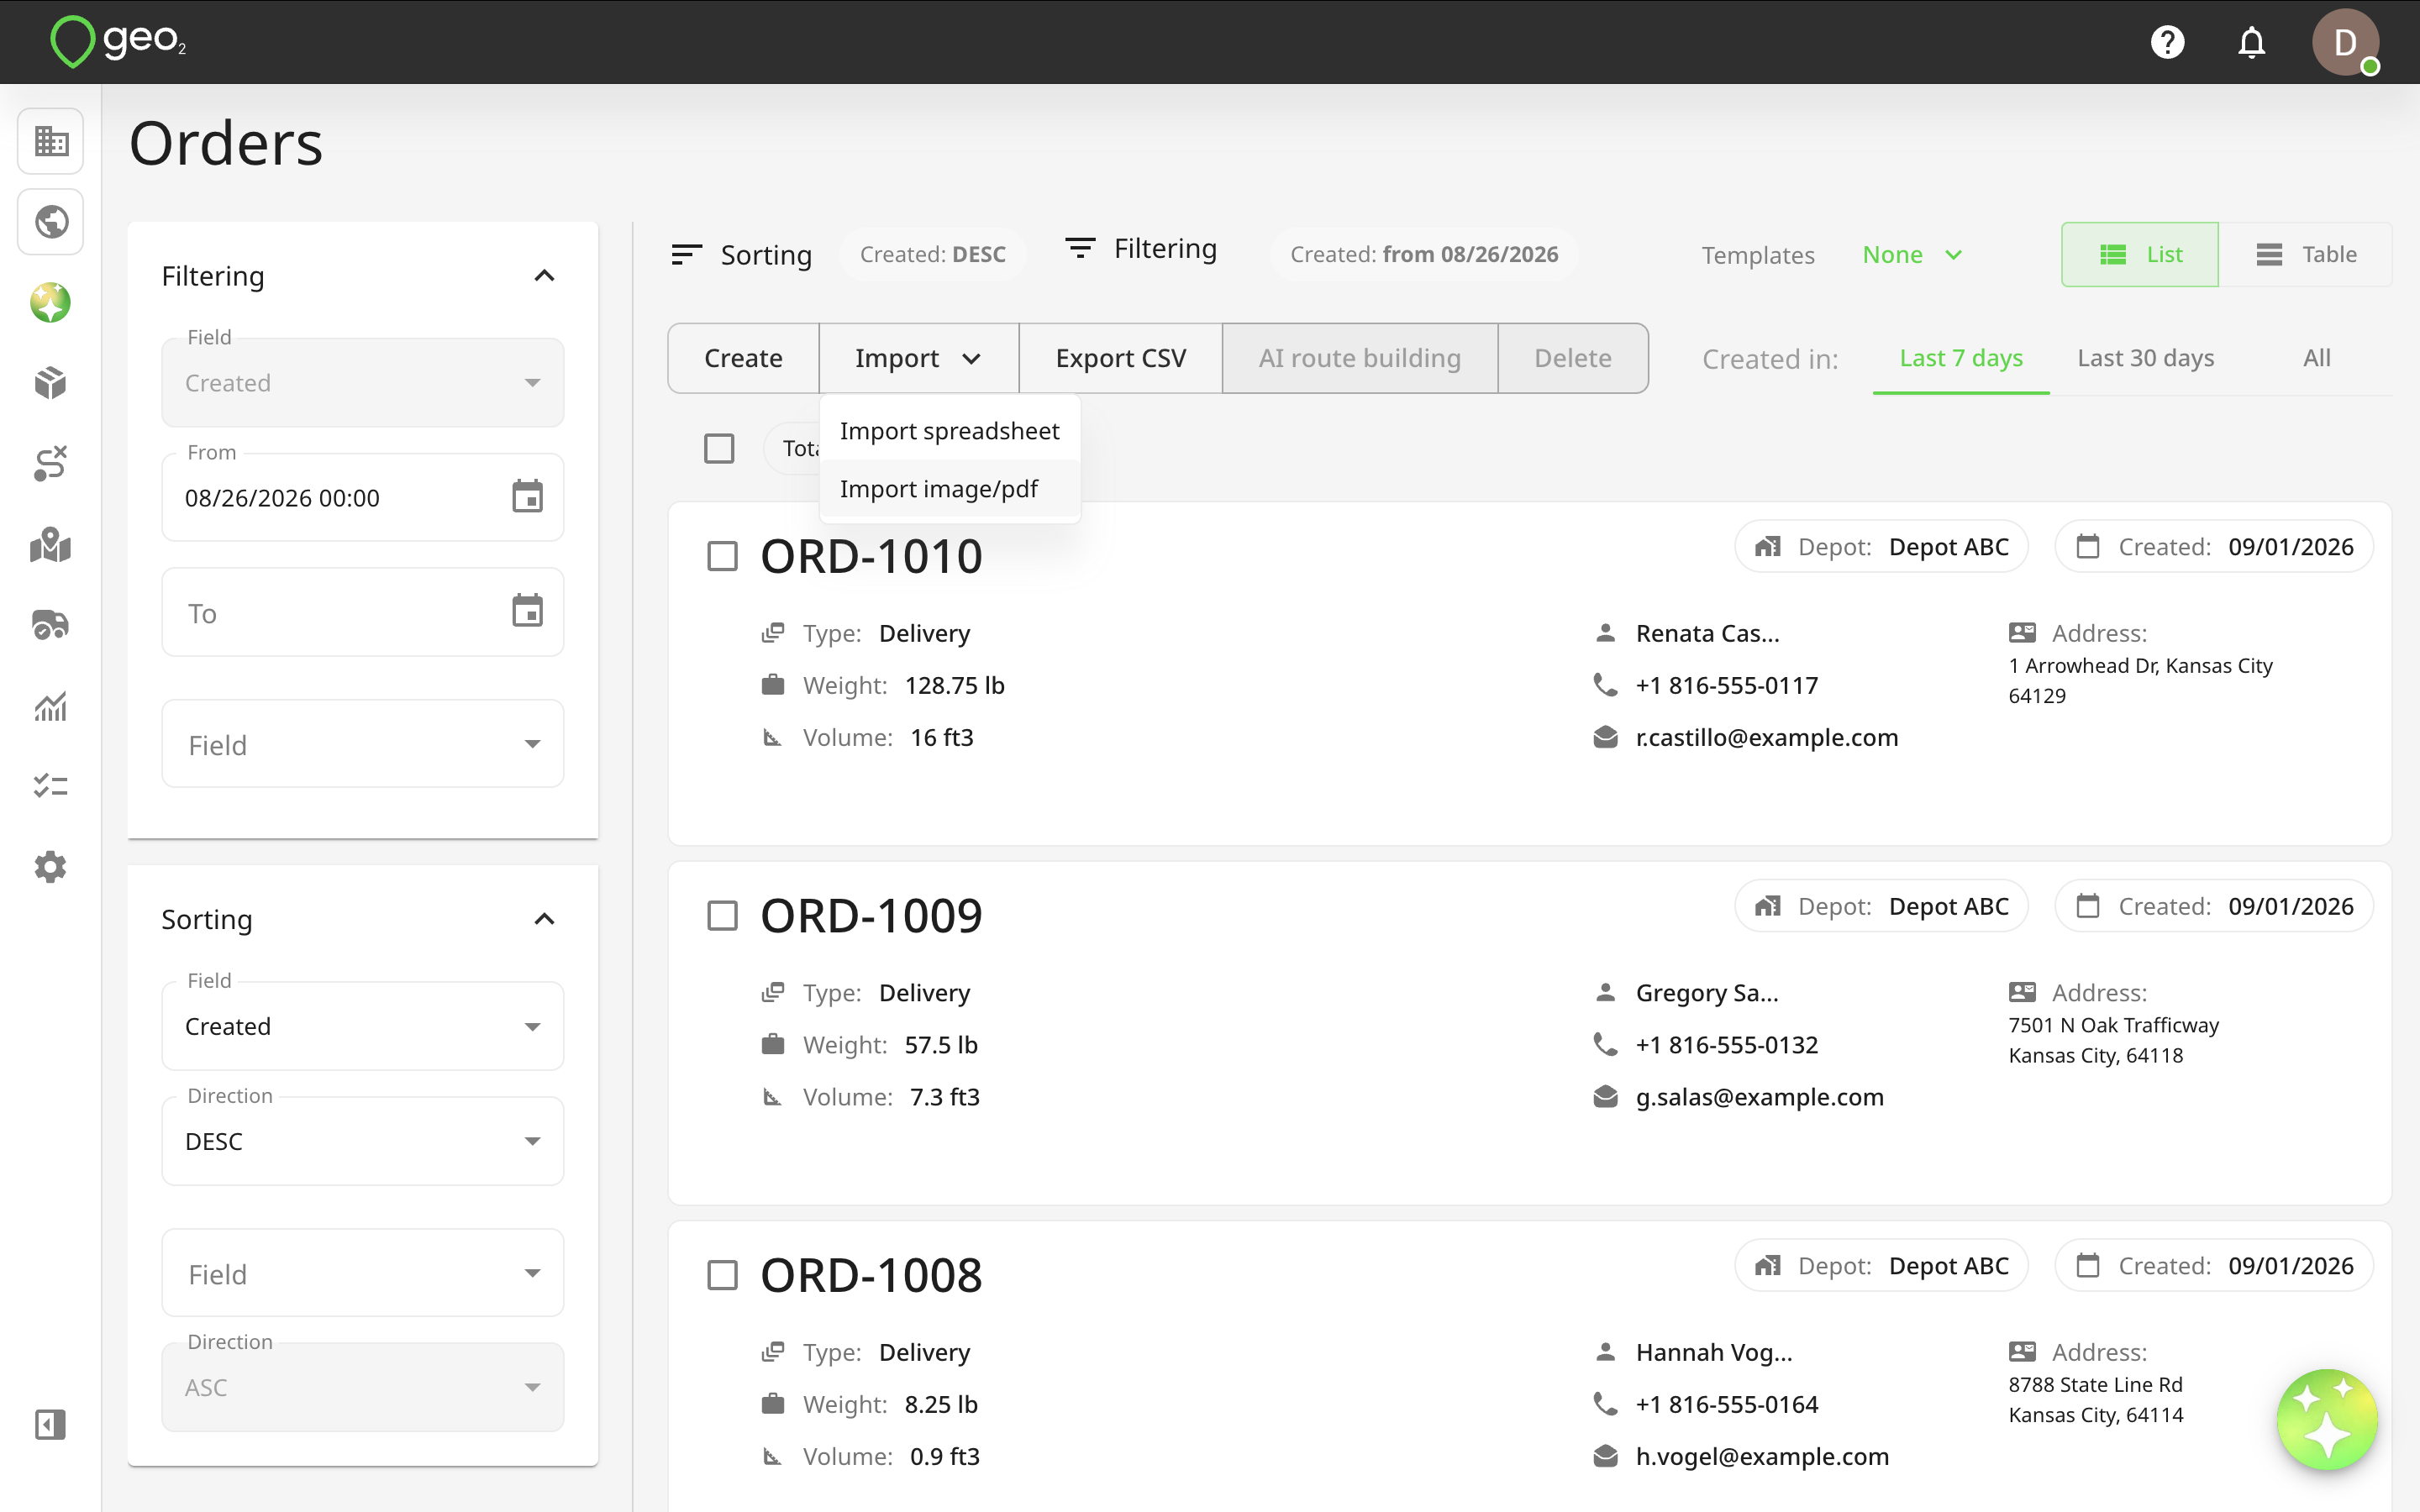
Open the Orders page and select Import. Two options appear: Import spreadsheet, which opens the usual Excel and CSV import, and Import image/PDF. Choose the second one.
The file picker accepts .png, .jpg, .jpeg and .pdf files. On the Free and Pro levels you can select one file per import; on Advanced and Enterprise you can select up to five at once.
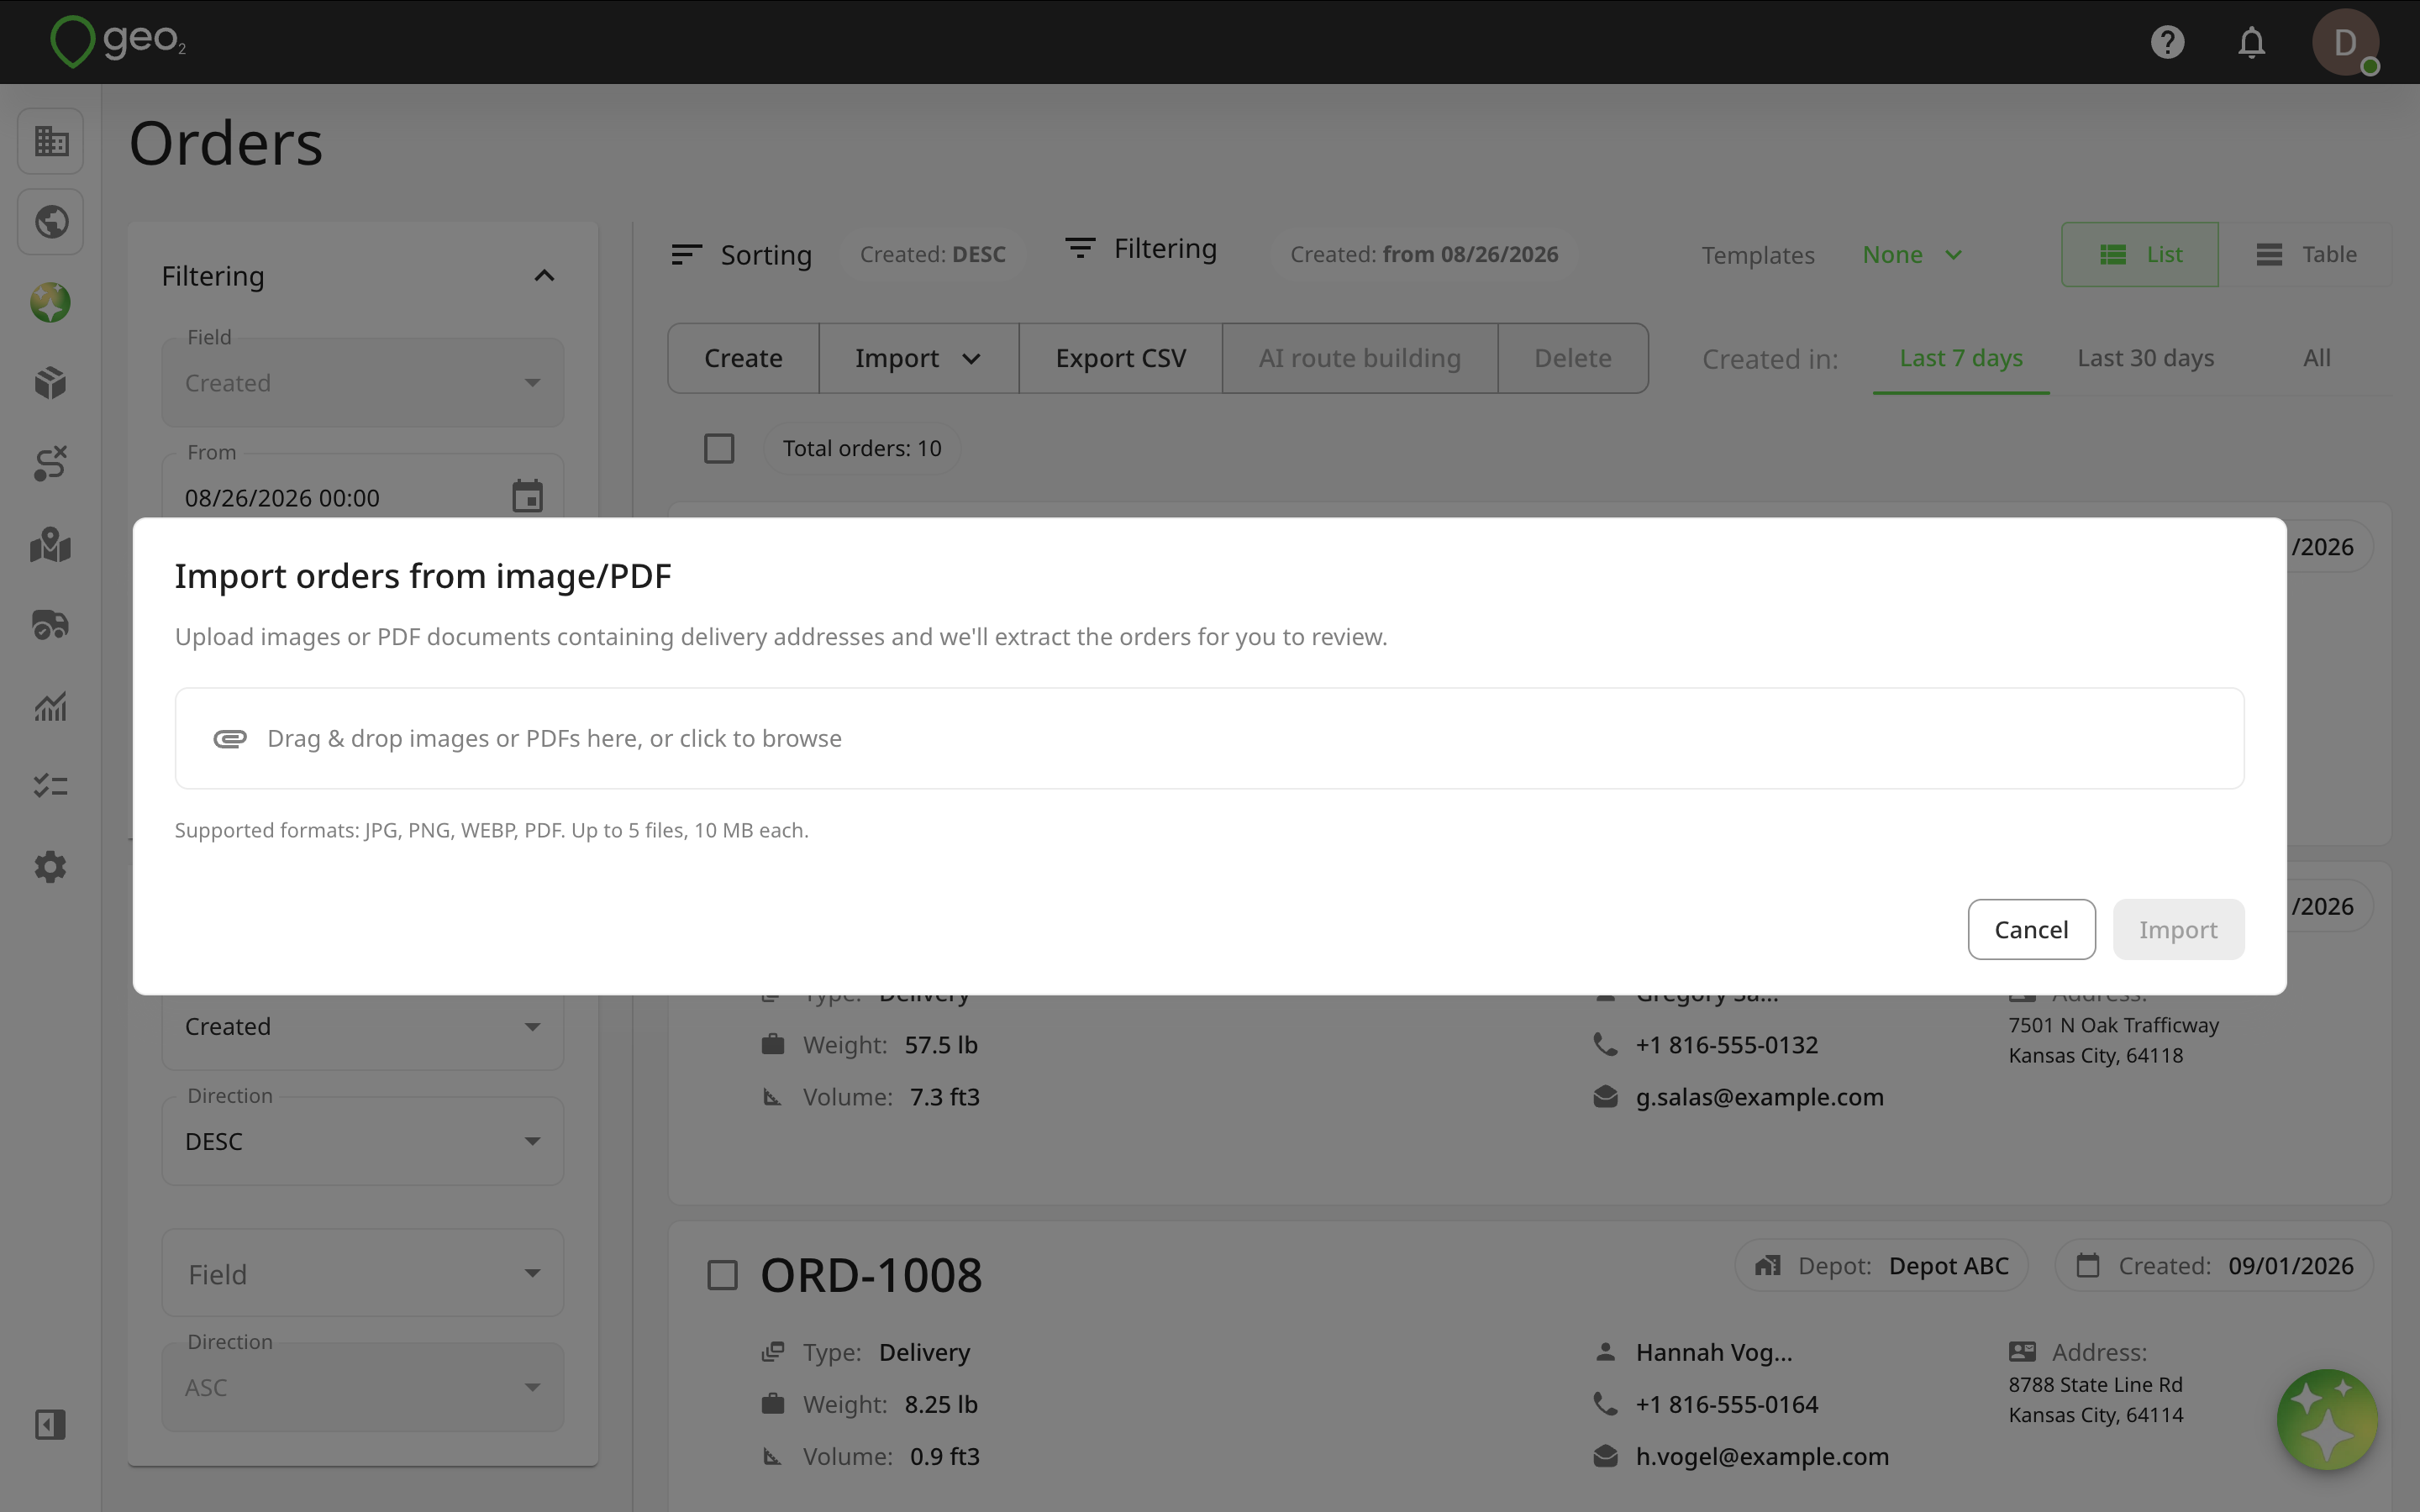
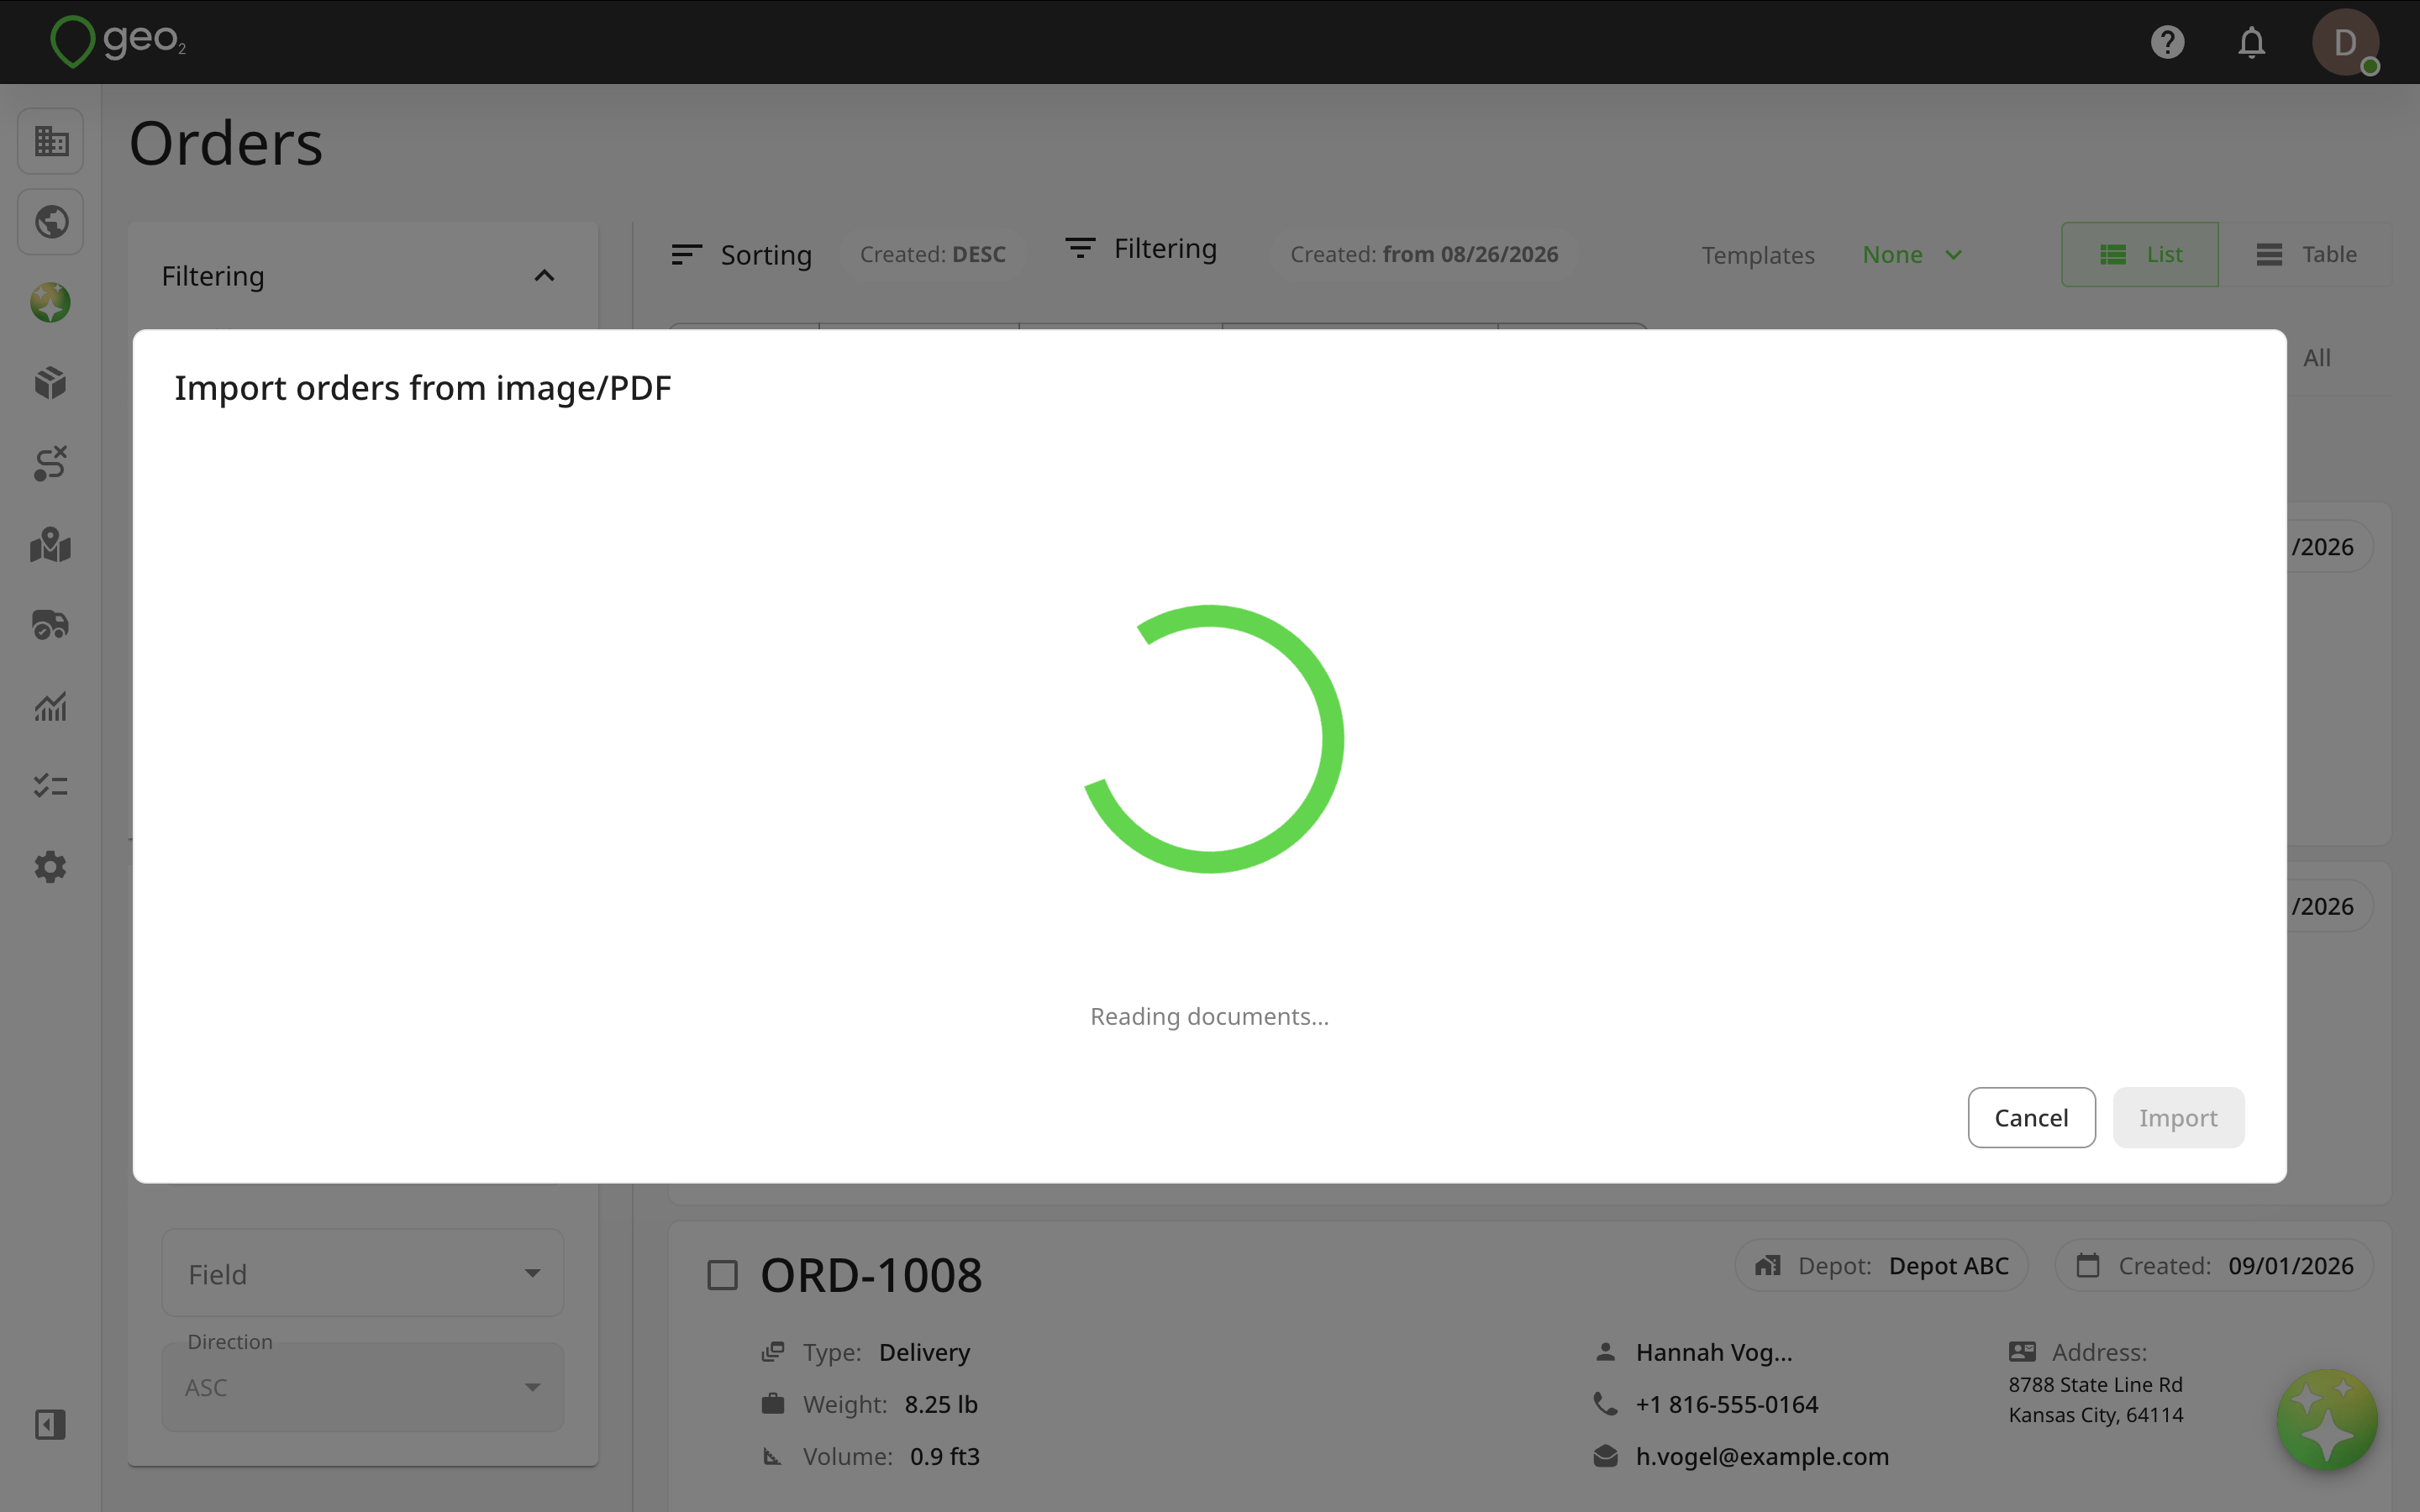
Once you have picked your files, the AI reads them. This happens in the background, with a progress indicator while it runs, and can take a moment for several files or dense documents. When it finishes you get a review screen listing everything it found. Nothing is added to Hub until you confirm.
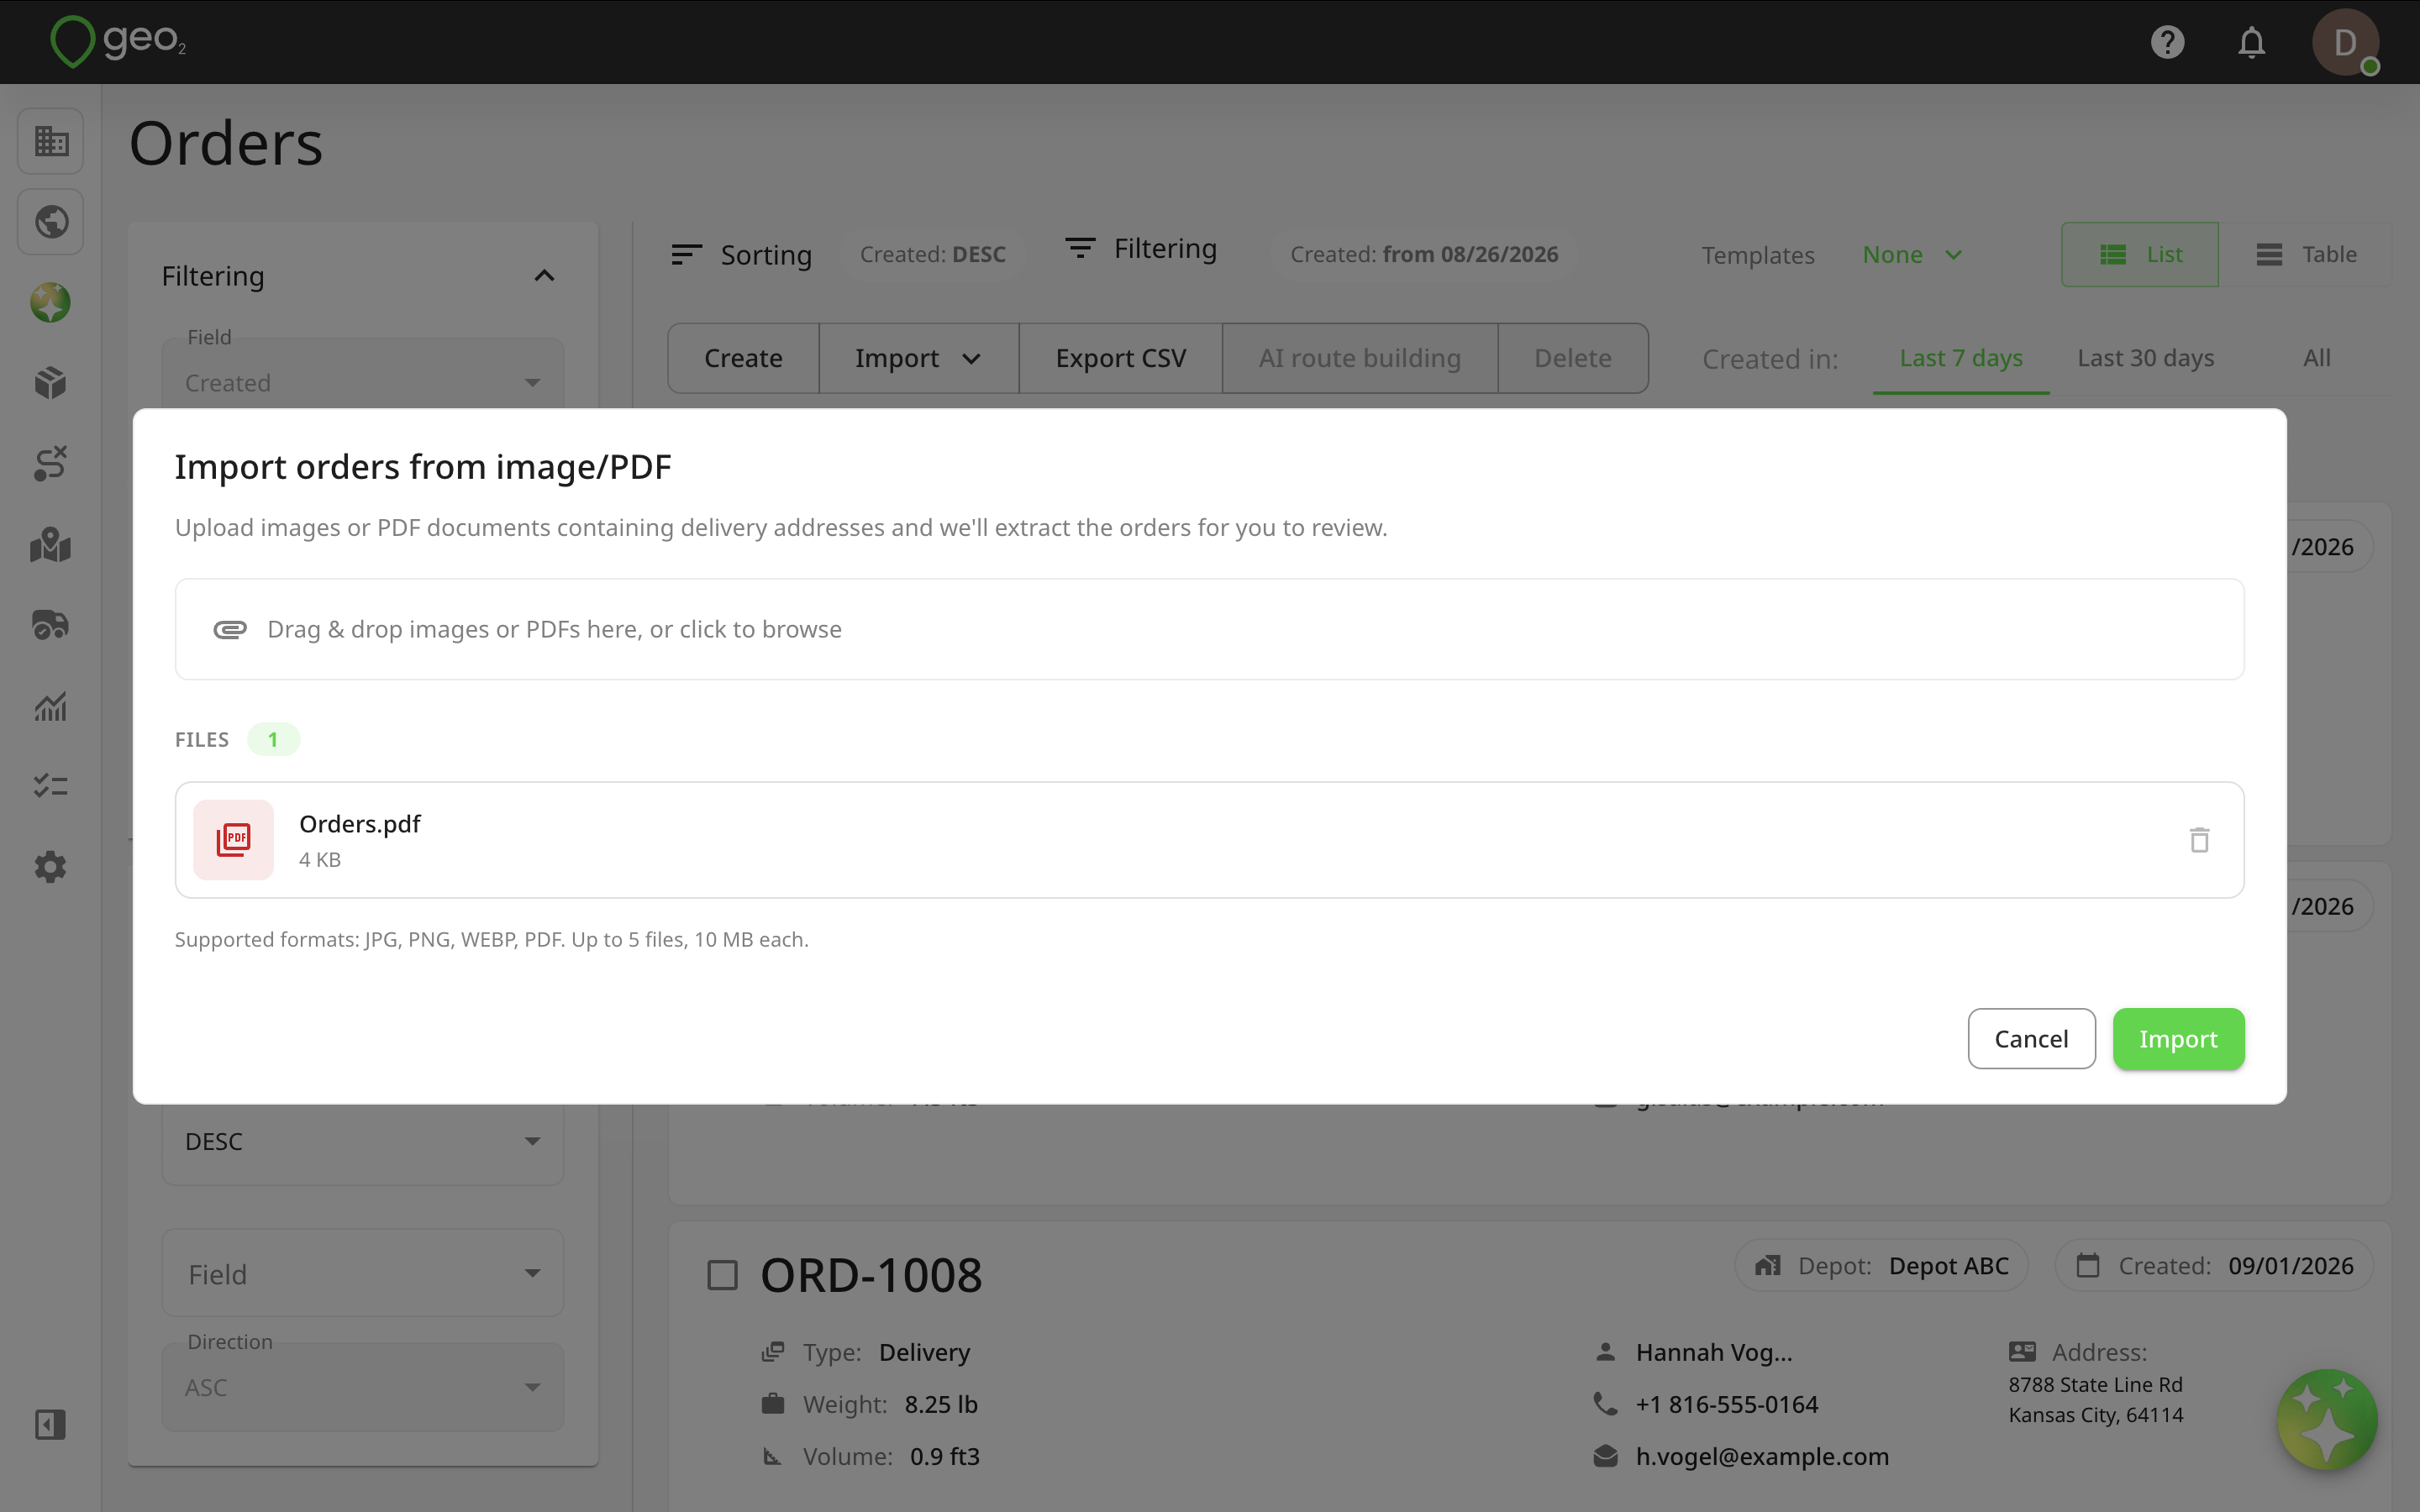
Where the information is present and legible, Geo2 detects the delivery address, the customer or company name, contact name and phone number, delivery instructions and notes, the order key or reference, the stop type (delivery or collection), any required time window, and the package count.
Files containing several orders are handled fine. Each order is separated out on its own, and the original sequence is preserved whenever it can be identified from the file — useful if your source document already lists stops in the order you intend to drive them.
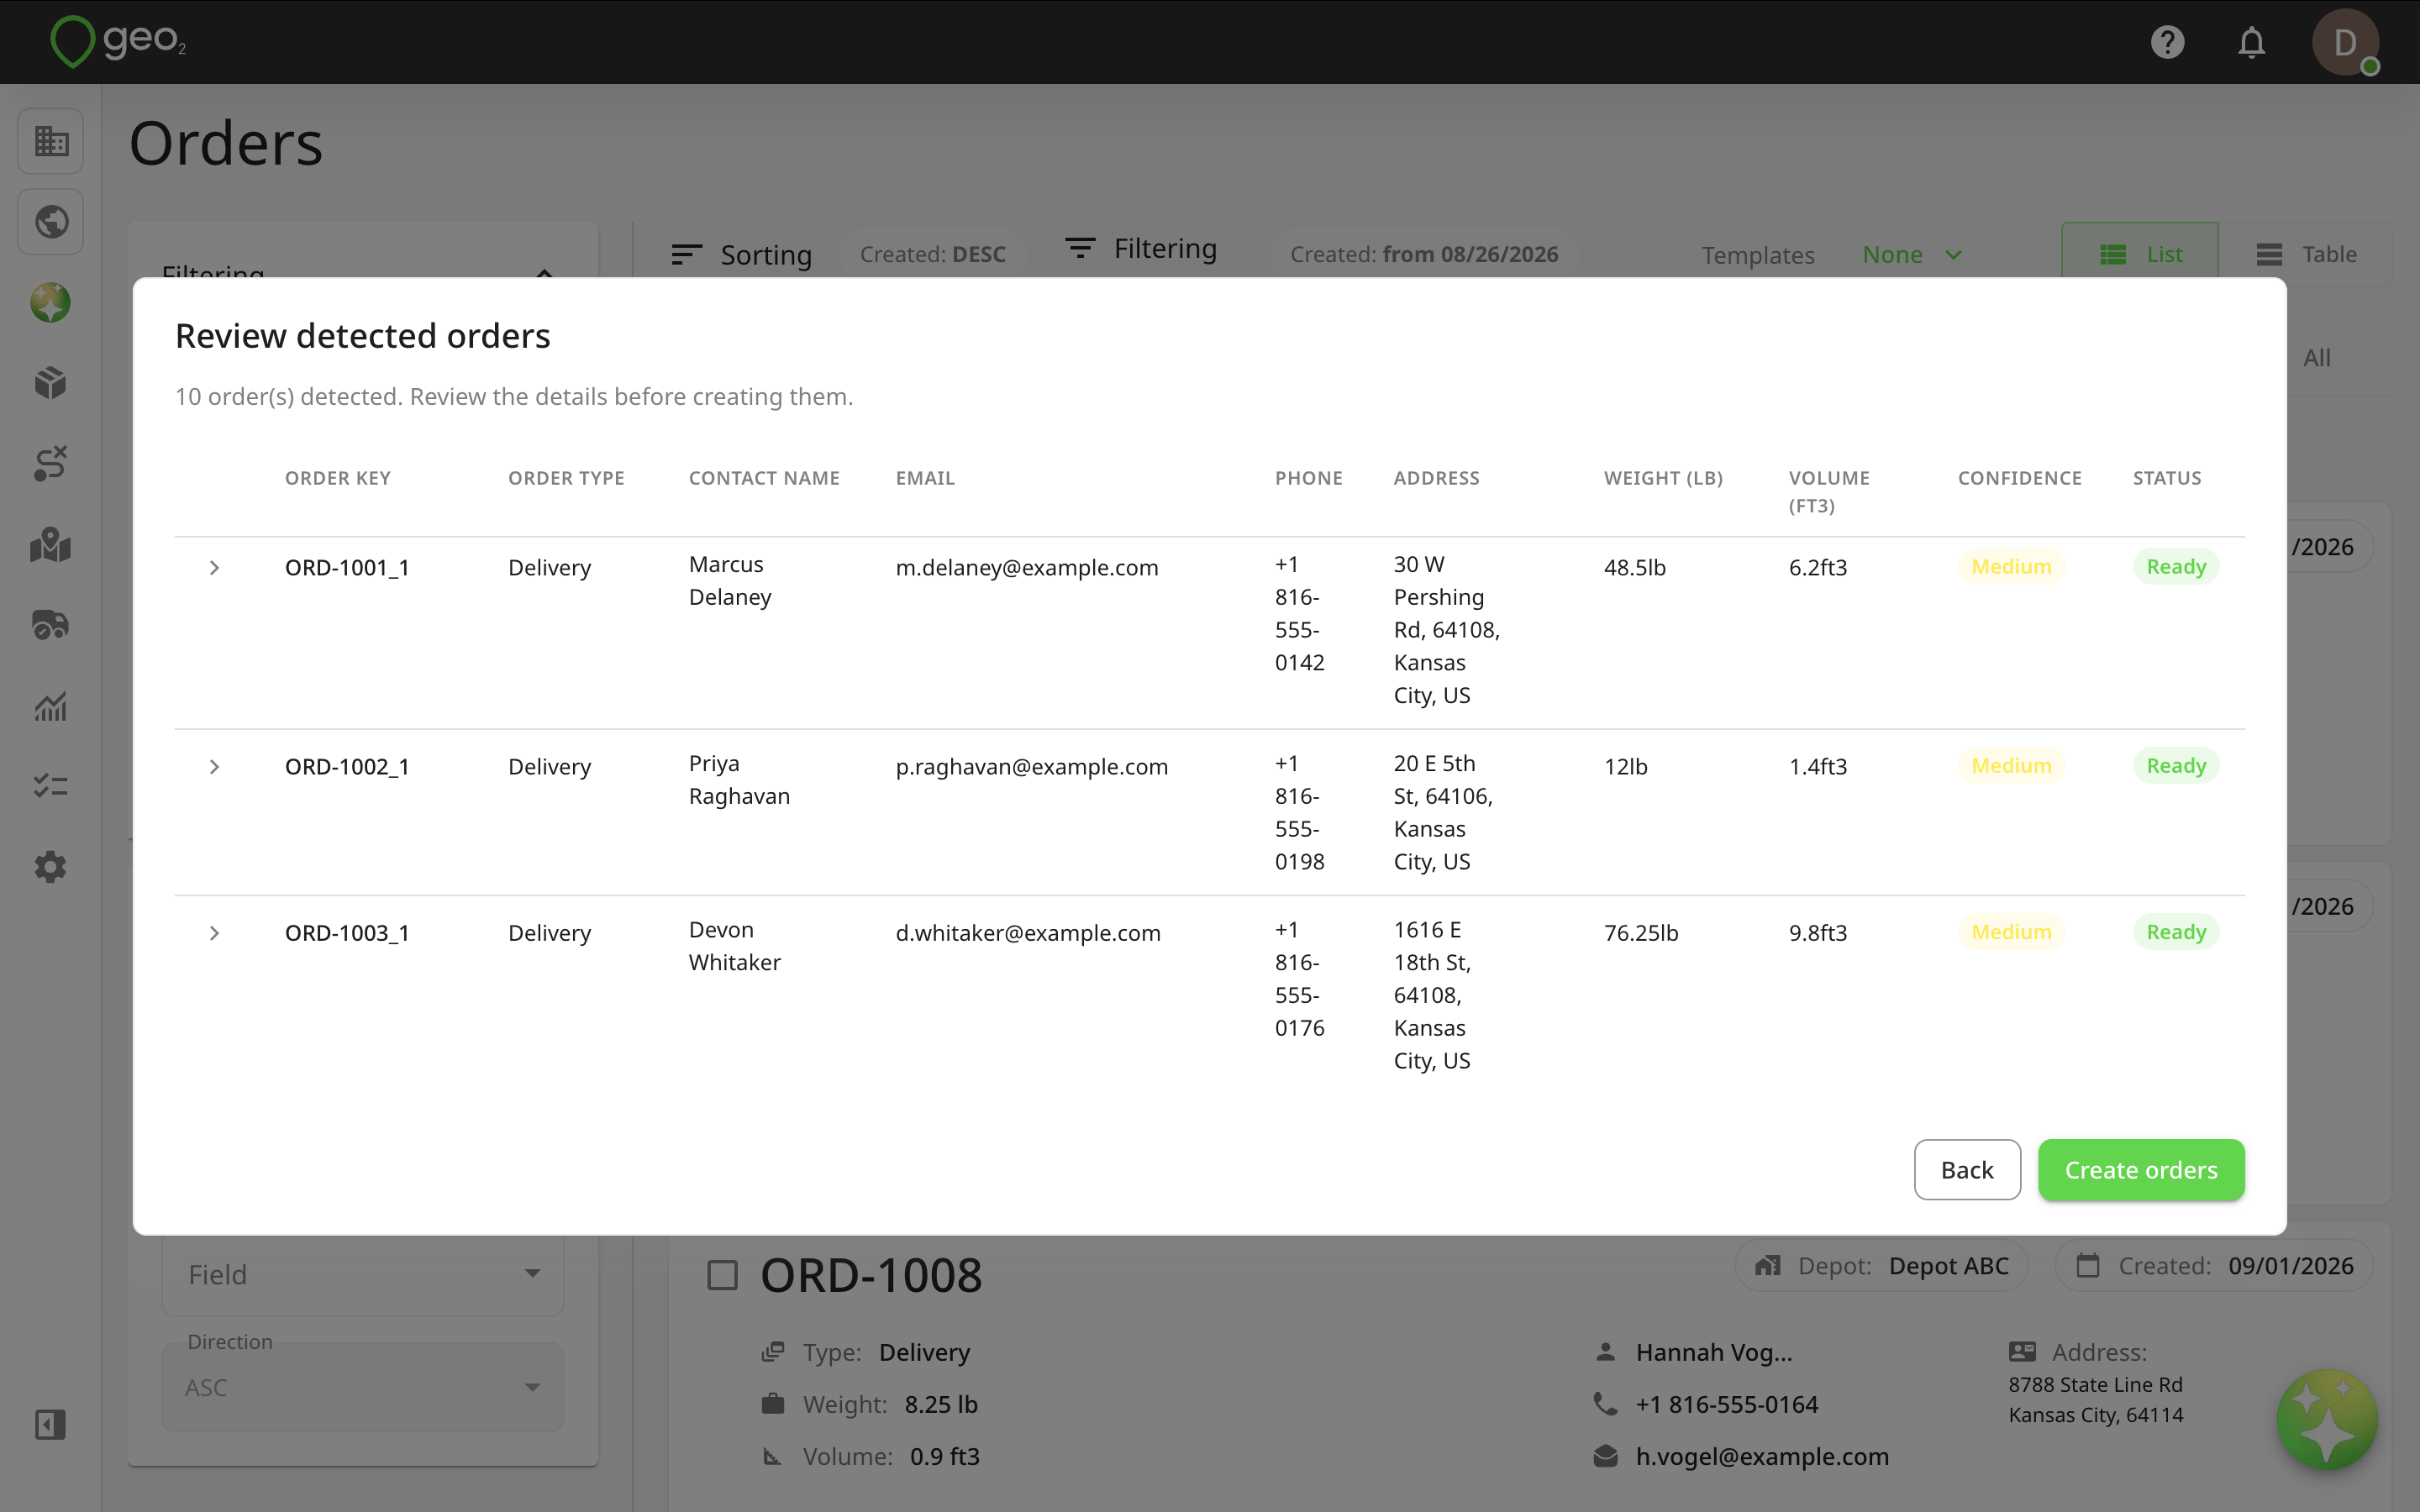
The review screen shows every detected order with its fields, so you can check what was read, edit or complete anything that needs it, and then confirm creation.
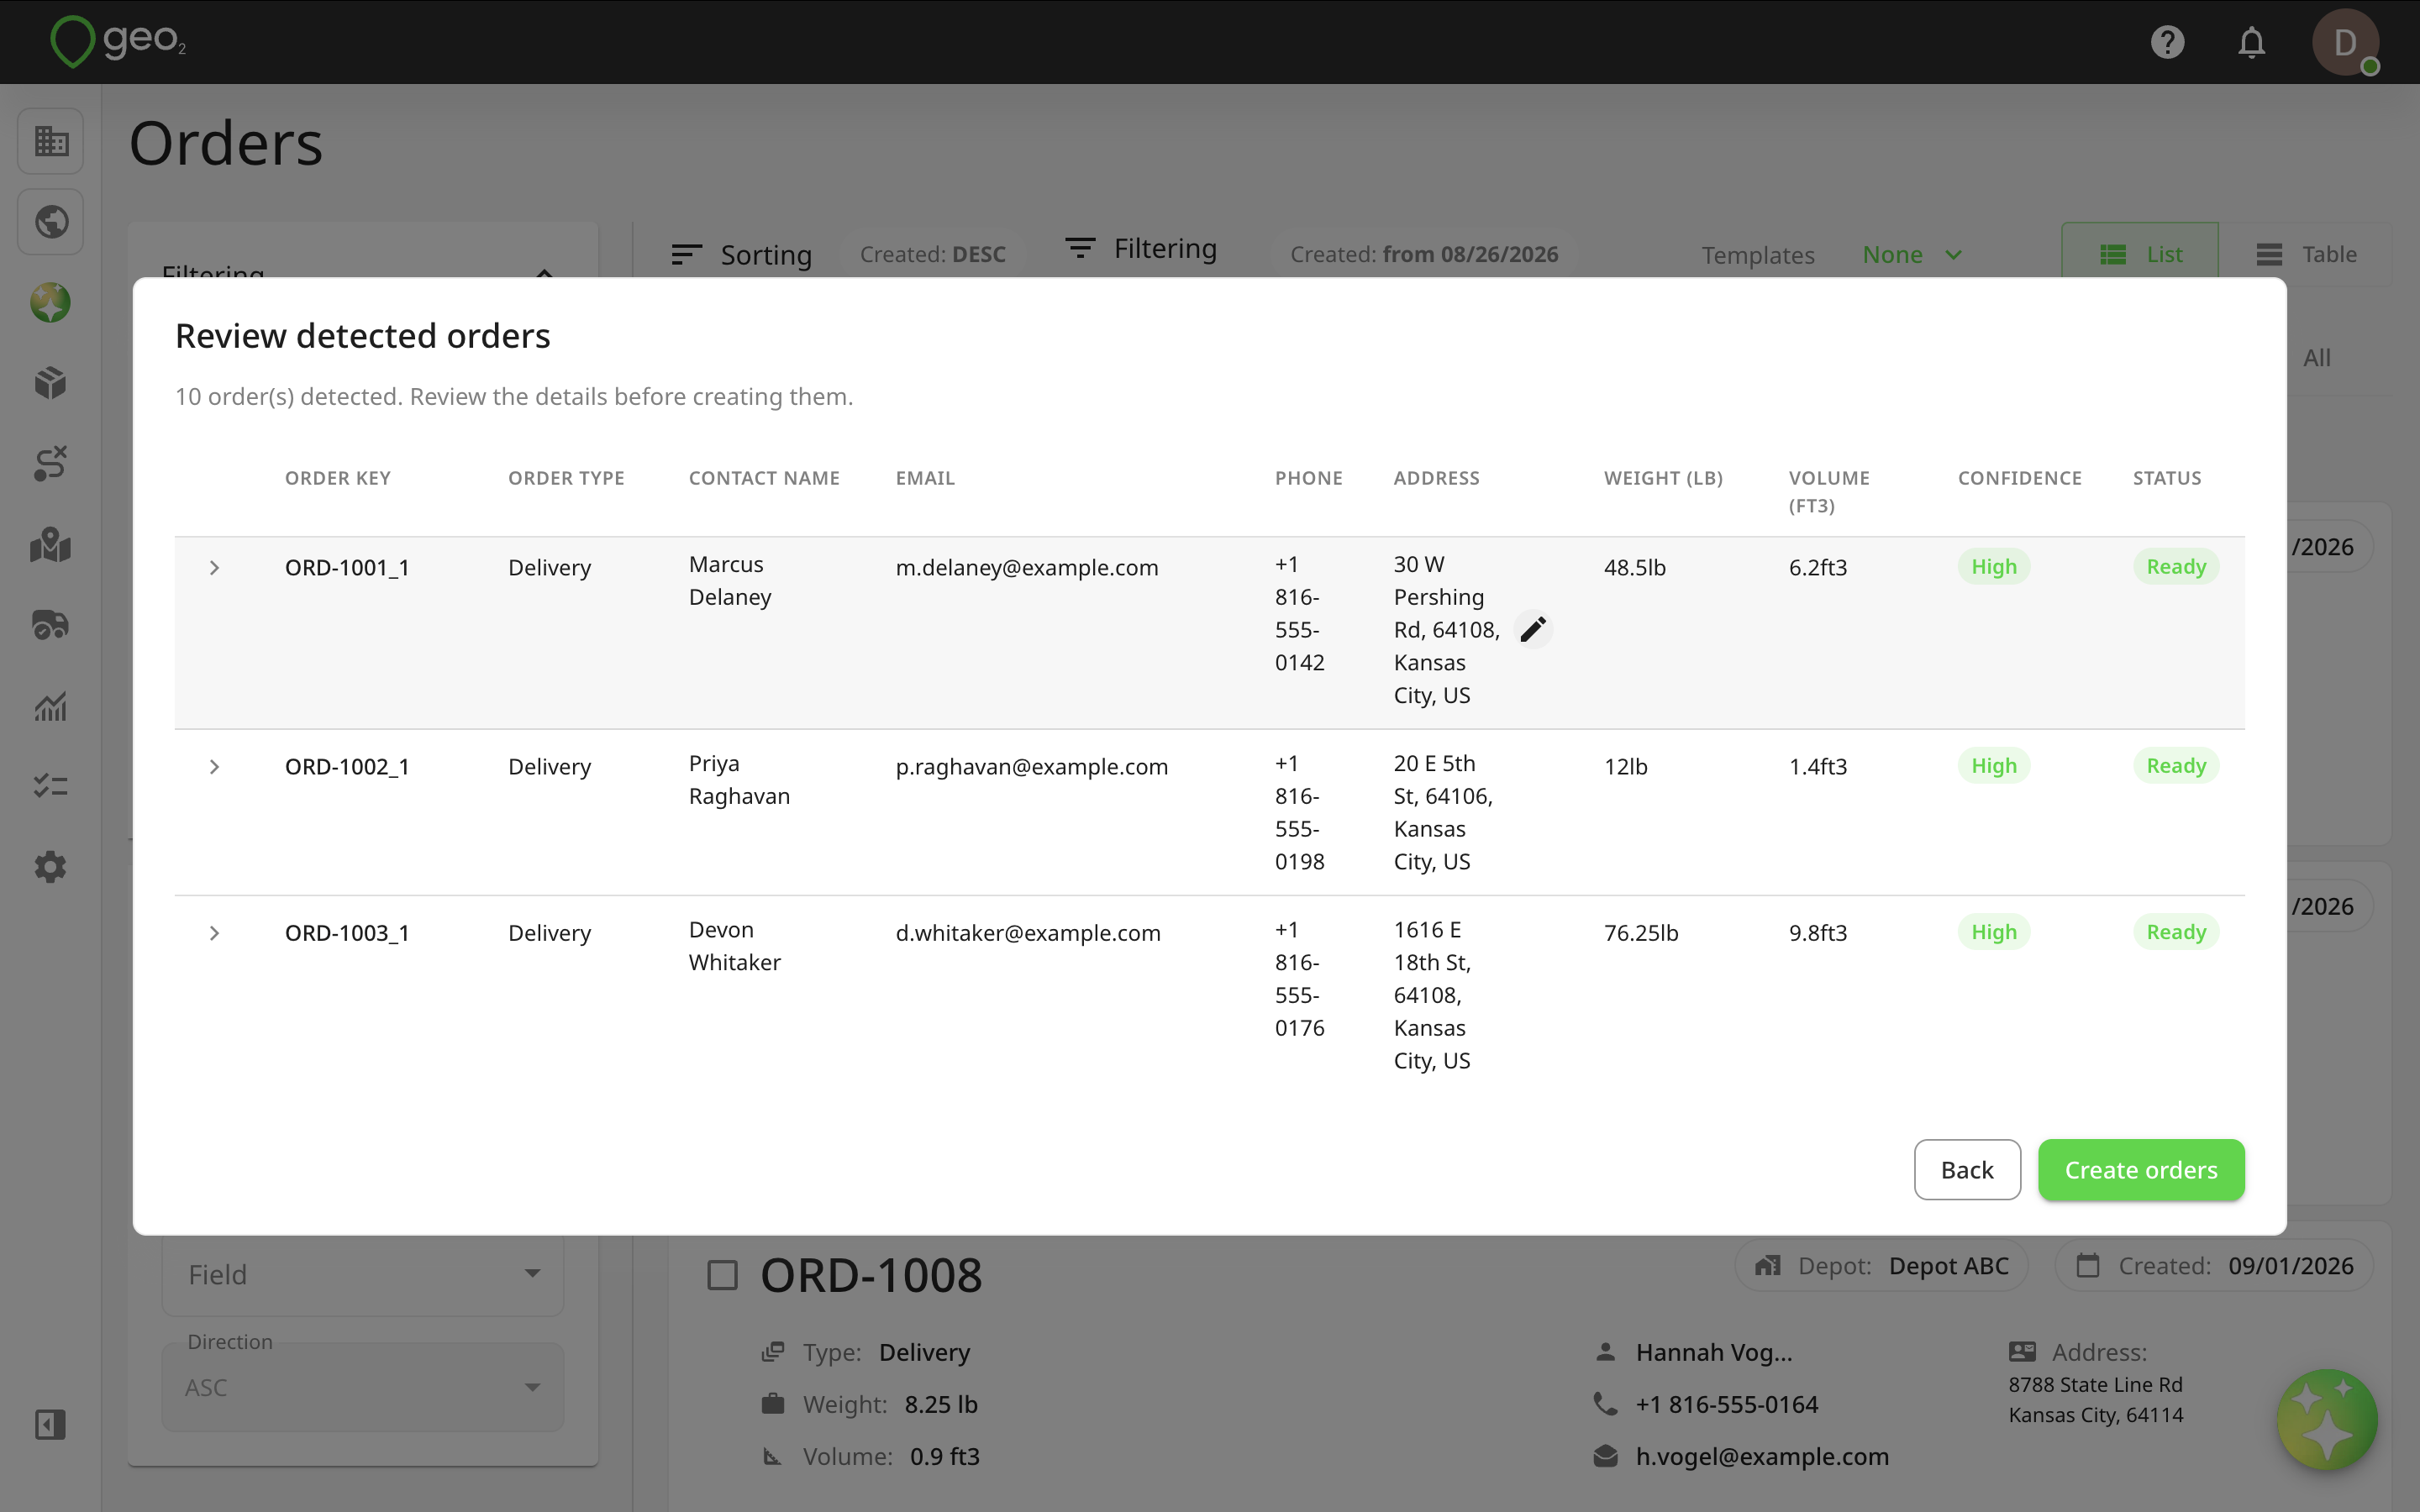
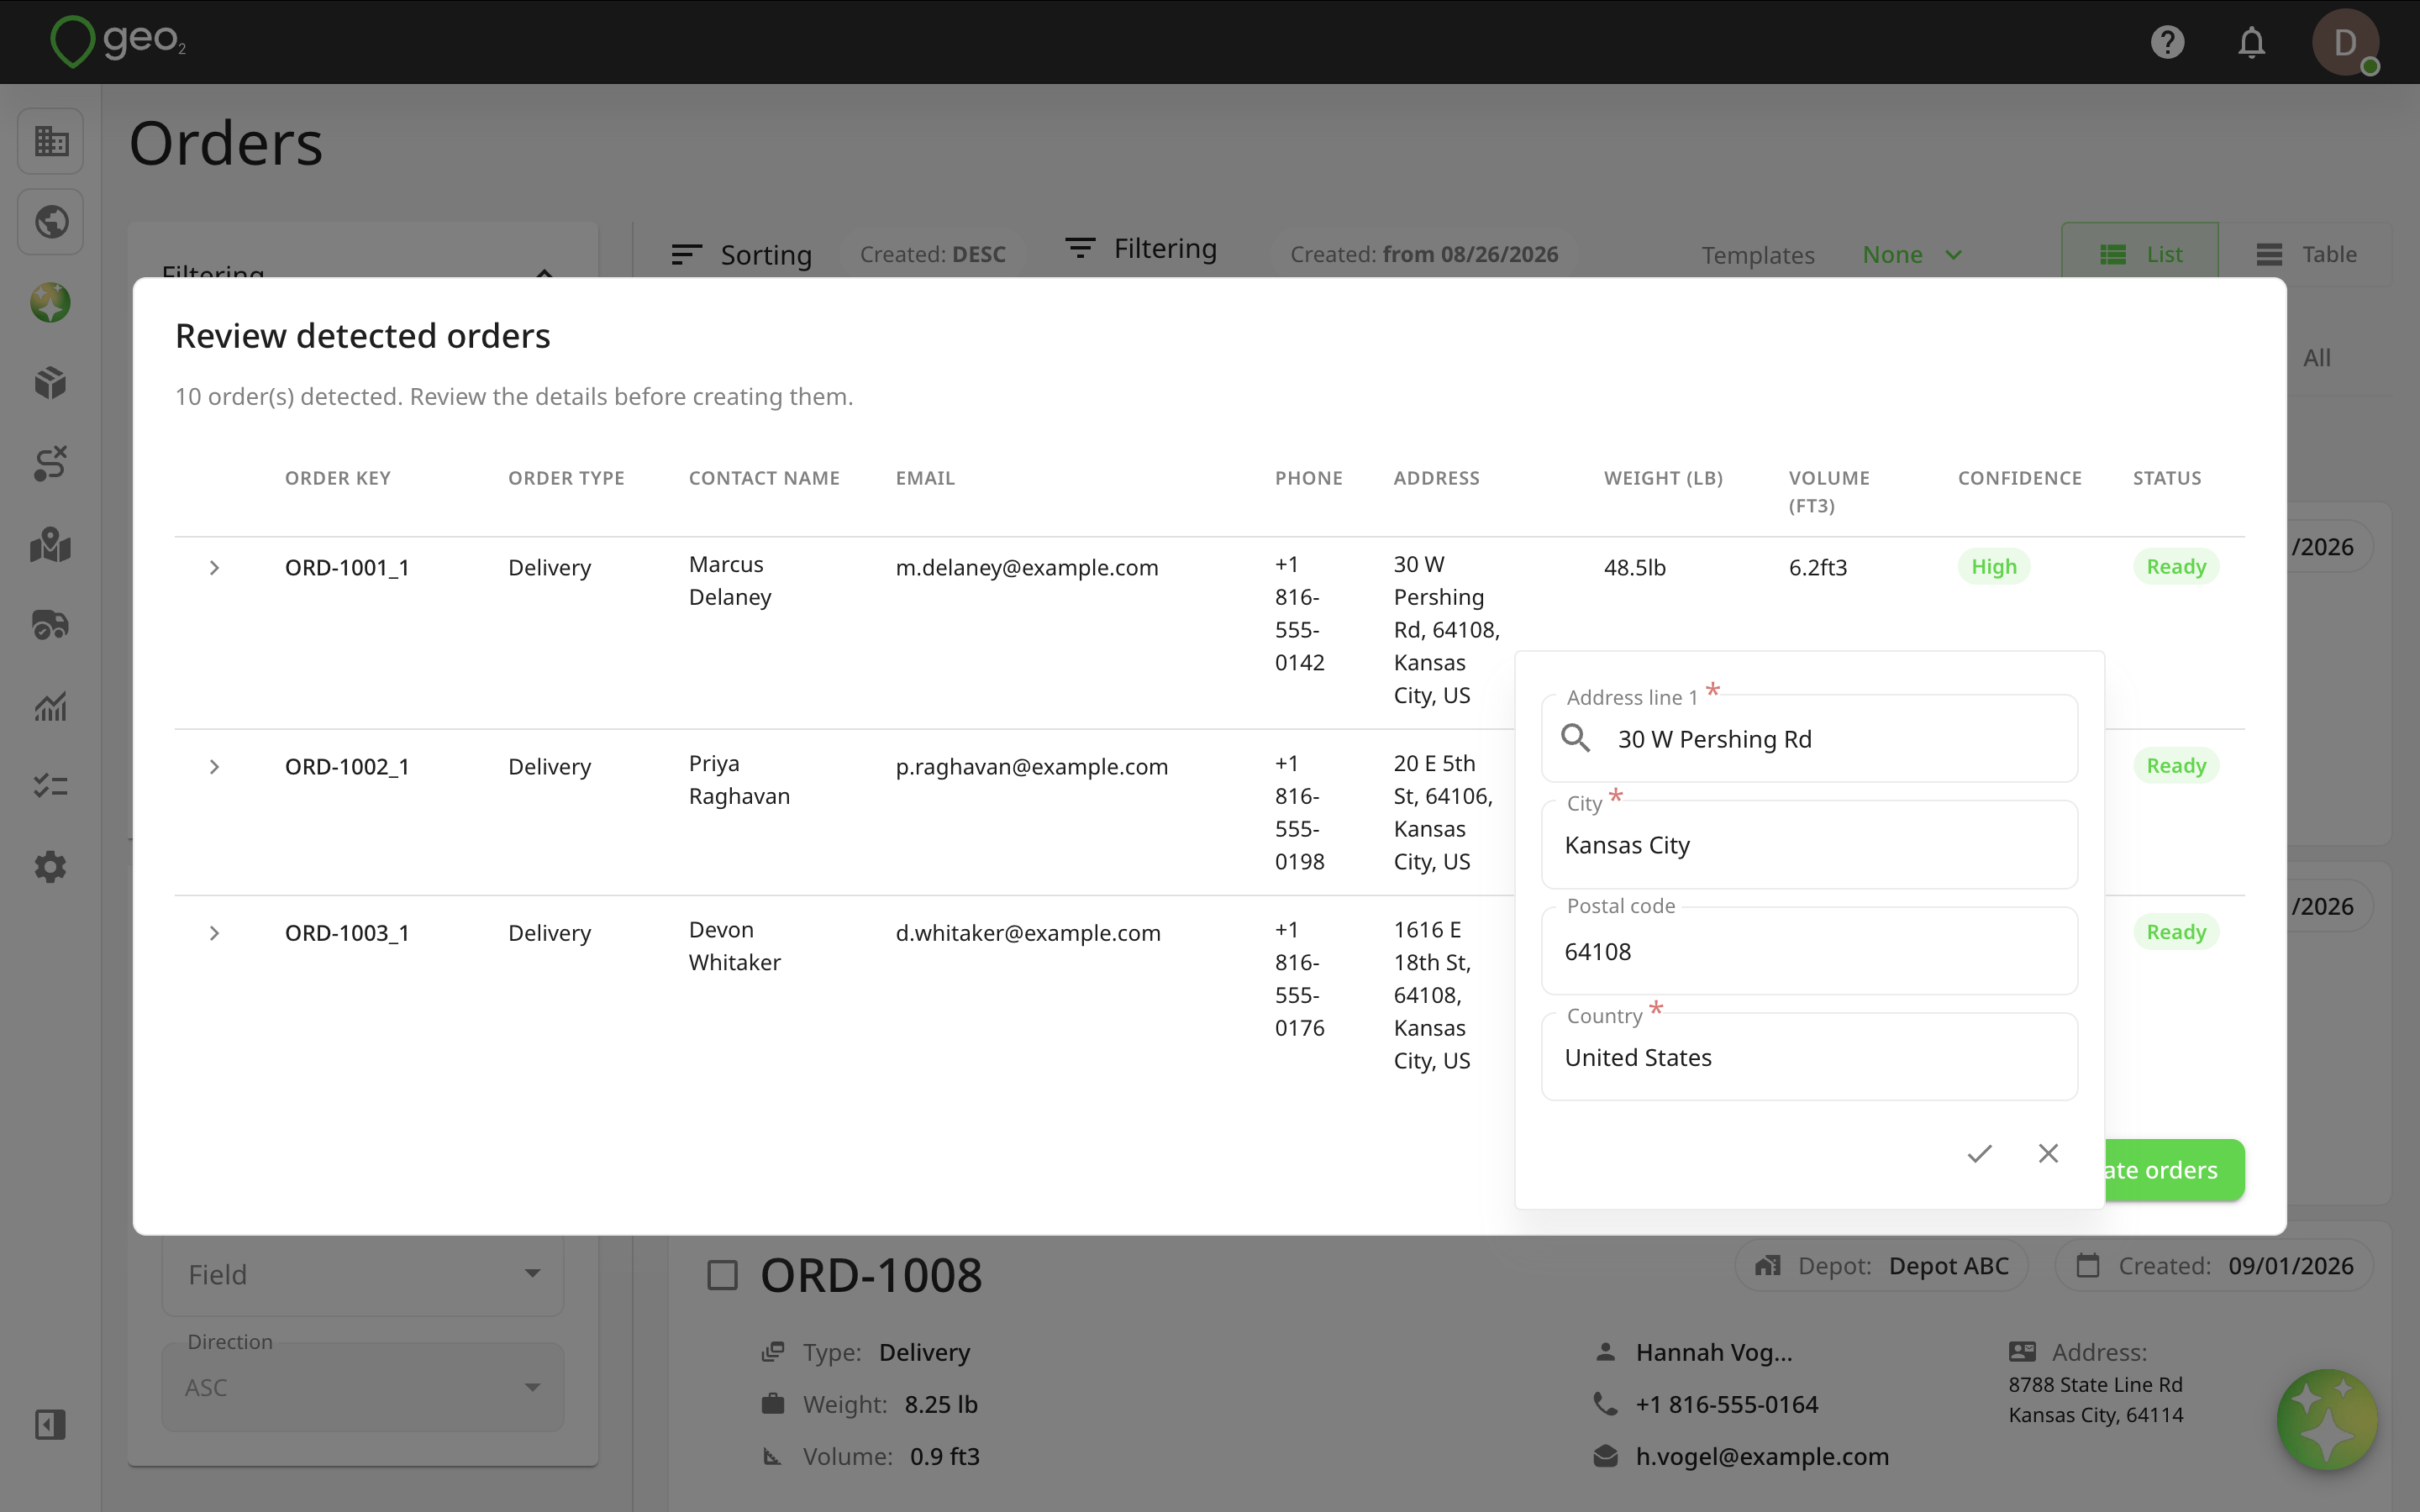
Fields the AI was not confident about are flagged for your attention. An order with missing or uncertain data is still created as a draft from whatever was detected, so a blurry phone number or a half-visible note does not cost you the whole import — you fill in the gaps on the review screen rather than starting again.
Before the orders are created, Geo2 checks for likely problems and warns you. It flags an order that matches an existing one on both address and order key, an address that already exists in your order list, and an address it ca not validate.
If a file can not be read at all, it is named in the result so you know which one to retake rather than having to work out what is missing.
Press Create orders to confirm importing all orders.