Hub: Map View
Introduction
You can visualize and manage multiple routes side by side on a map by either selecting Map view from the menu or choosing specific routes on Routes page and clicking the Map view button in Hub.
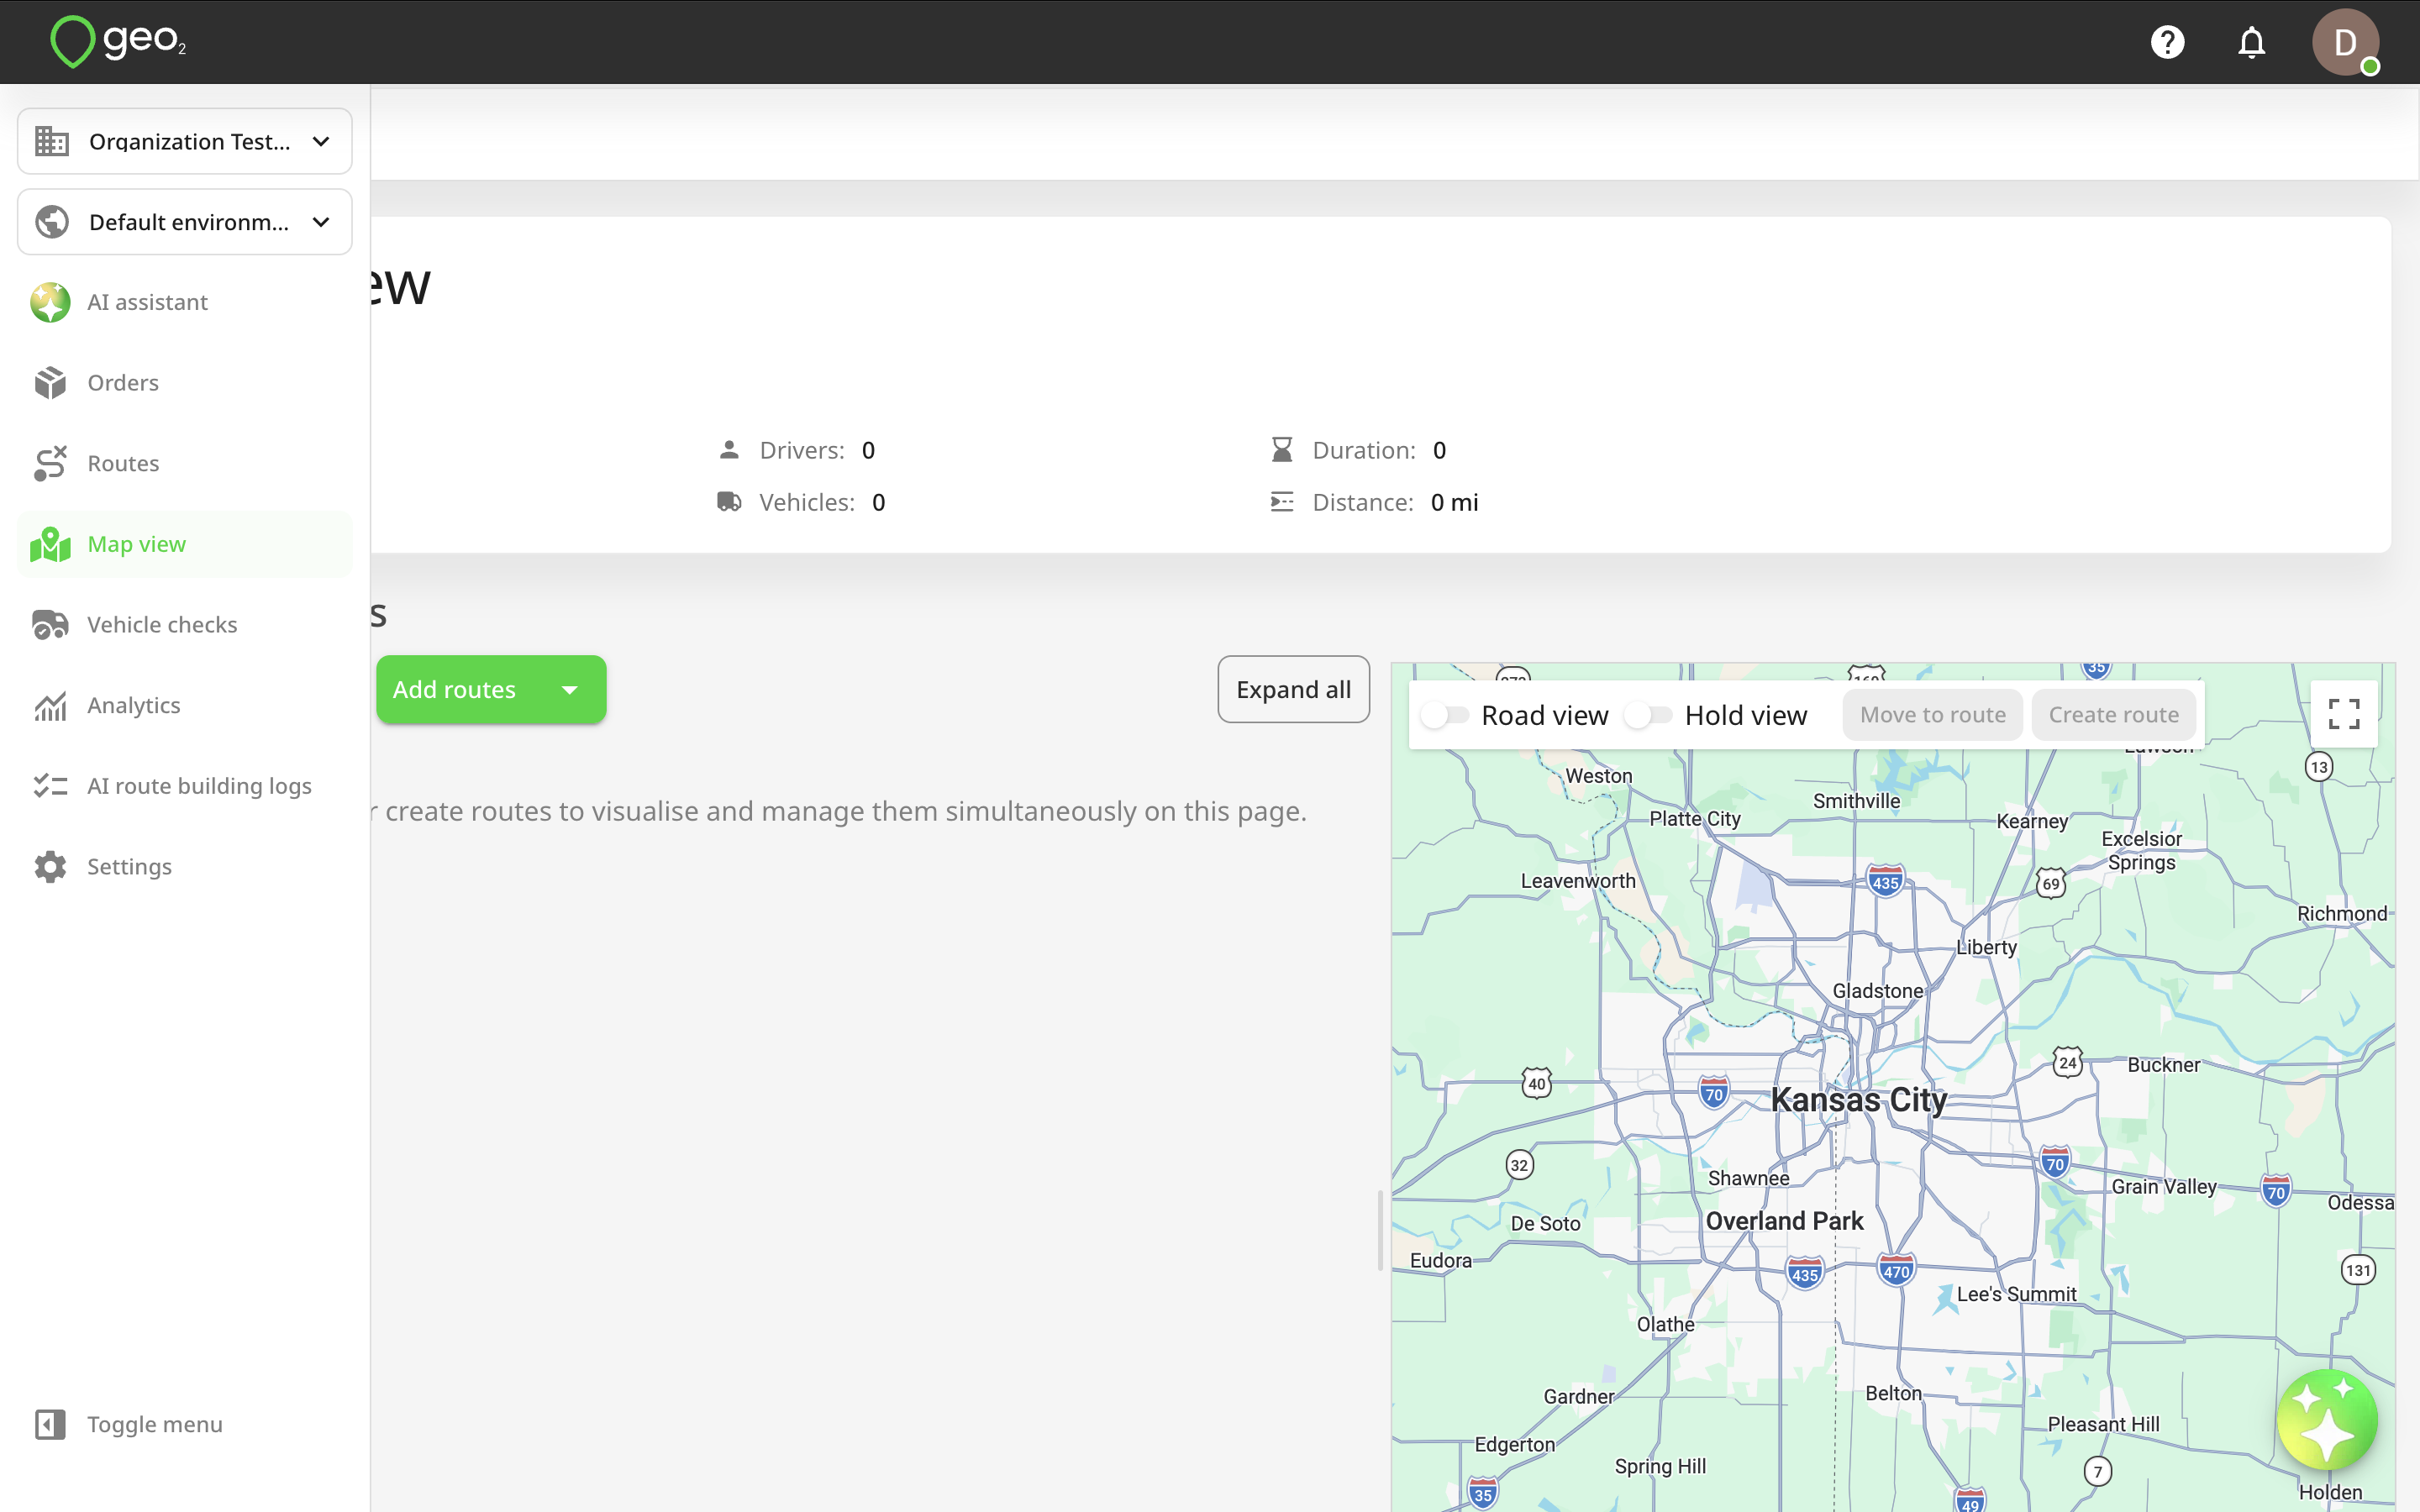
- If you open Map view from the menu, you’ll be redirected to the empty Map view page, where you can create new routes and orders or add existing ones.
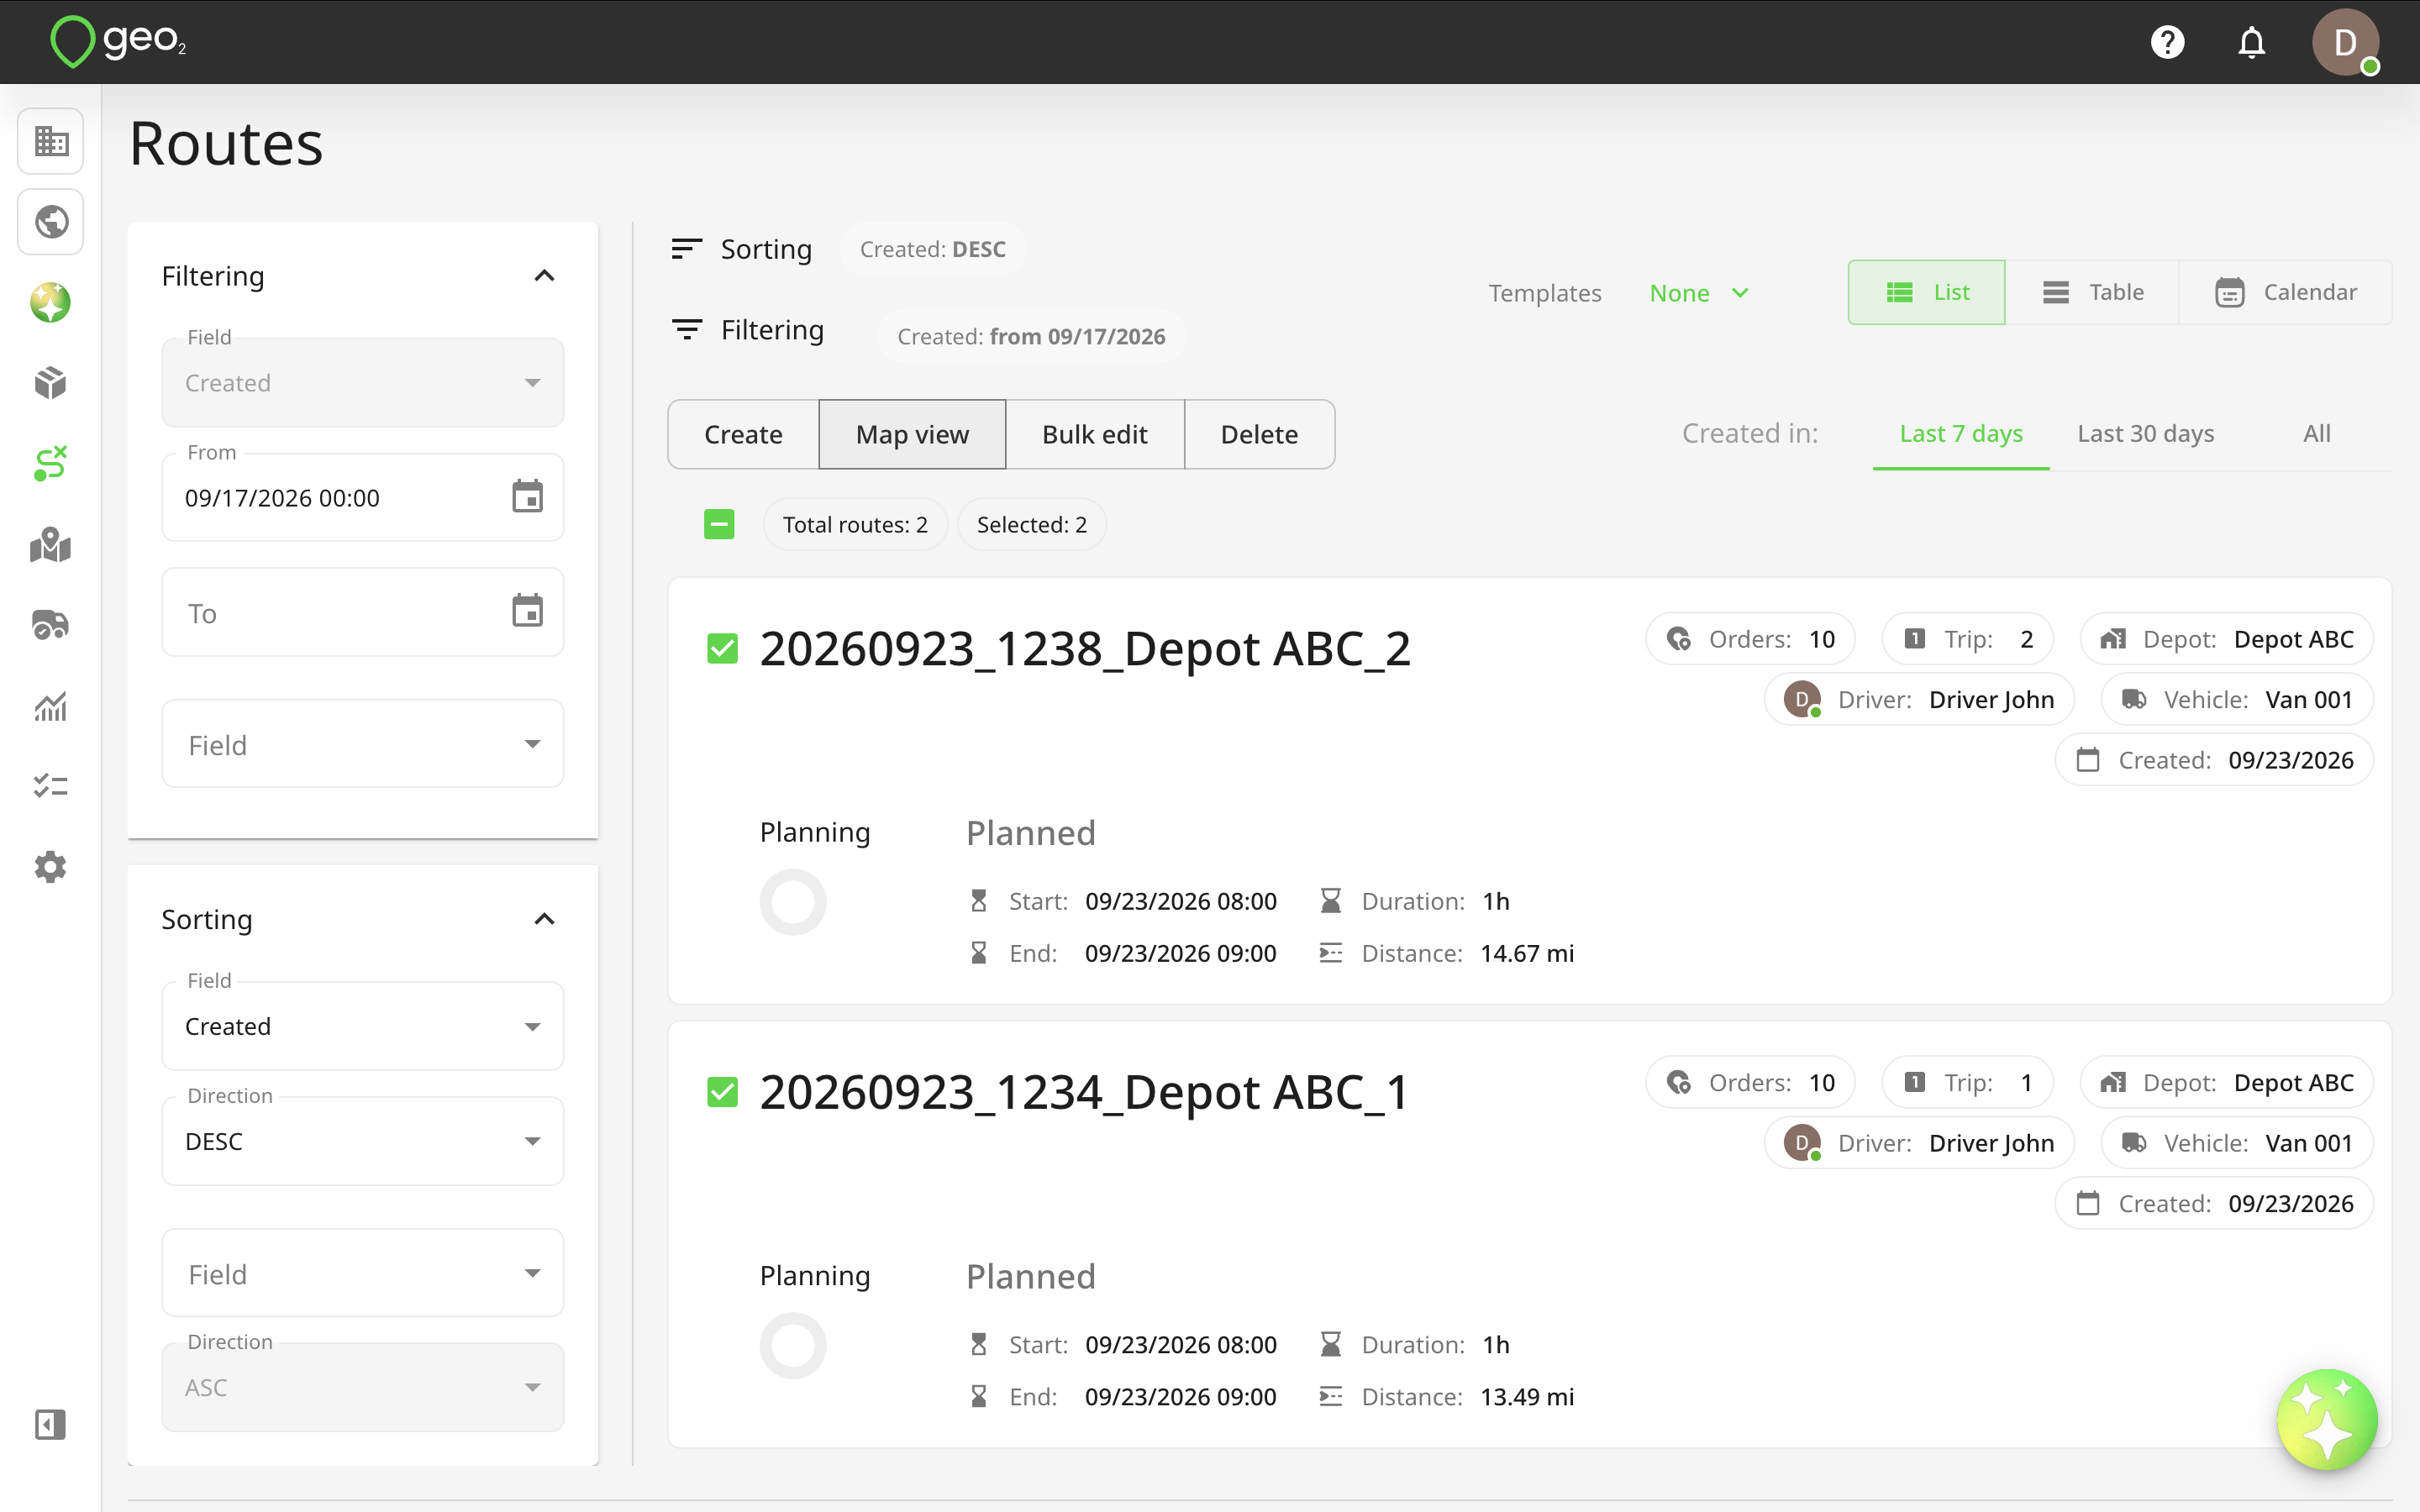
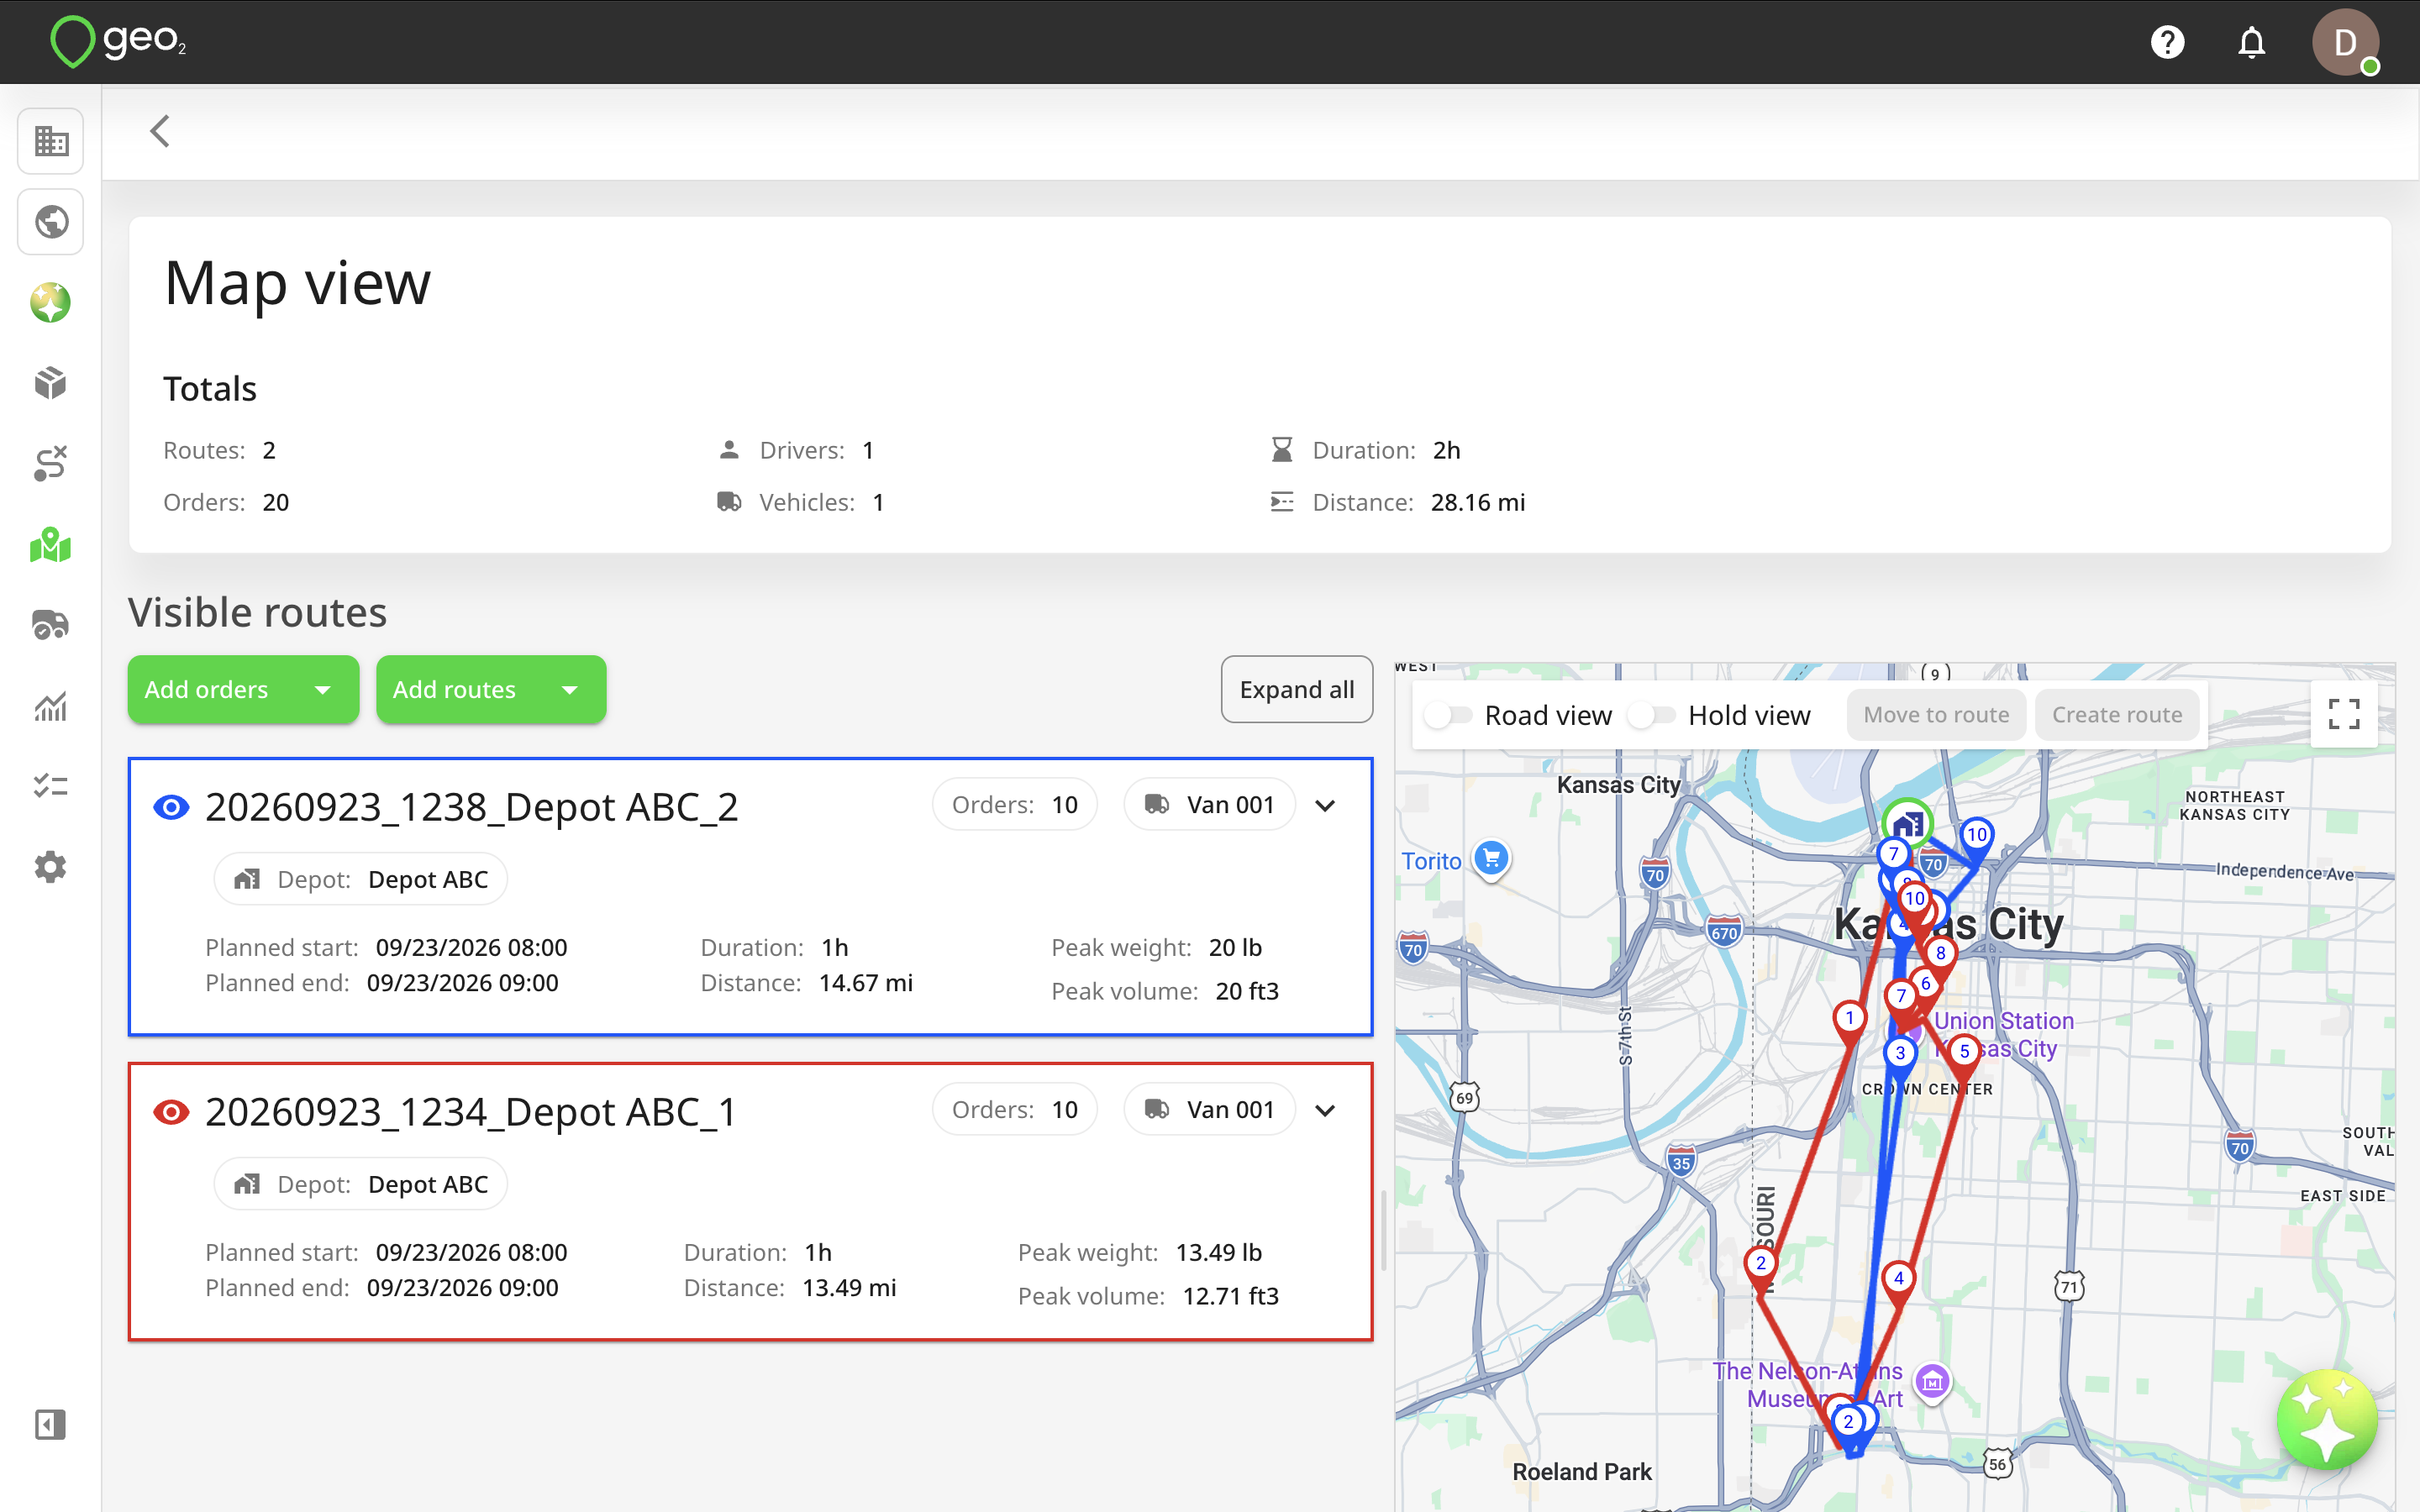
- If you select routes on Routes page and click the Map view button, you will be redirected to Map view page with the selected routes displayed on the map. You can still create or add additional routes and orders from there.
Map view option in the menu:
Map view from Routes page:
Routes Visualisation
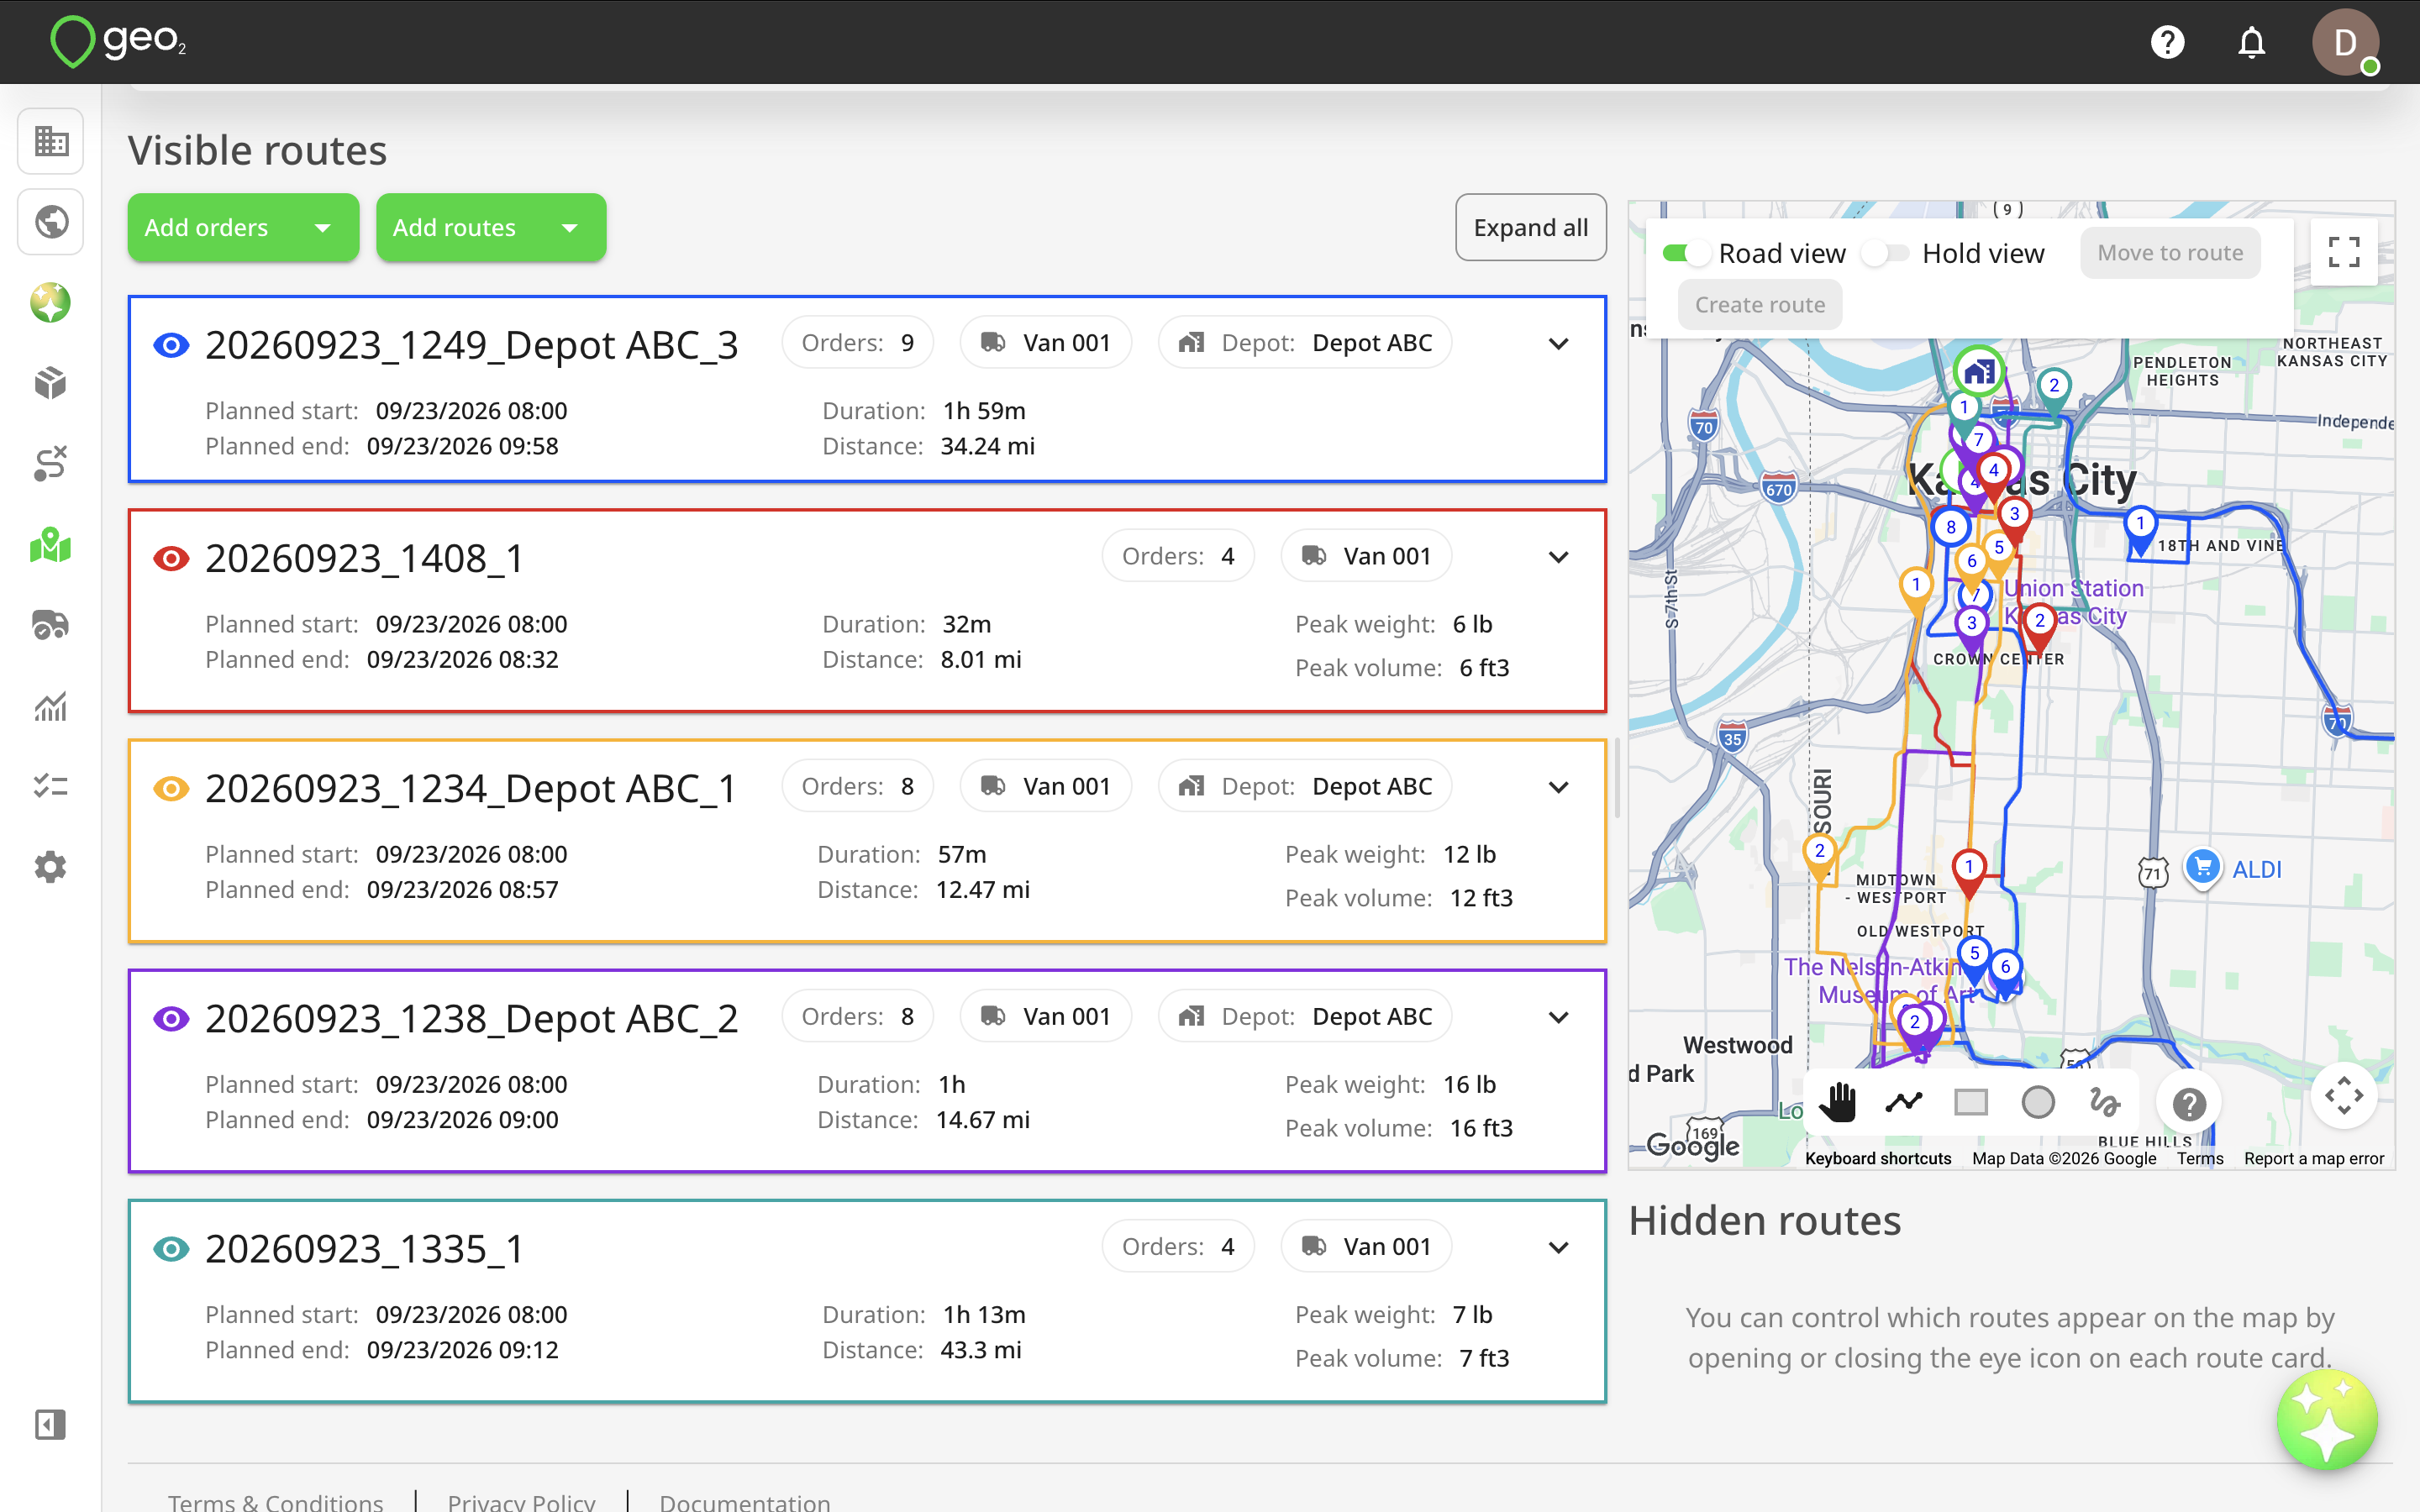
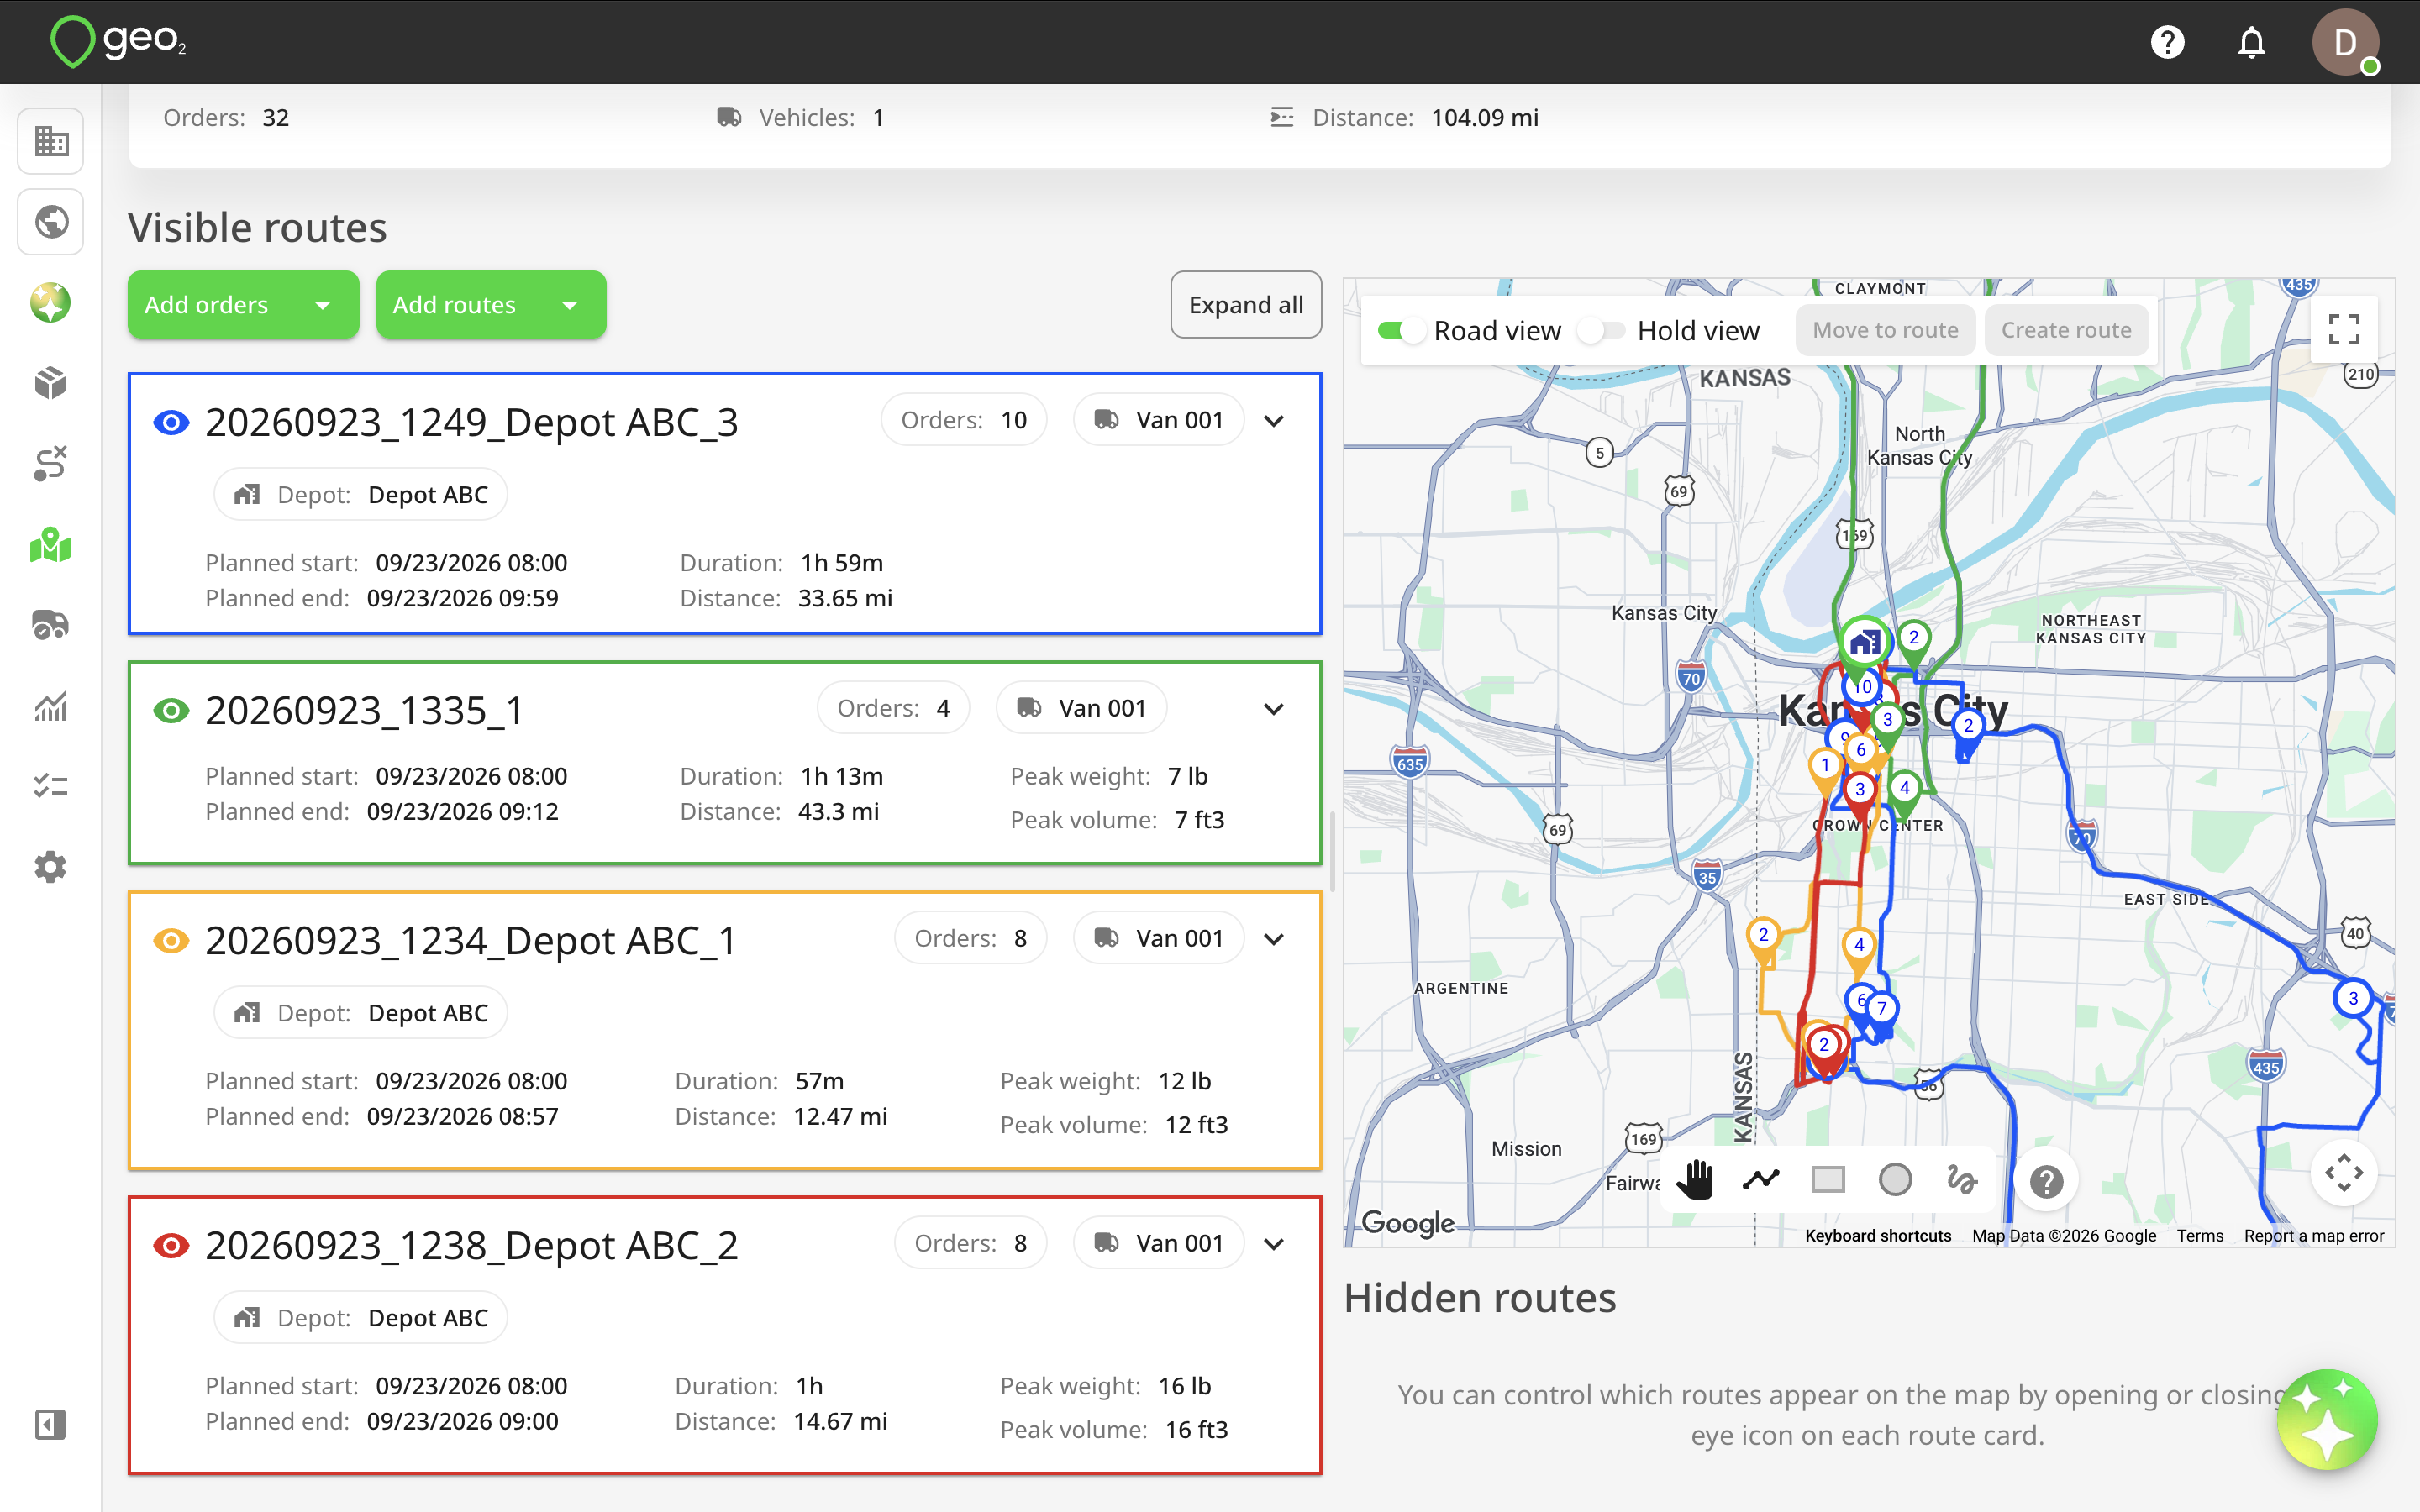
The Map view page is divided into two columns:
- Visible routes, in the left-hand column - currently shown on the map.
- Hidden routes, in the right-hand column under the map - not currently shown on the map.
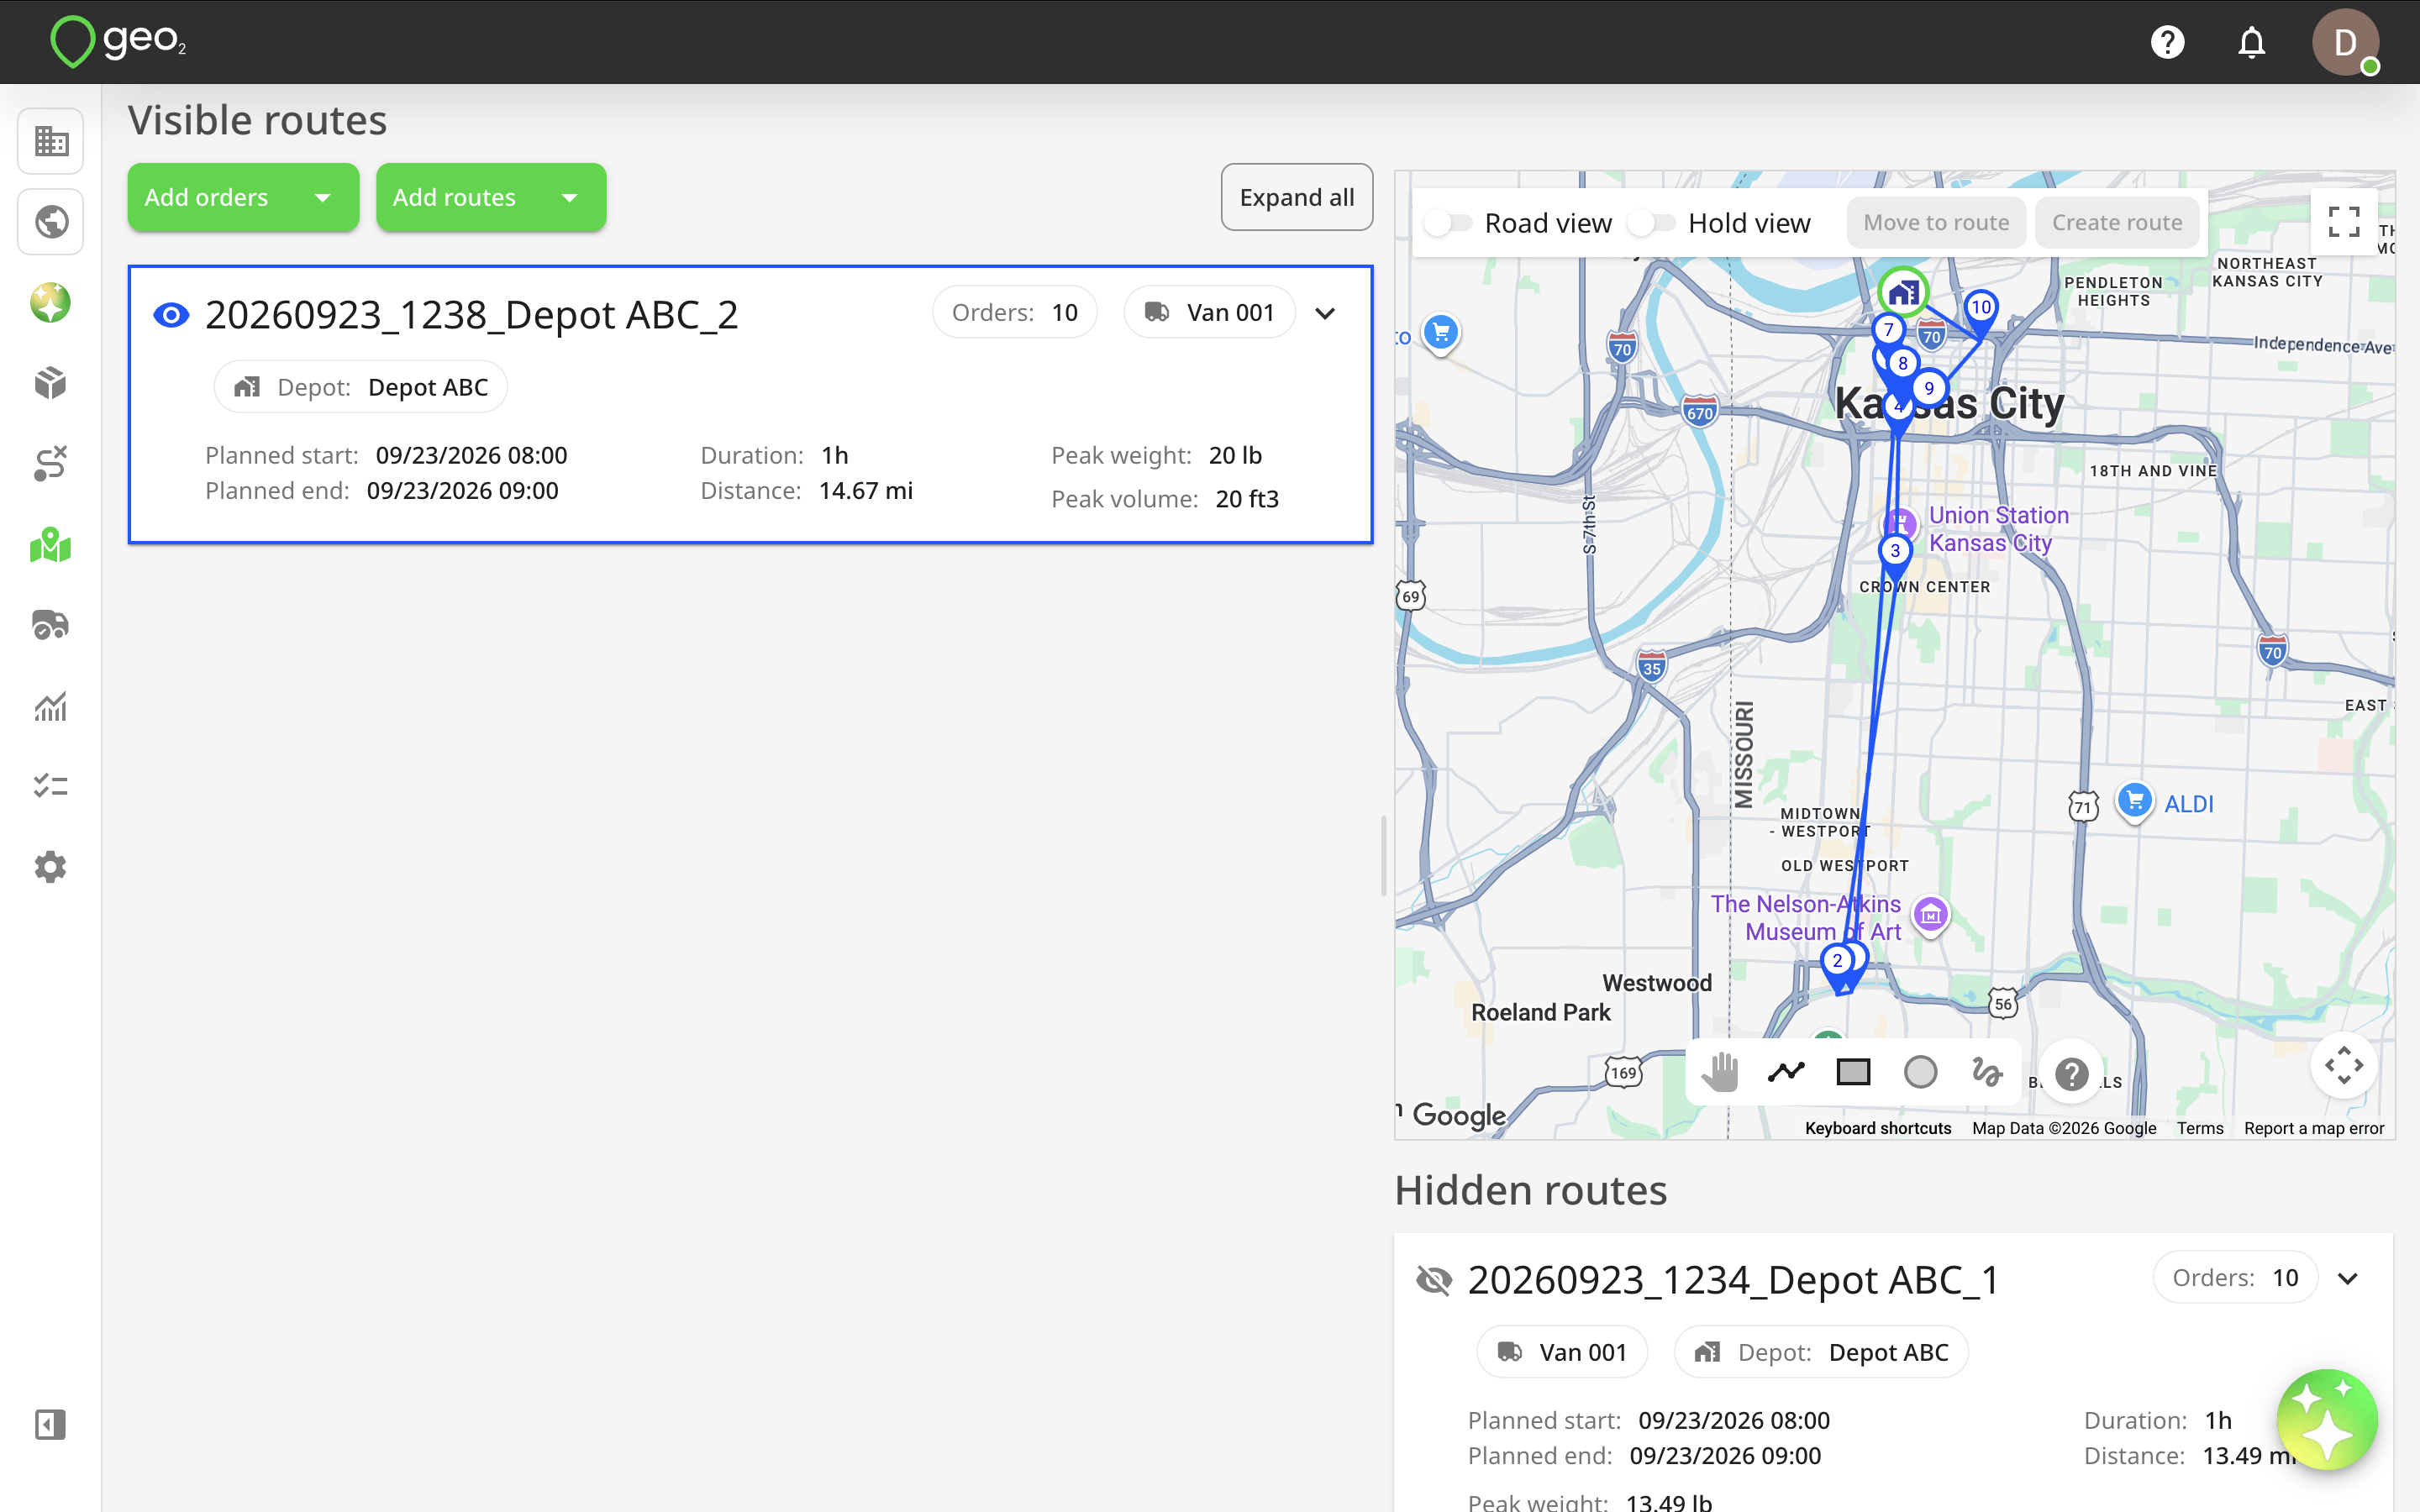
Up to 40 routes can be shown on the map simultaneously. If you have initially selected more than 40 routes on Routes page, the excess routes will be hidden.
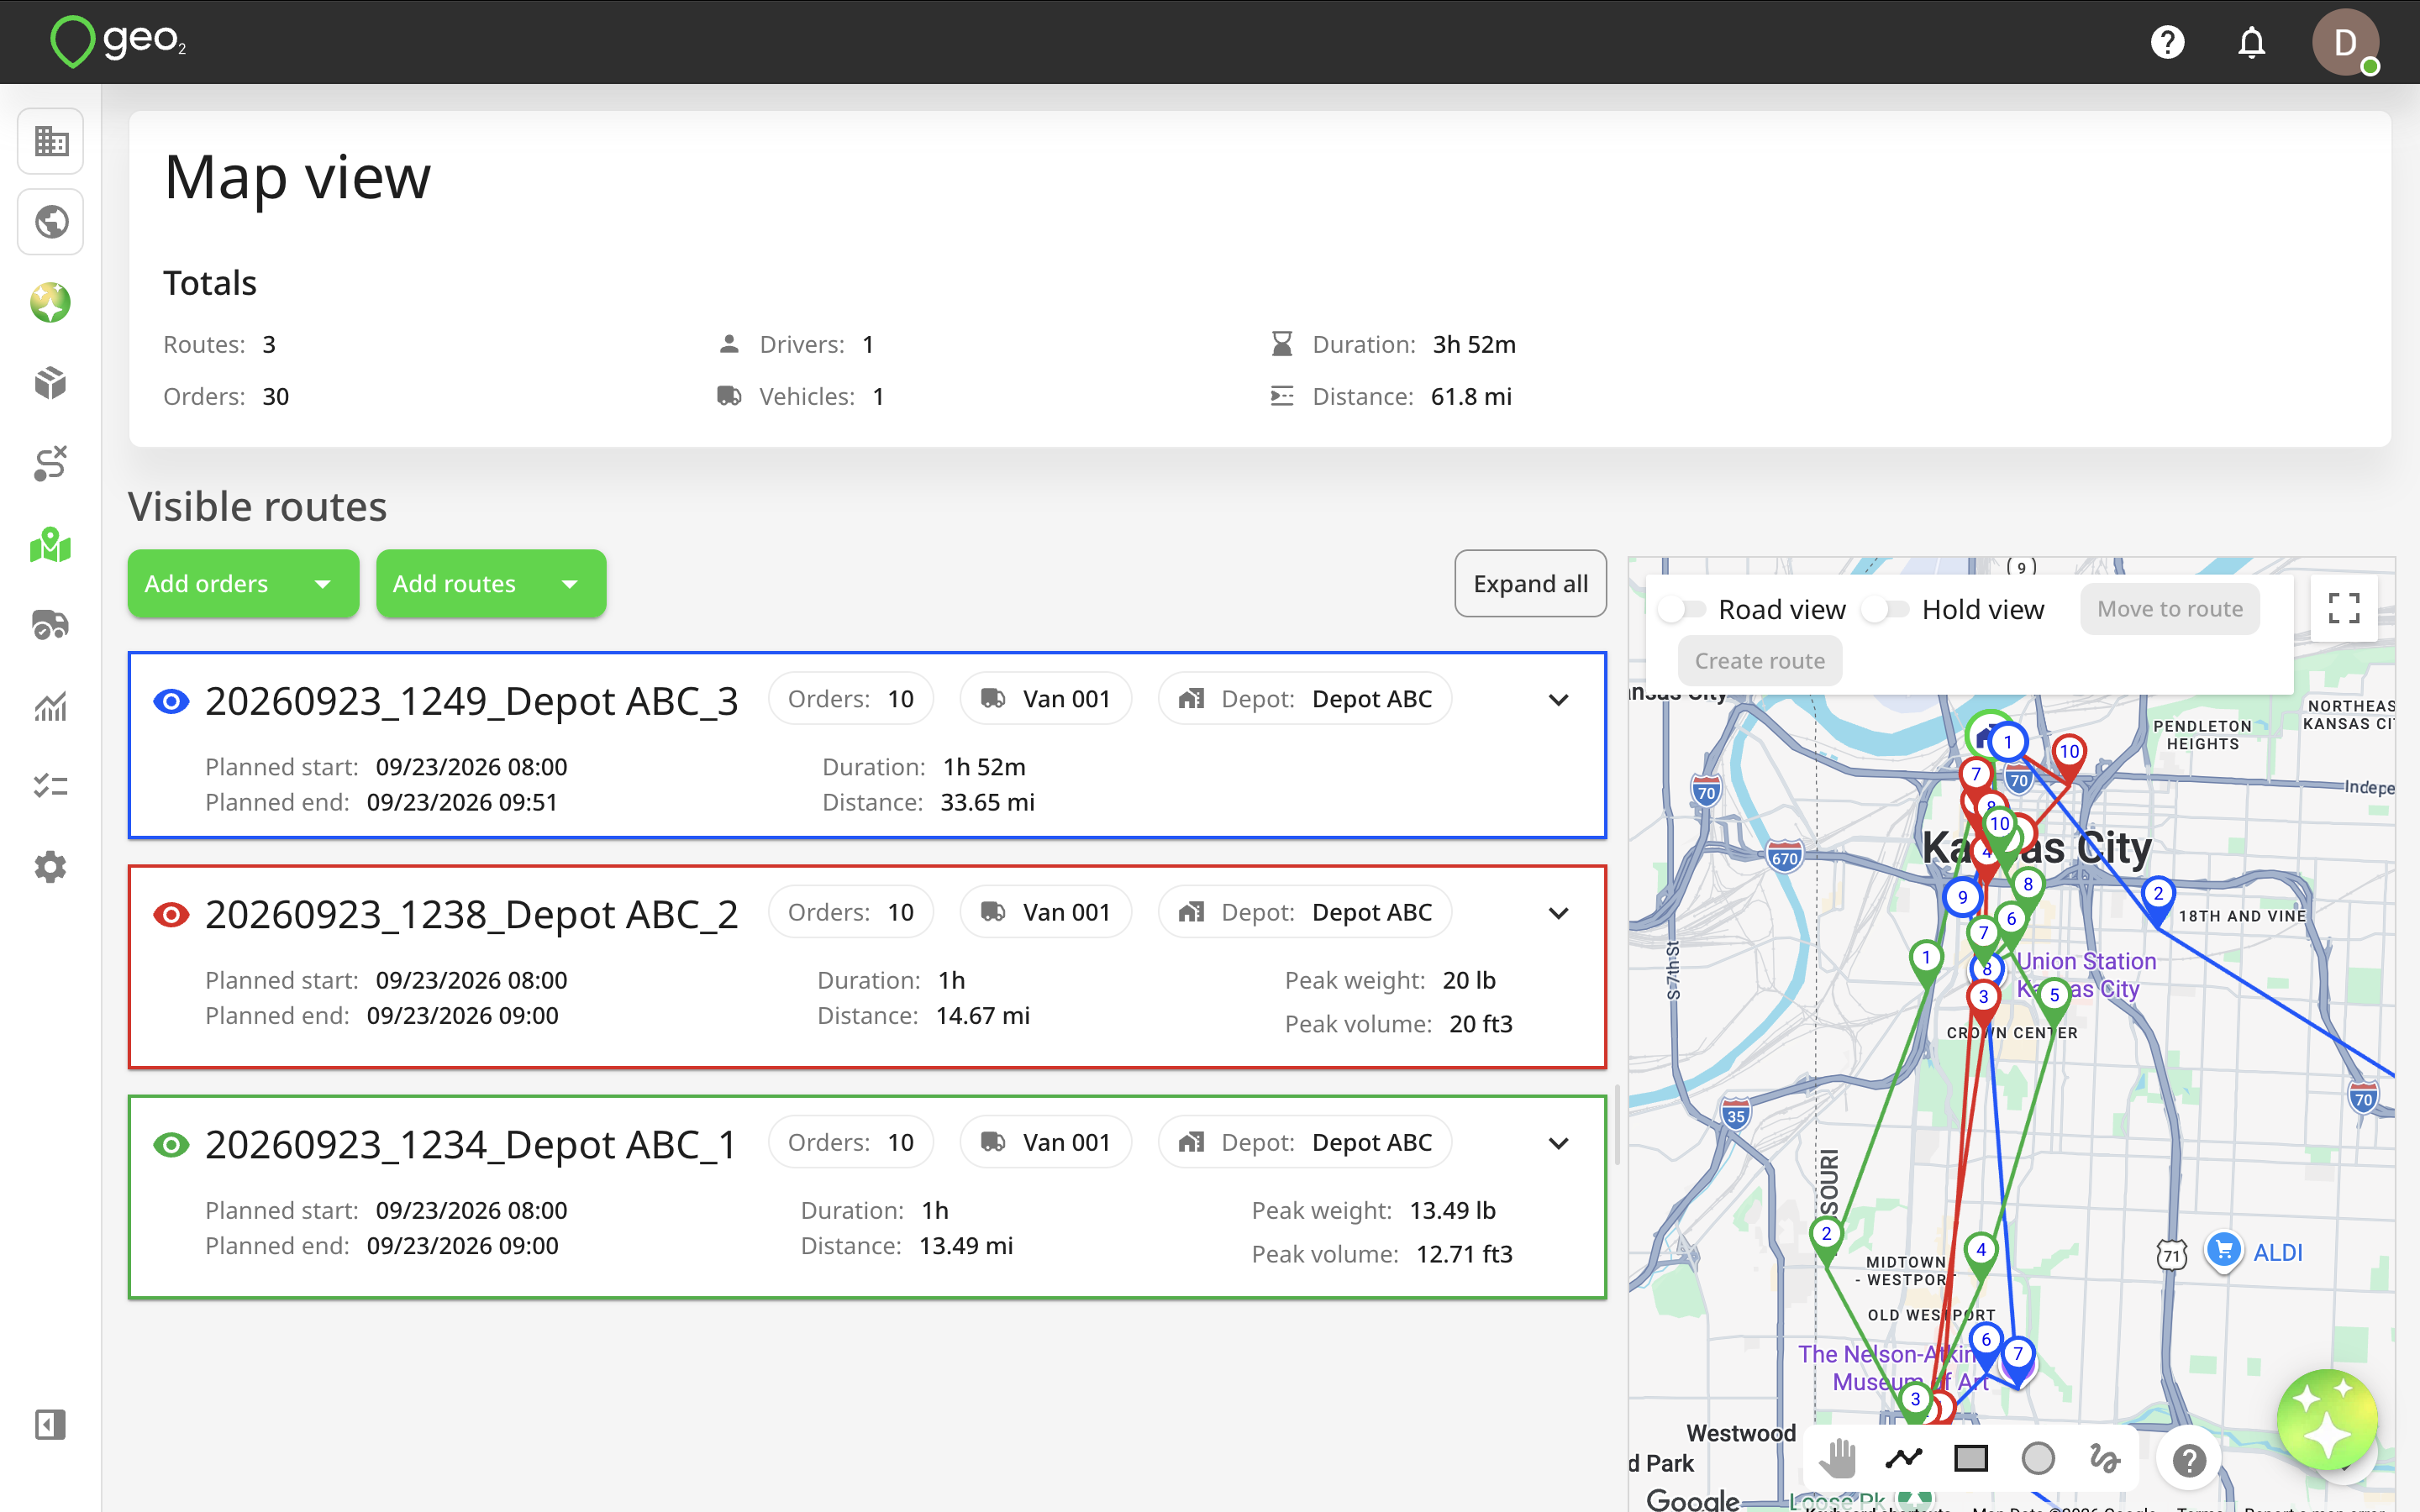
Each route card has the following information on it:
- Route key which you can click to open a route in a new browser tab
- Planned start and end date/time
- Planned duration and distance
- Peak weight and volume
- Depot to which the route can be optionally assigned as the start/end point
- Number of orders added to the route
Deleteicon to remove a route from visualisation on Map view page

The eye icon in the top left-hand corner of each route card lets you toggle whether the route is shown or hidden. When you click on the eye icon on the route, the route card will move to the bottom of the appropriate column.
The colour used to show the route on the map is the same as the colour of the frame and eye icon in each visible route card.
Orders Visualisation
It is possible to click on a route card to expand it to see a list of orders added to a route on Map view page in Hub.
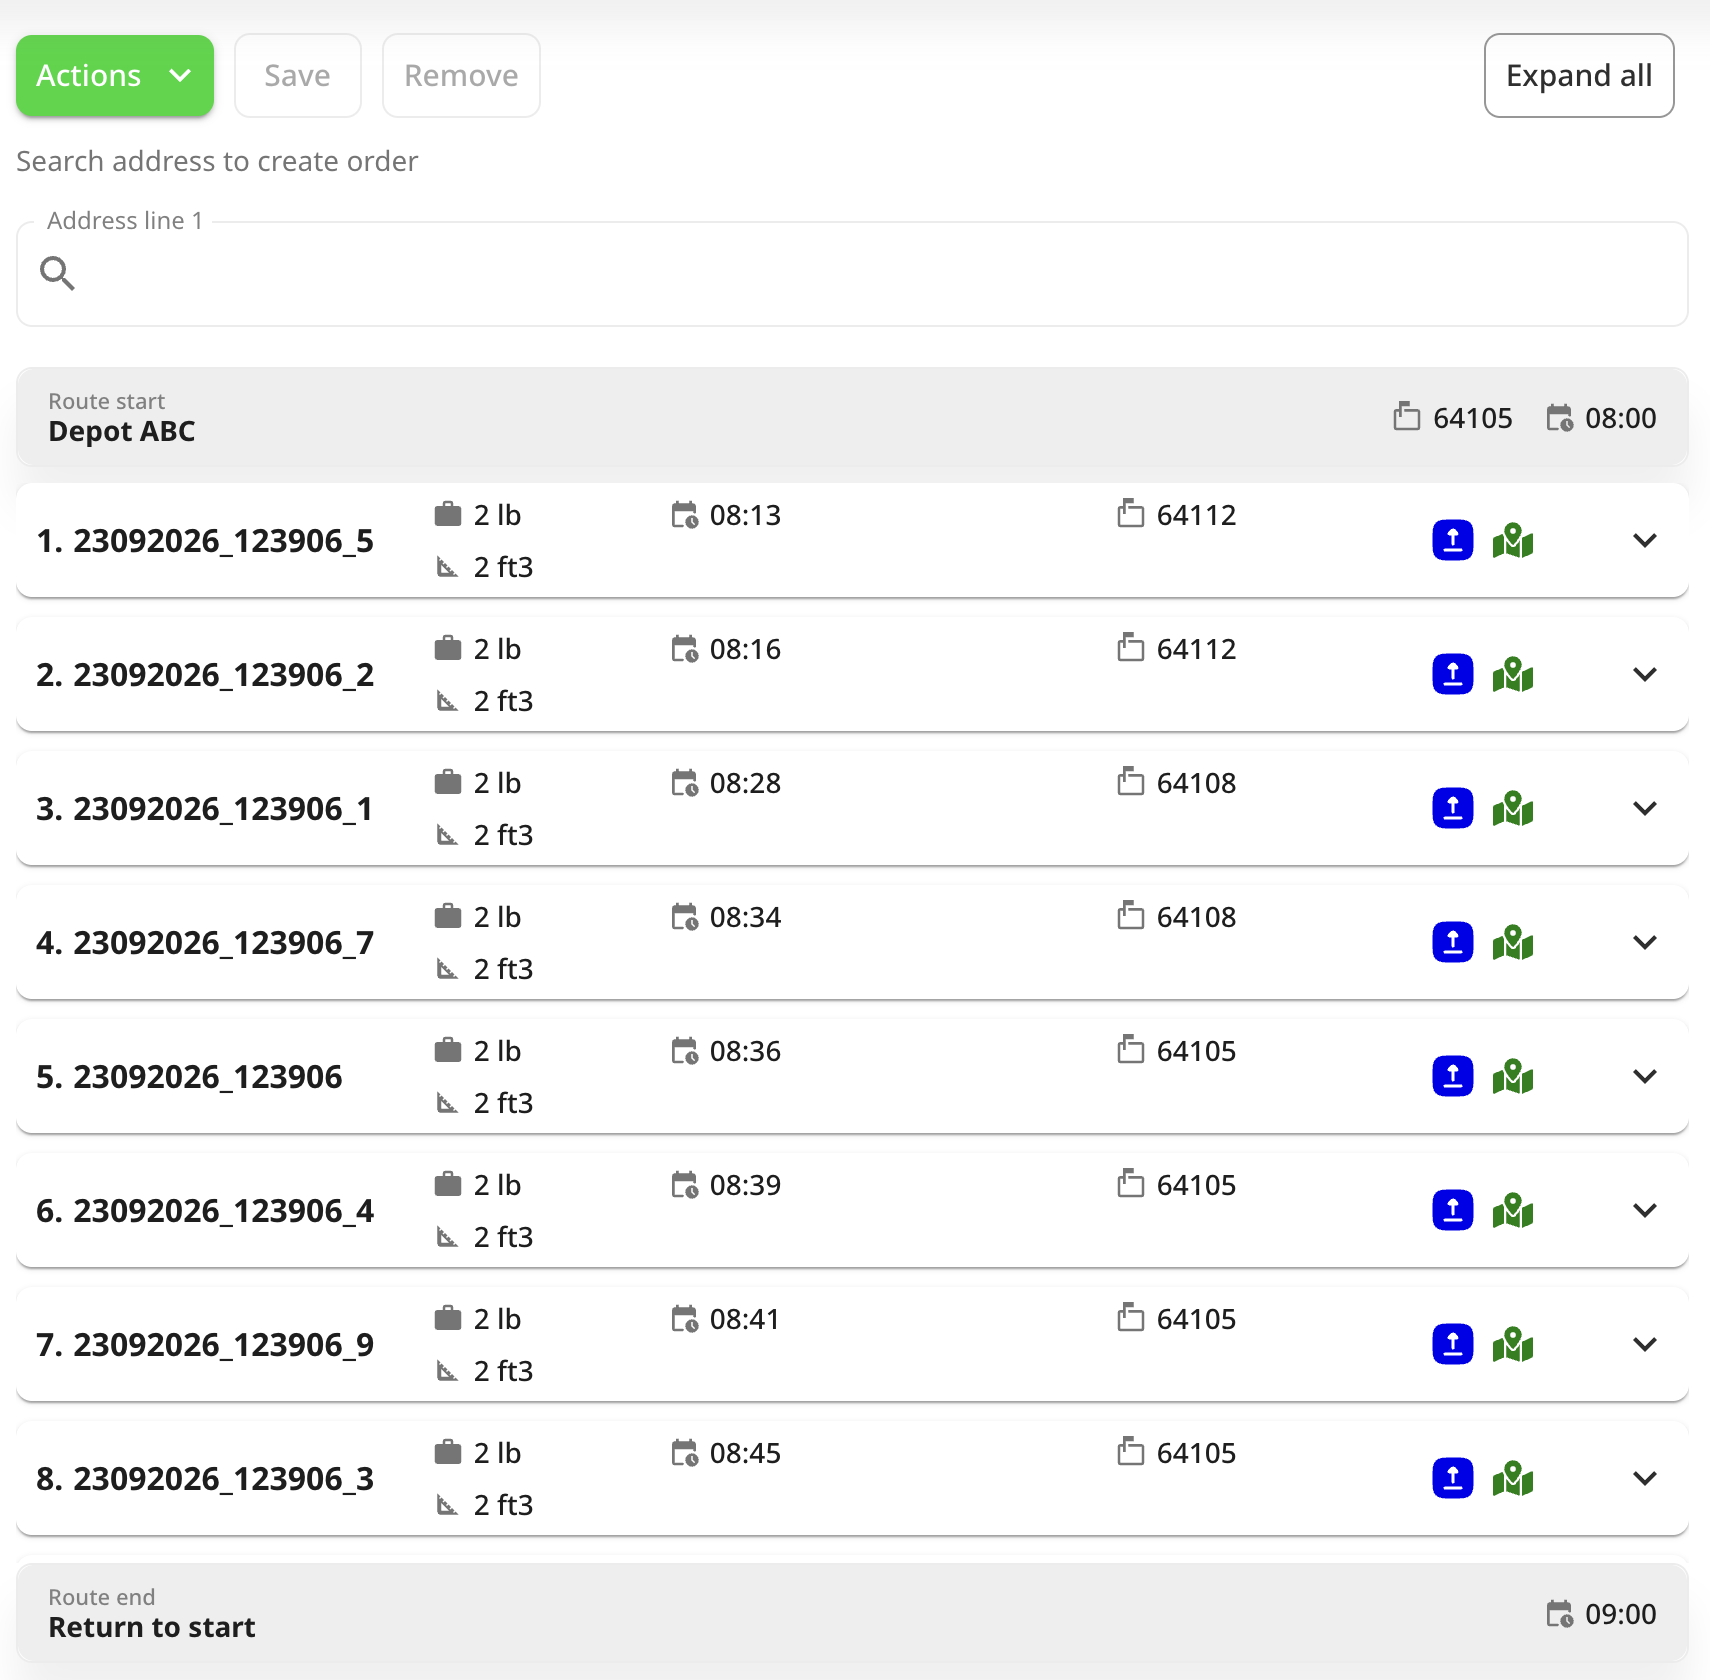
By default, the following properties are shown on a stop card::
- Stop position
- Order key (click to be redirected to Order details page)
- Order weight and volume
- Planned stop arrival time (affected by route calibration/optimization)
- Required from/to time slots
- Recipient postal code
- Order type - delivery (blue) or collection (orange)
- Recipient address geo-coding indicator - green (high accuracy), orange (low accuracy), red (failed)
- Delete icon - this will remove the order from the route, after you press
Save. The order will be moved to the No route card and be still visualised on Map view page. - Planning instructions (on large screens only)
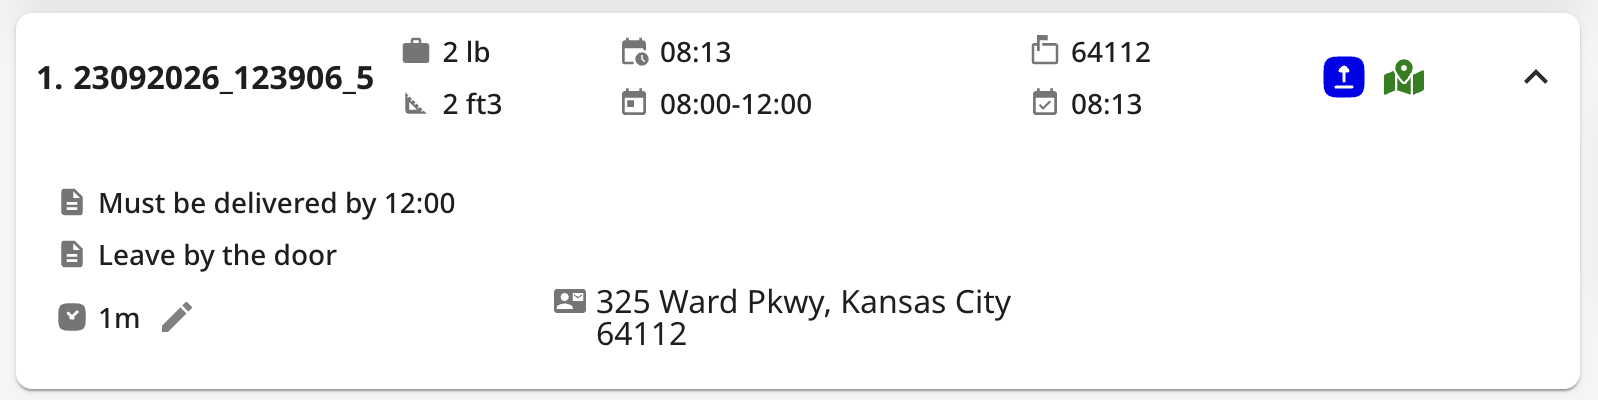
If you expand the card by pressing the down-arrow v on the right side of the card, you can additionally see:
- Recipient contact name
- Planning and delivery instructions
- Committed time
- Planned stop duration (editable via the pencil icon)
- Full recipient address
If there is insufficient horizontal space, the text field labels are omitted and only label icons remain.
You can customize the information displayed on the stop card in the collapsed and expanded view in Routes settings.

Modifying Routes
On each route card, you can make the same changes that are available on Route view page for a single route:
- edit route properties by clicking the route key to be redirected to route editing
- remove a route from Map view page by pressing the
Deleteicon on a route card - create or add orders, import from images or PDF files
- edit order properties by clicking the order key to be redirected to order editing
- remove orders from a route by pressing the
Deleteicon on an order card orRemovebutton (orders will be moved to the No route card and be still visualised on the Map view page to continue working with them, for example, moving to other routes or create a route for them) - re-order orders inside a route or between routes via
drag-and-drop - add driver breaks
- optimize a route with time windows
- optimize a route without time windows
- calibrate a route (without optimisation)
- update orders' committed ETAs
- move orders between routes
- create a route from stops selection on the map
- reverse stops
- view route on the interactive map
- export orders to synchronise the changes made in Geo2 to the other systems you have integrated via Geo2's API, such as your ERP or WMS.
To save changes to a route, press the Save button inside the route card. If you have provided vehicle dimensions in Vehicle settings (“Gross weight”, “Height”, “Width”, and “Length” fields) for the vehicle assigned to the route, it will be used for calibration/optimization with vehicle restrictions. The system will factor these dimensions into route building to generate the most efficient outcomes, for example, to avoid bridges with height restrictions, narrow roads unsuitable for wider vehicles, or areas with weight limits that could affect the selected route.
Learn more about route planning.
You can also drag-and-drop route cards to change their position on the page. For example, you may want to move a route to the top of the page, to be as close as possible to the map or make it a focus on the page for any other reason.
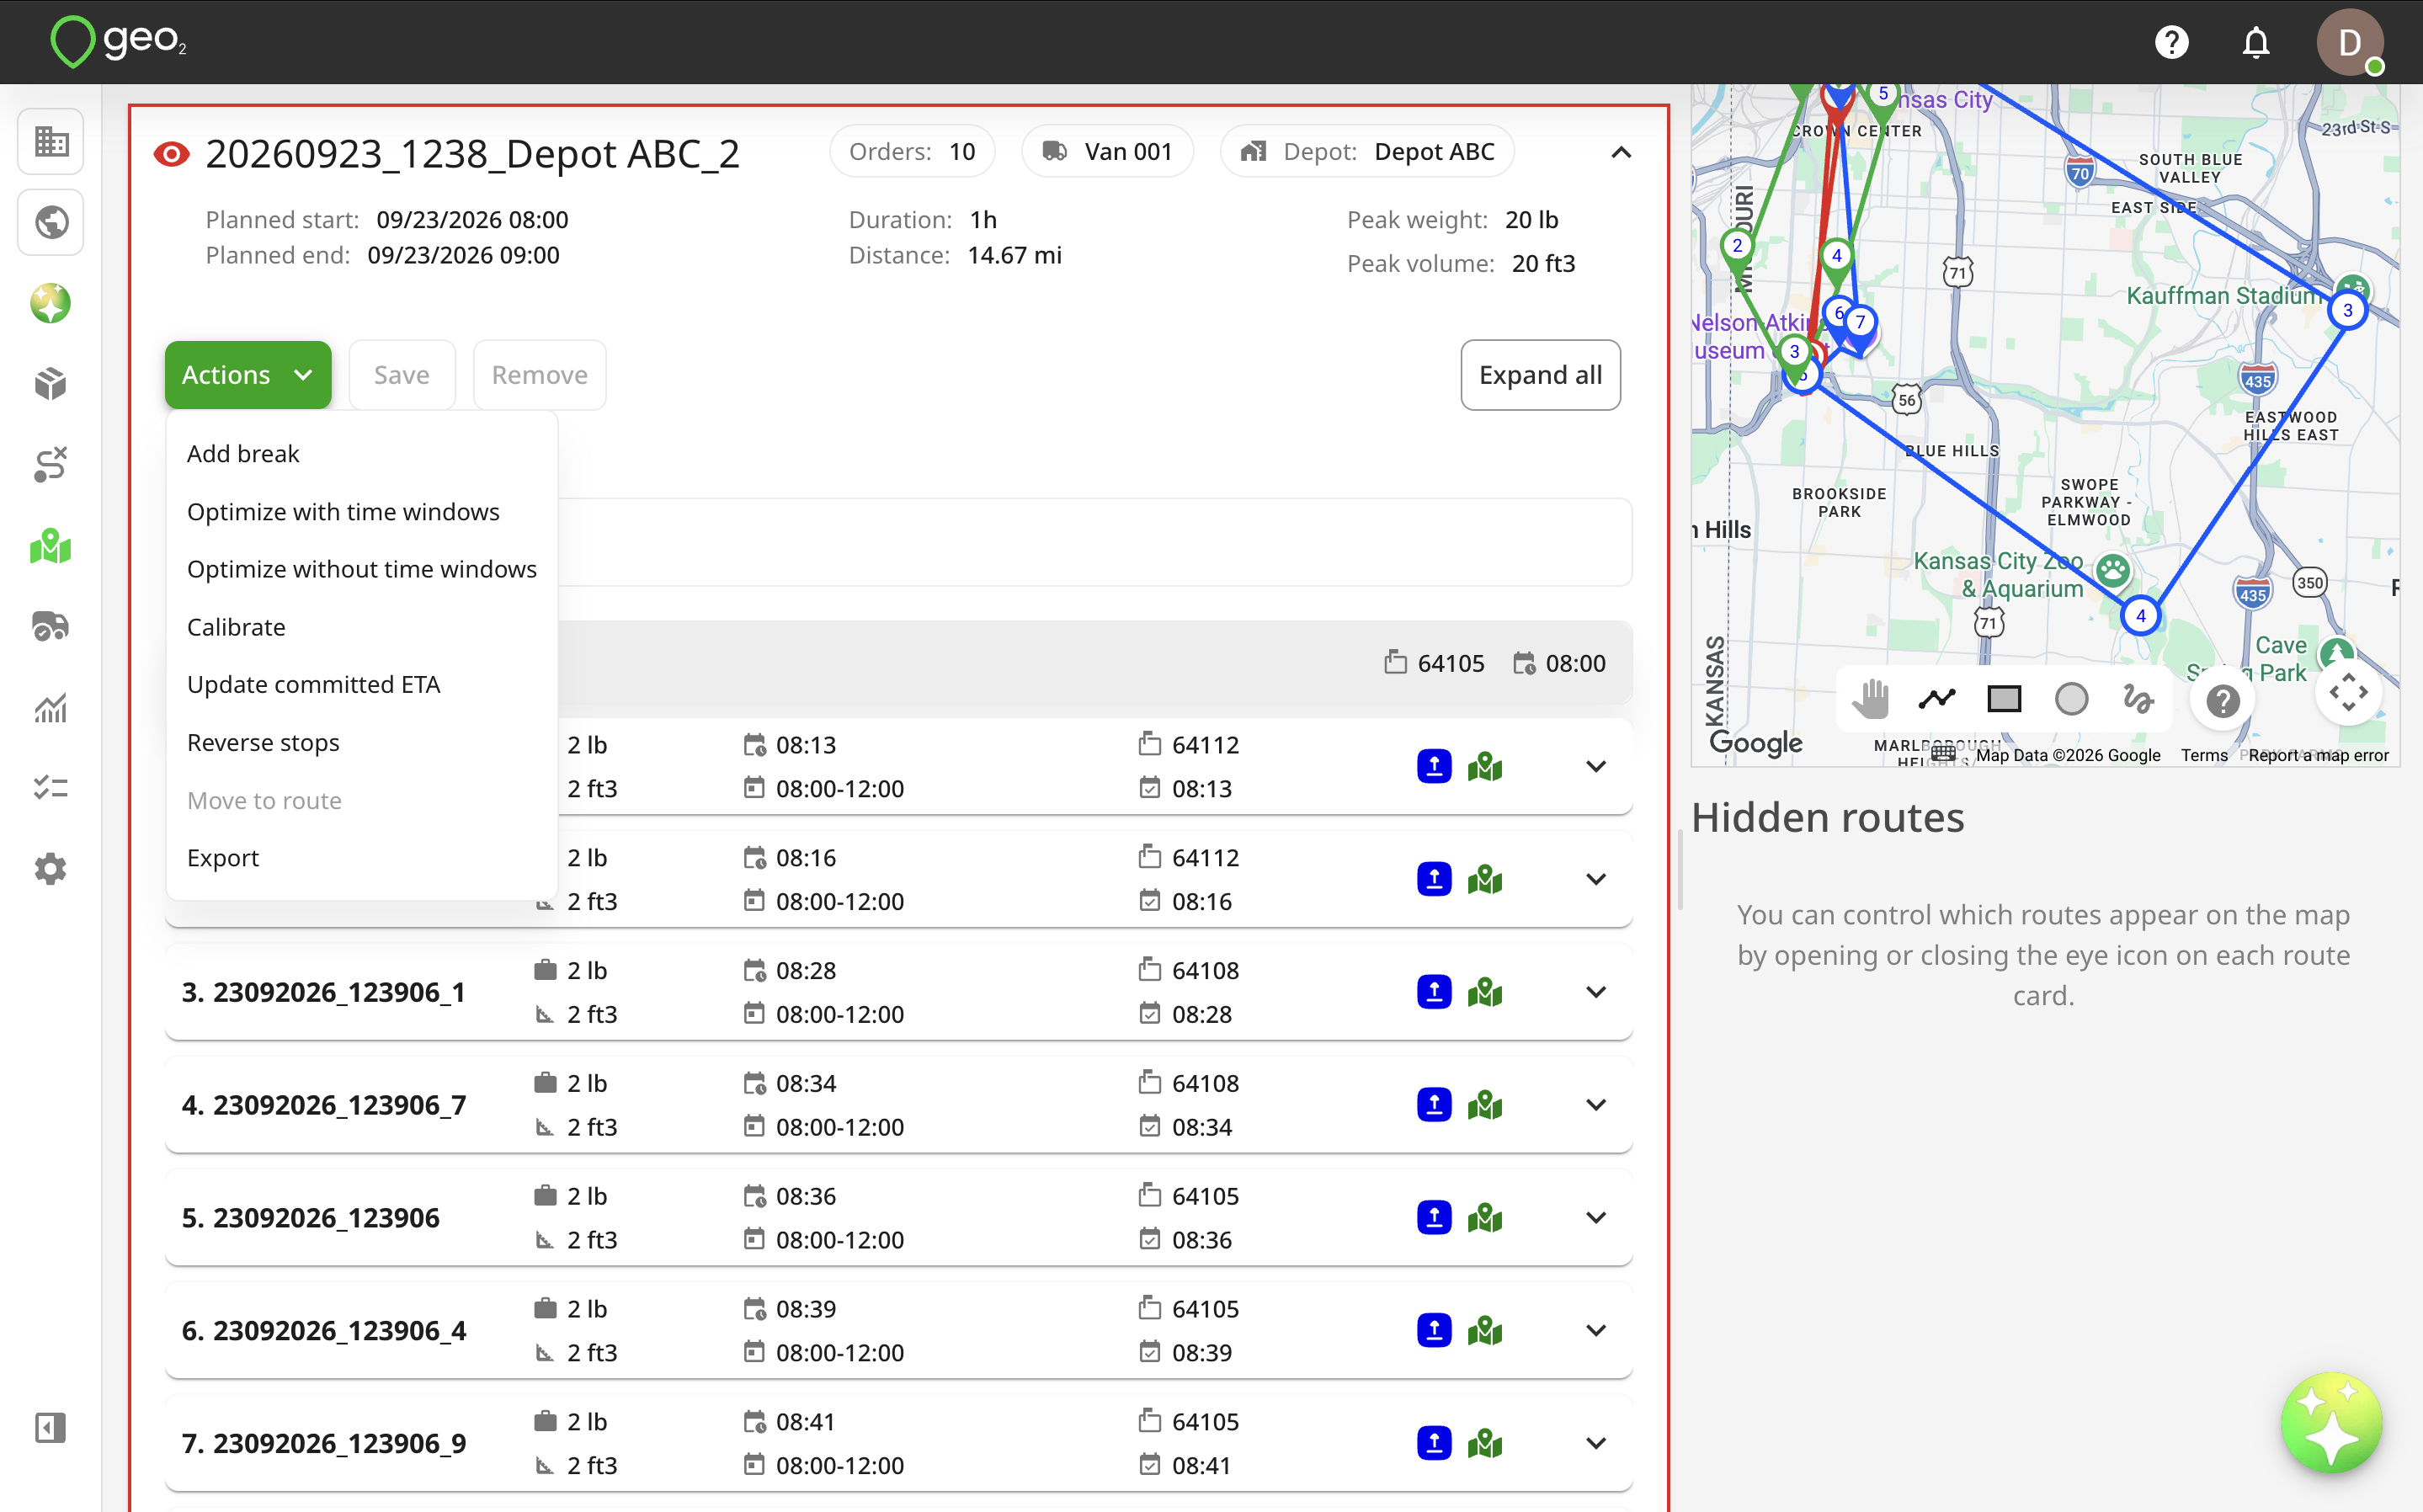
Map
Up to 40 routes can be shown on the map simultaneously with assigned route start/end points and stop locations. The colour used to show the route on the map is the same as the colour of the frame and selection checkbox in each visible route card.
The route between the stops is indicated with straight lines for simplicity but you can enable road view.
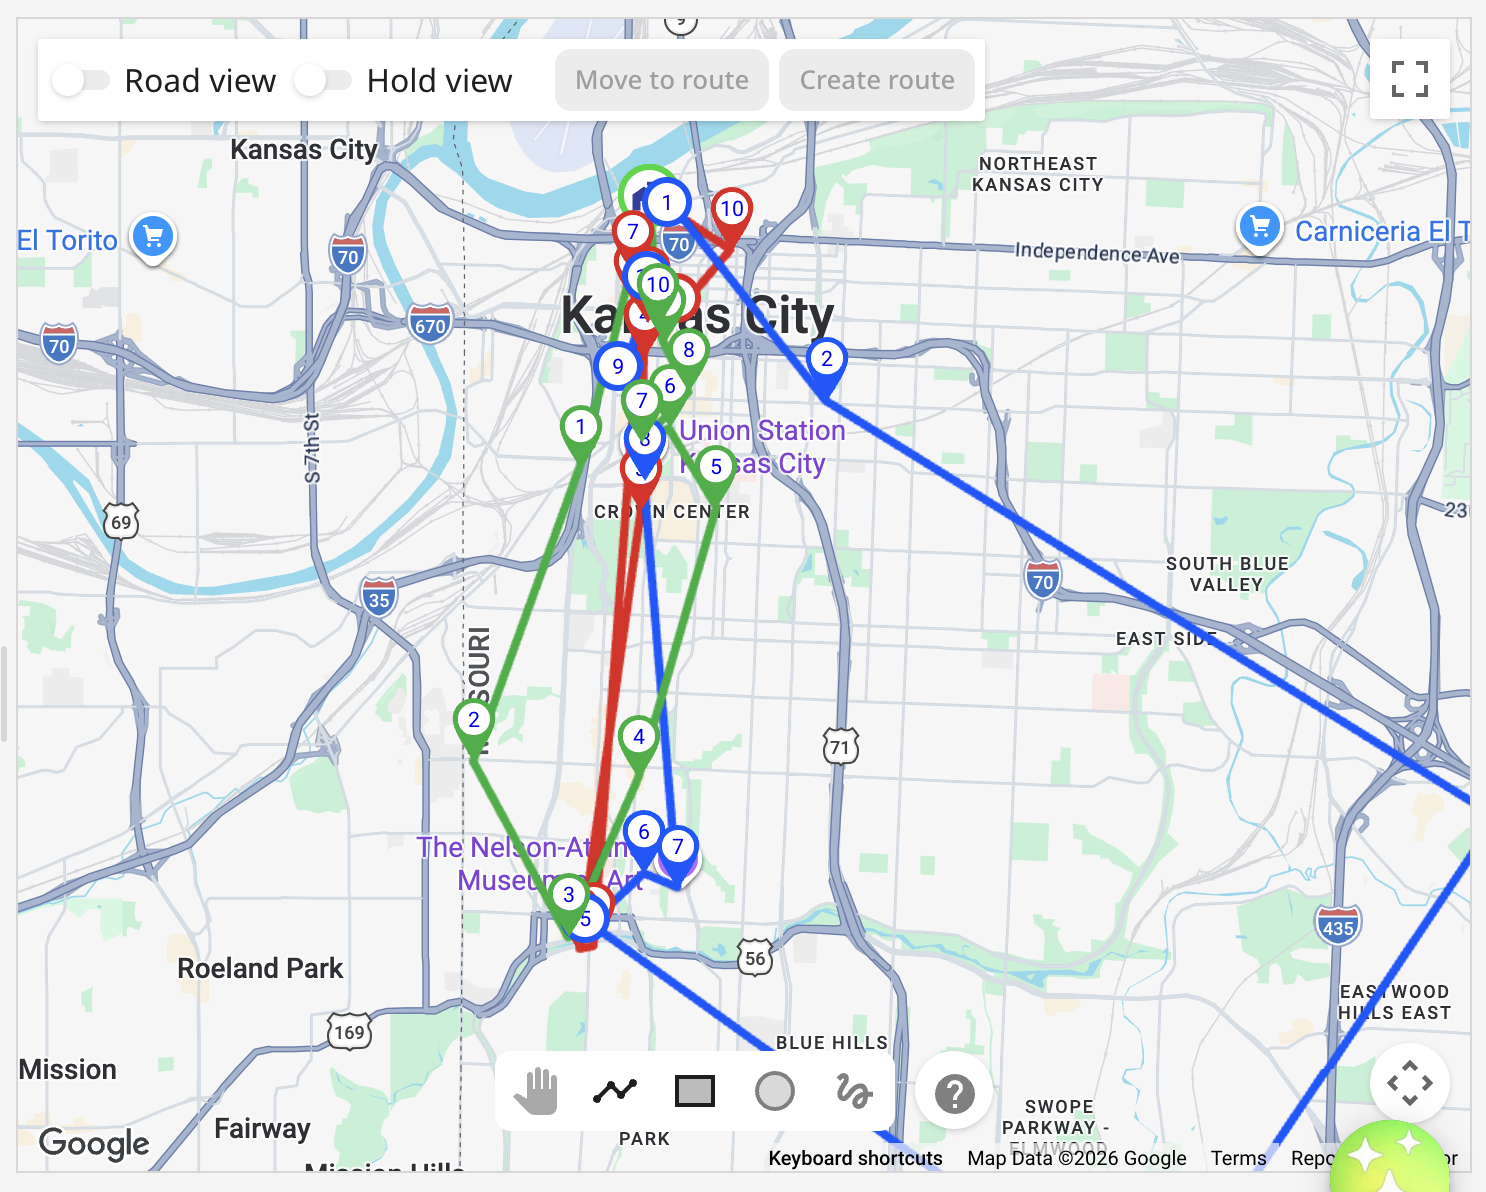
Further details of each stop are shown when you click the location marker.
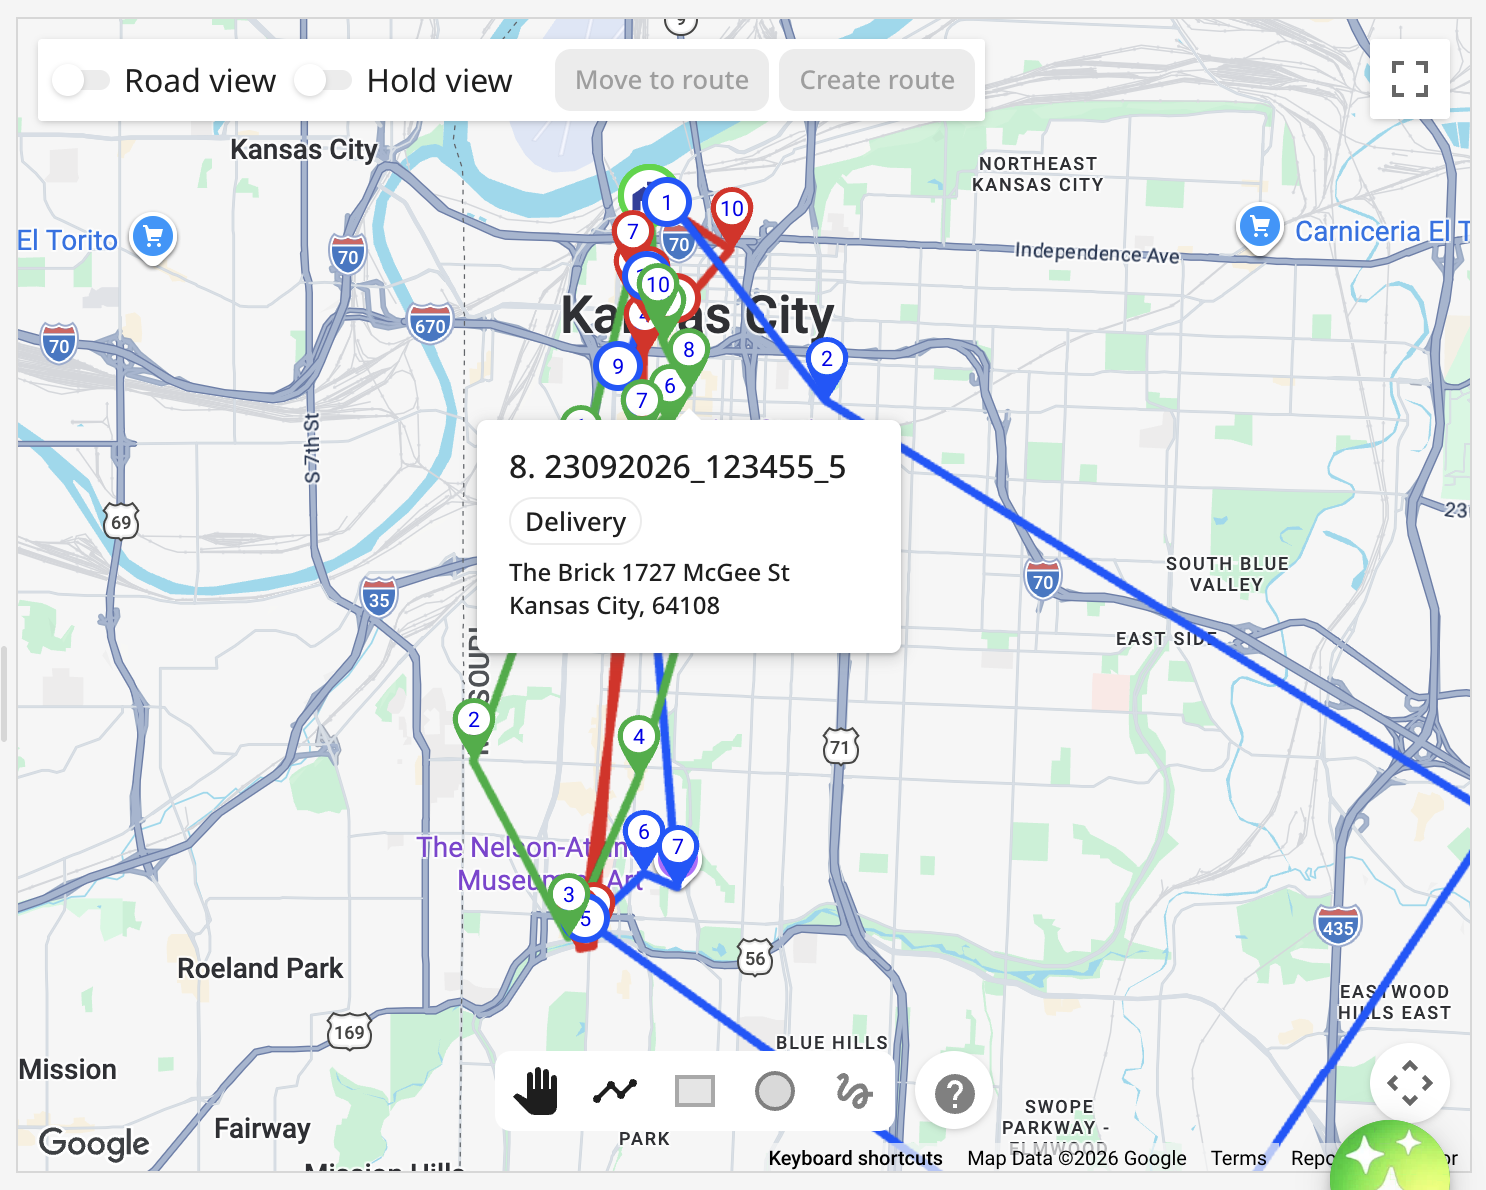
Road View Toggle
If you enable the Road view selector on the map, you will see a suggested route on the road network. The Duration takes into account projected traffic conditions.
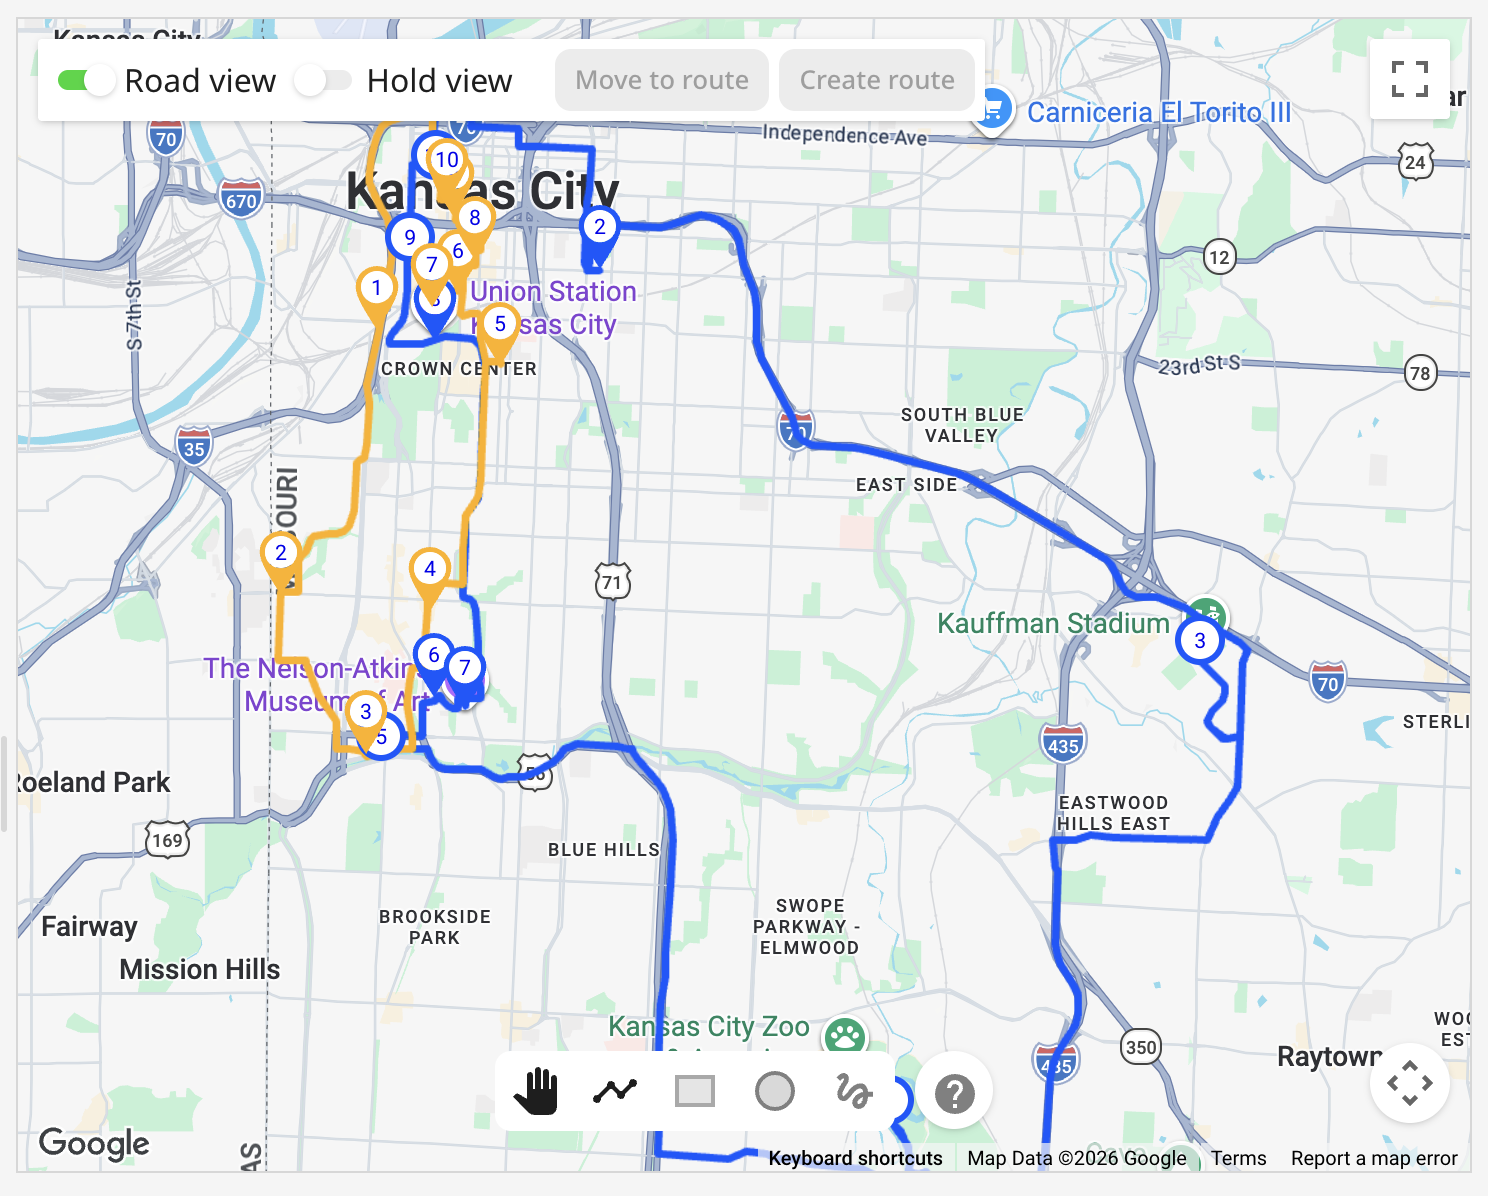
Hold View Toggle
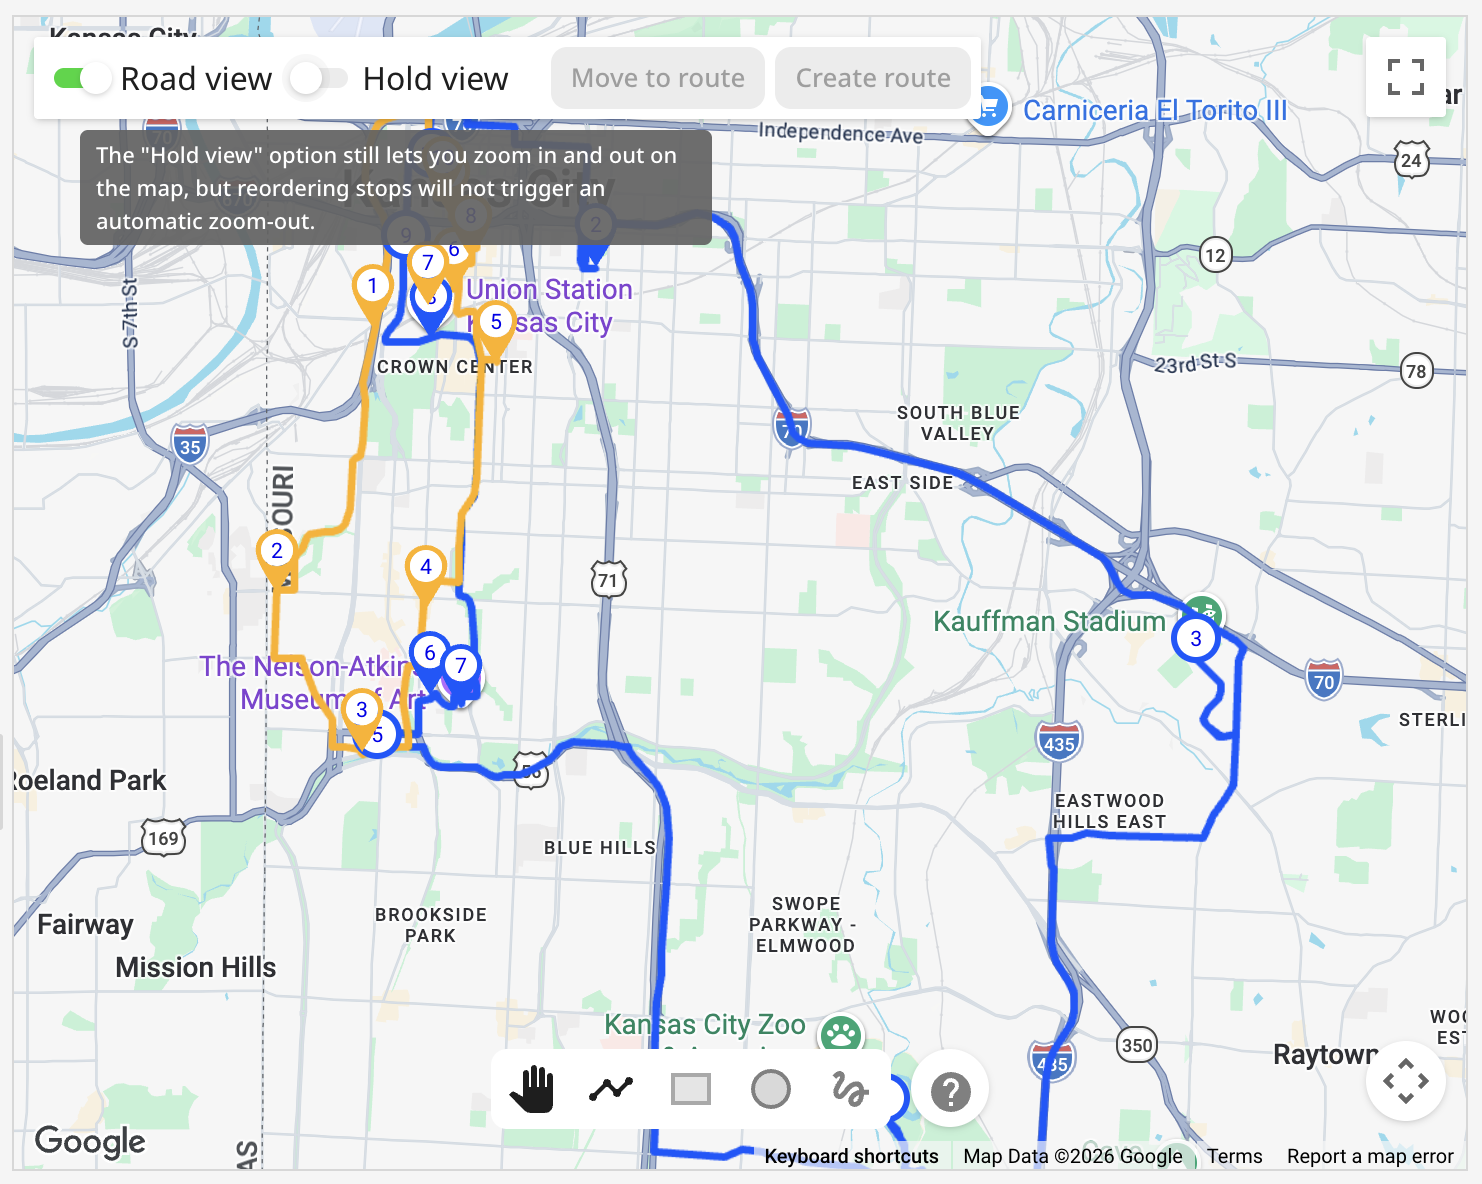
By default, the map zoom resets when you change the stop order. Press Hold view to hold the map zoom. This still lets you zoom in and out on the map but it will not be automatically zoomed out when you make some changes in the orders list.
Bulk Move Orders between Routes
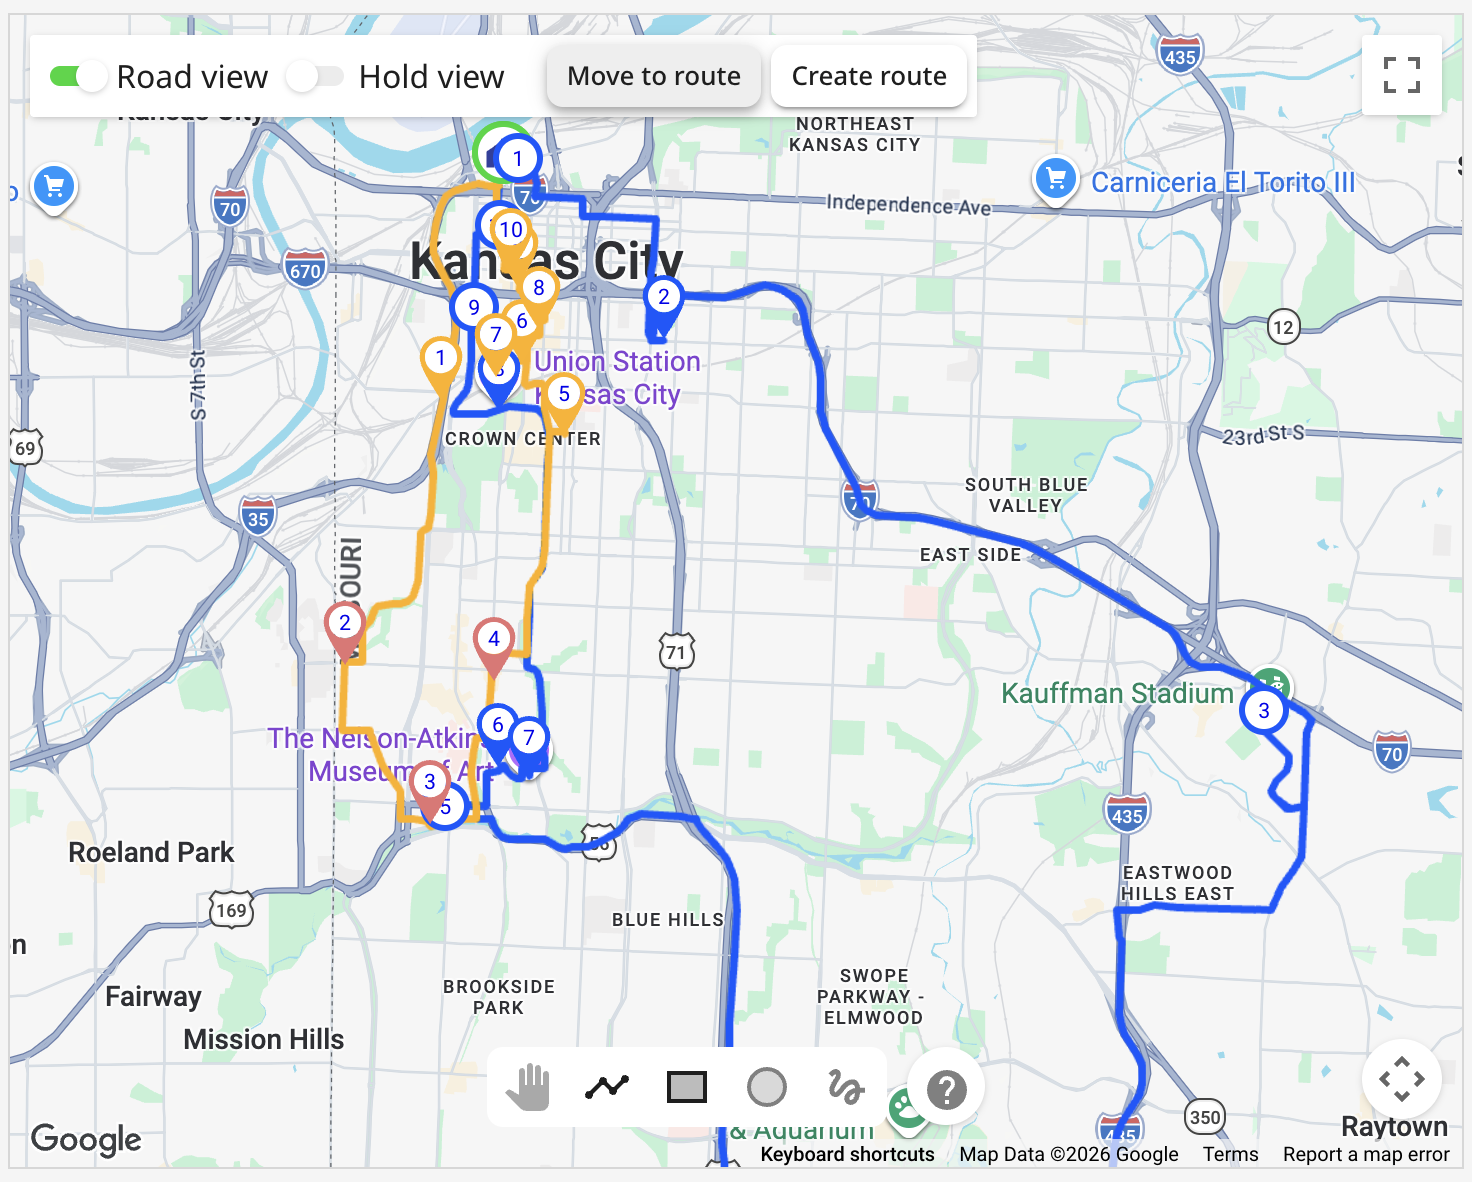
To move orders from one route to another, you can select stops on the map one-by-one using Ctrl/Command+click or by drawing figures using tools the bottom of the map - circle, shape or rectangle. Once stops are selected, they will be highlighted with a red colour.
Next, press the Move to route button on the map. You can select and move stops from multiple routes visible on the map. If a route starts or ends at a depot, orders with depots must match: the delivery depot must align with the start, and the collection depot with the end. Orders without assigned depots can be added to any route, and if a route does not use a depot as its start or end point, any order, with or without a depot, can be added.
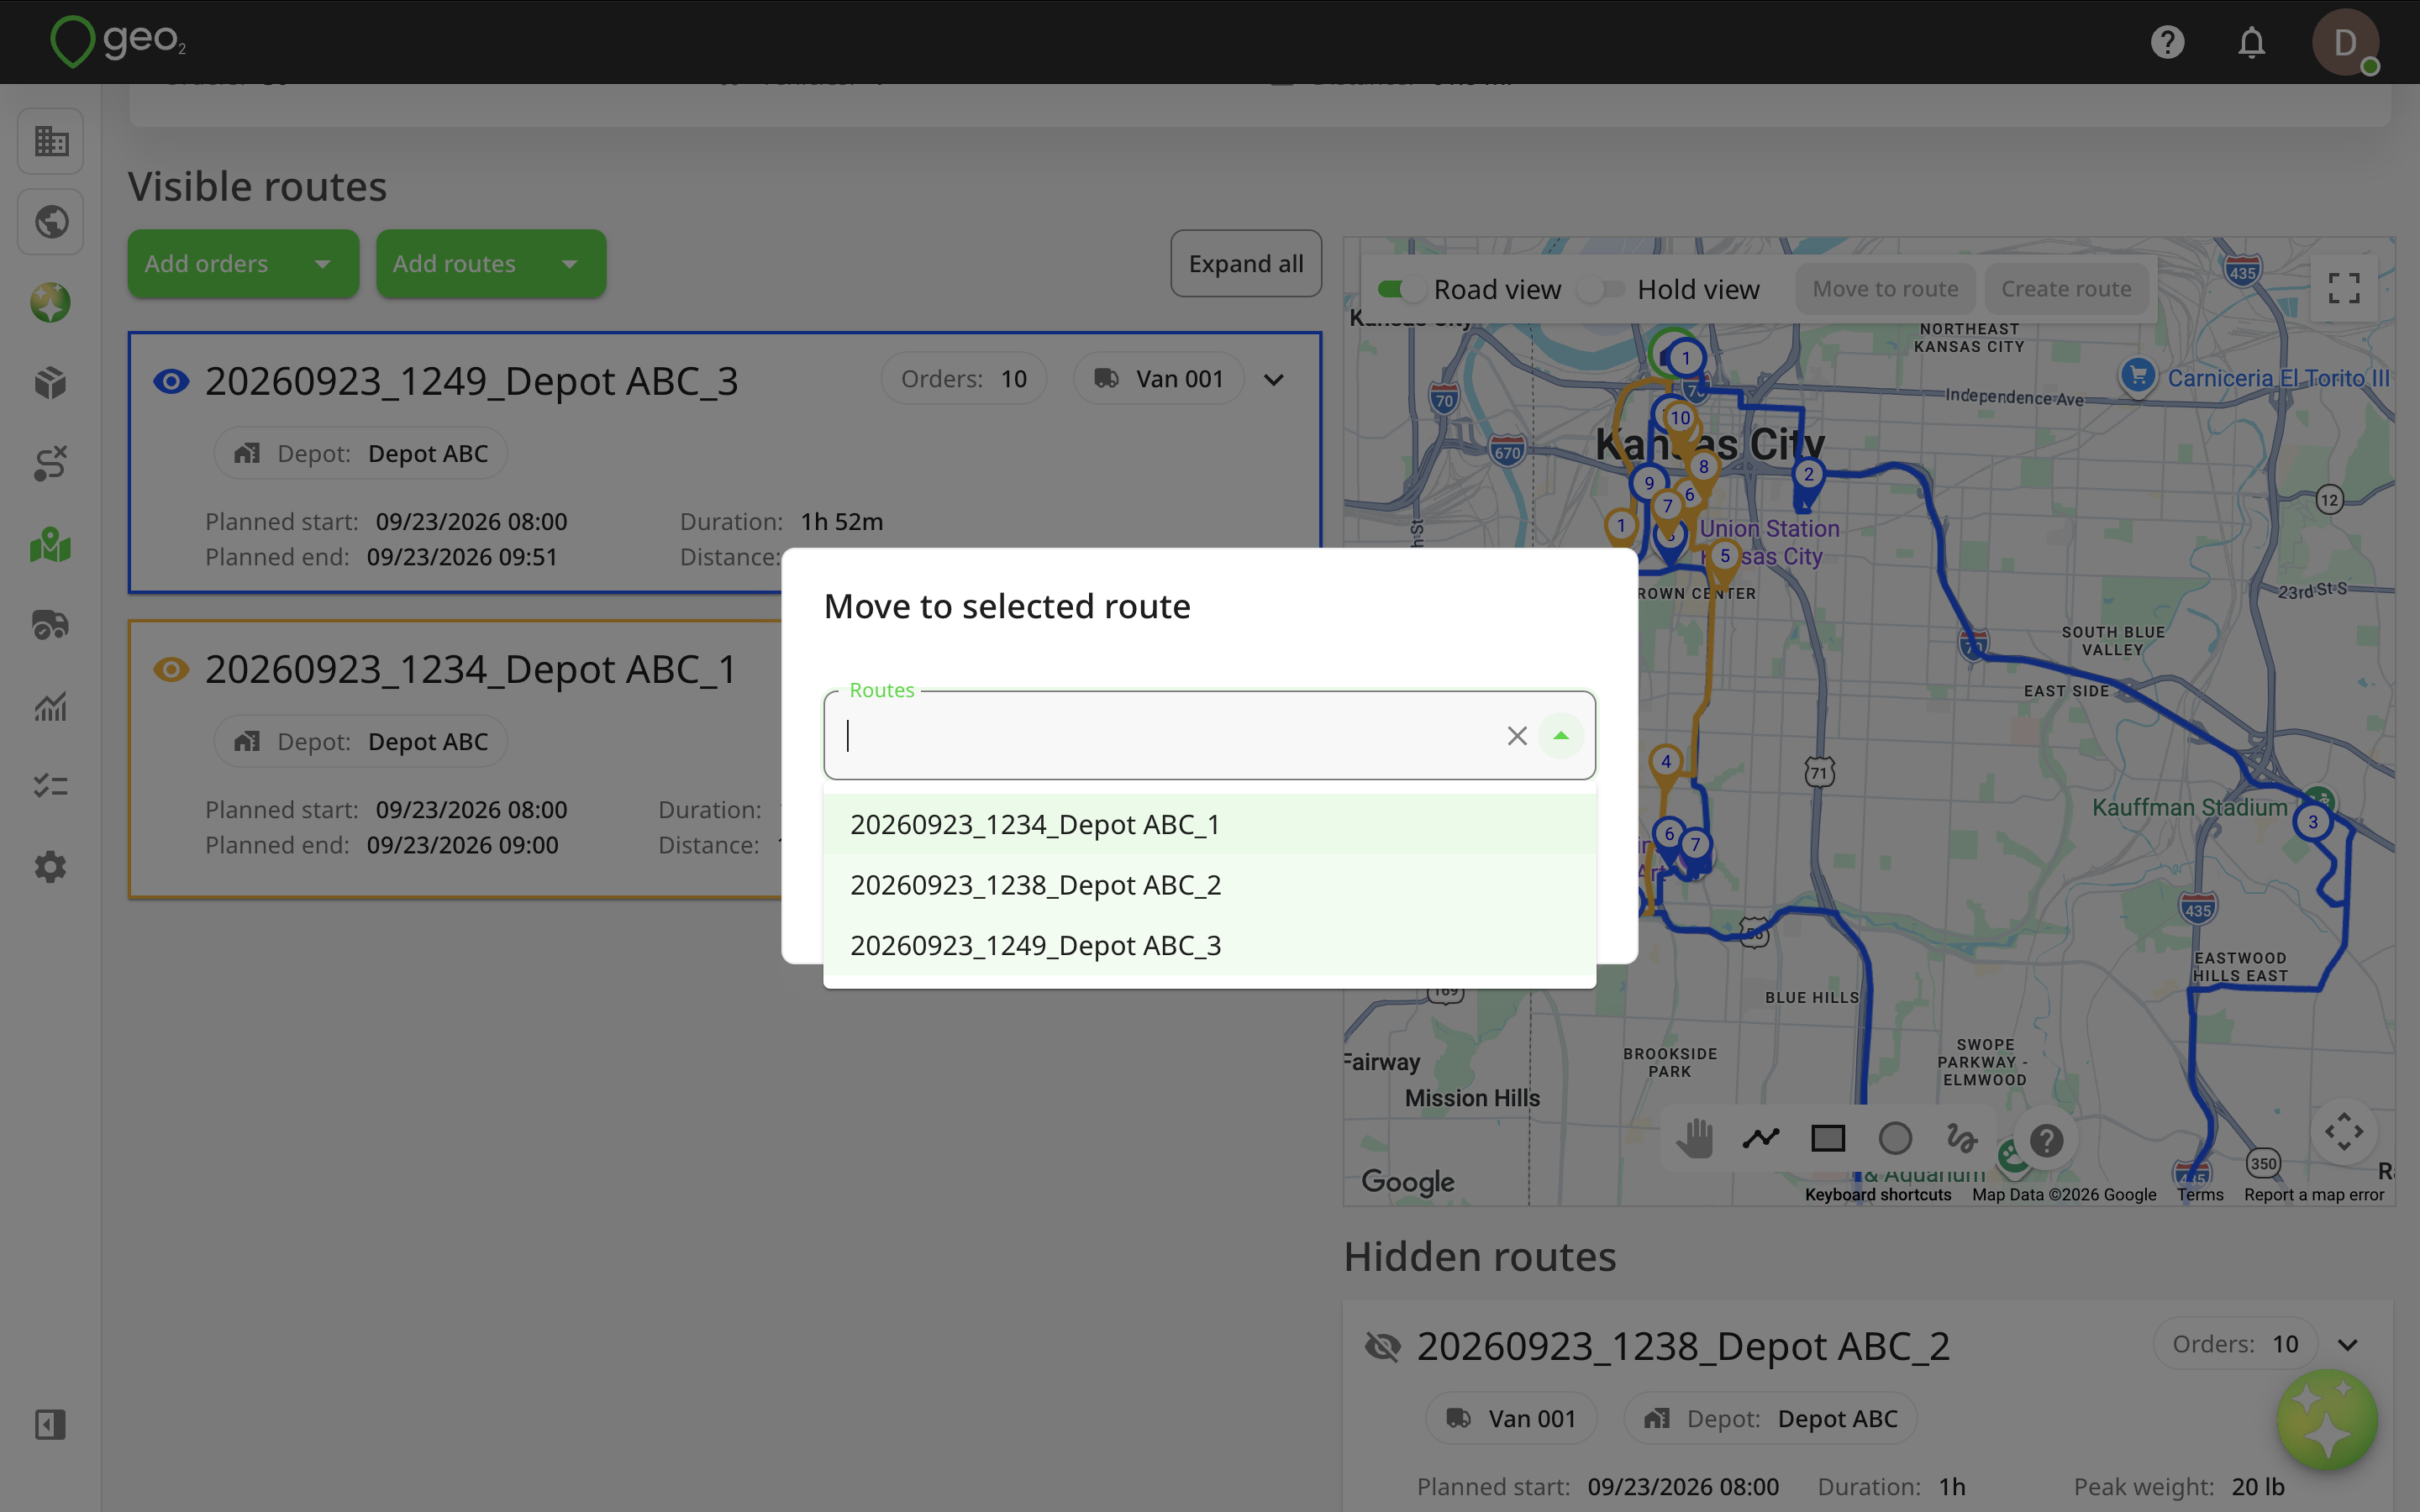
On the Move to selected route pop-up, choose the route you want the orders to move to (destination route). We do not apply automatic calibration to the routes - calibrate it manually once you have finished arranging its stop order.
Route Creation for Selected Stops
You can select stops directly on the map one-by-one using Ctrl/Command+click or by drawing a figure using tools at the bottom of the map — regardless of whether they are assigned to existing route — and click the Create route button.
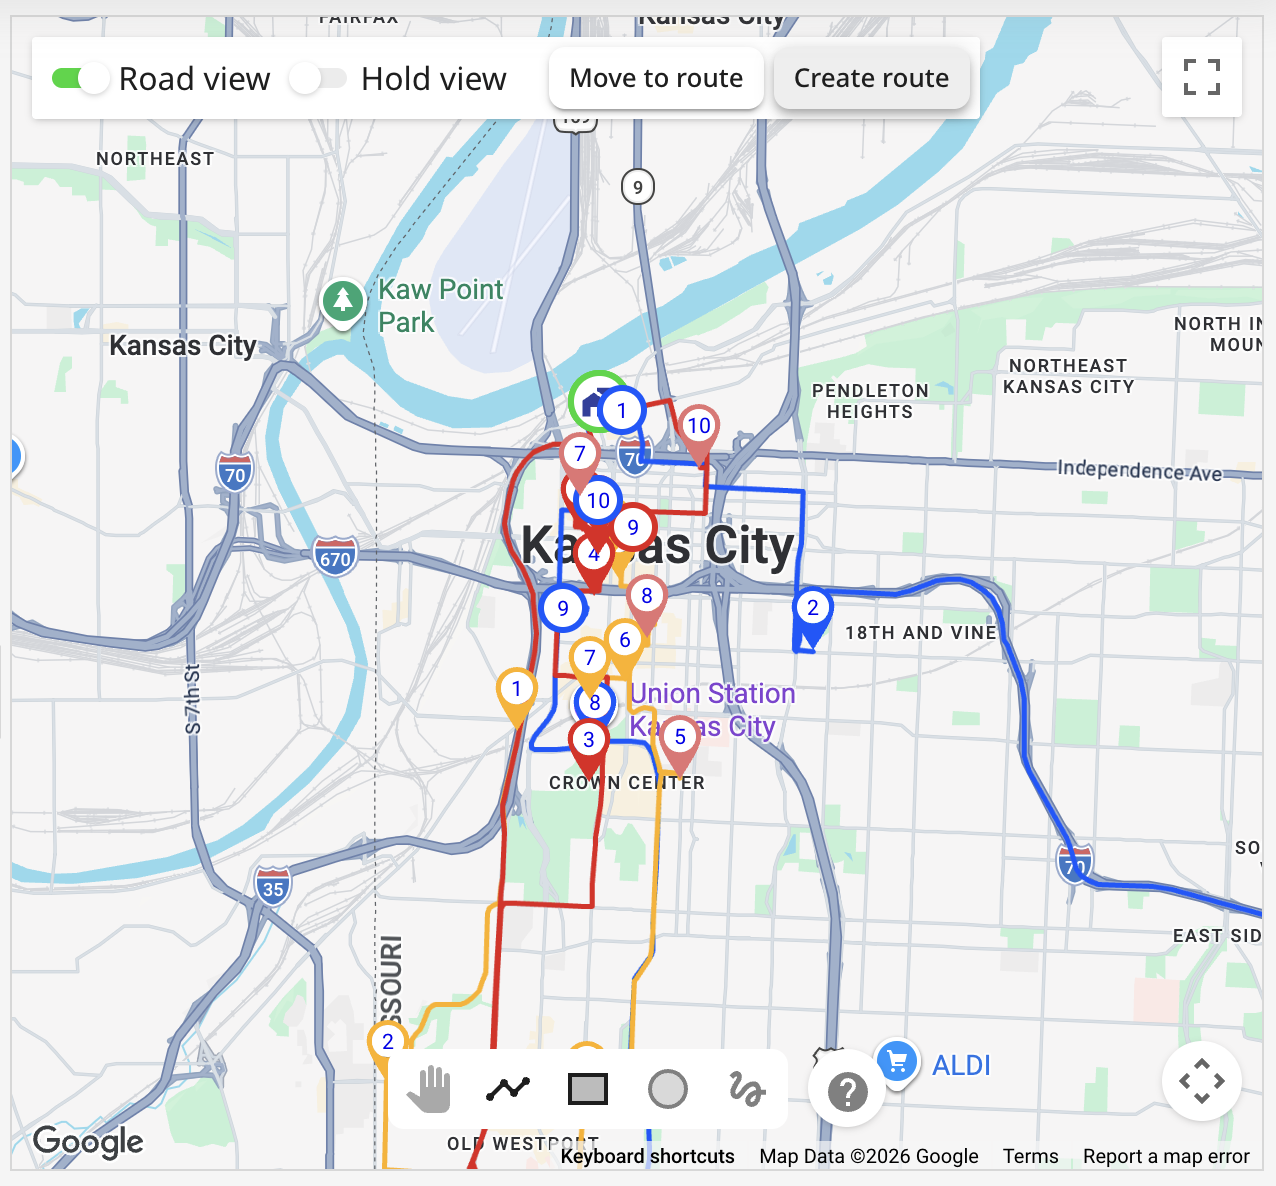
The Create route dialog will be displayed where you provide the following information:
| Property | Description |
|---|---|
| Key | Your unique identifier for the route in this environment. It can be a route number, for example, 1, 2, 3, etc. By default, the route key is generated automatically based on the parameters configured in Settings → Routes → Route key autogeneration. Current date/time, depot, and trip are selected by default. |
| Trip | A number you can use to indicate, for example, the order of routes for the same vehicle on the day, with the first route of the day being 1, a subsequent one being 2, etc. |
| Status | Planning - actively being planned. Planned - planning is completed, but route has not yet been released to a driver. Released - released to a driver, so that they can work with it in the mobile app. Started - indicates the route has left the start point. Completed - all work on the route has been completed; for example, the vehicle has returned to the end point. |
| Driver | User responsible for the route. Once released, the assigned user sees the route in the mobile app. A driver has permission to start/complete the route. Once the route is started and location tracking enabled, the driver’s location will be displayed on Route view and on the Started Route Driver Position on Dashboard page, as well as on the recorded vehicle checks. The driver’s location can also be optionally displayed on Public tracking. However, for POD's, the geolocation of the user who records it will be captured (either the driver or participant). If you use Vehicle categories functionality, the system can match the user’s and vehicle’s categories. Users without categories can only be assigned to vehicles without categories. Vehicles without categories can be assigned to any user. Assigning categories to users and vehicles is optional. |
| Route start | If you set up the default depot in Depots settings, it will be selected by default as a route start but it can be changed. By pressing the Route start field, you can also select other depots from your environment, first stop location (first order recipient’s address), or search address. If you select to search for an address, the Address line 1 field will be displayed below. To enter the address, you can start typing it into Address line 1 and selecting it from the drop-down which appears. If no suitable match is found, press the Expand address form button and continue entering the address in the relevant address fields manually. |
| Route end | By default, the Return to start option is selected for a route end but it can be changed. By pressing the Route start field, you can also select depots from your environment, last stop location (last order recipient’s address), or search address. If you select to search for an address, the Address line 1 field will be displayed below. To enter the address, you can start typing it into Address line 1 and selecting it from the drop-down which appears. If no suitable match is found, press the Expand address form button and continue entering the address in the relevant address fields manually. |
| Vehicle | Vehicle assigned to the route. If you use Vehicle categories functionality, the system can match the user’s and vehicle’s categories. Users without categories can only be assigned to vehicles without categories. Vehicles without categories can be assigned to any user. Assigning categories to users and vehicles is optional. Vehicle dimensions specified in Vehicle settings (“Gross weight”, “Height”, “Width”, and “Length” fields) can be used for route calibration/optimization with vehicle restrictions. The system will factor these dimensions into route building to generate the most efficient outcomes, for example, to avoid bridges with height restrictions, narrow roads unsuitable for wider vehicles, or areas with weight limits that could affect the selected route. |
| Area | Area tag. You can set up the default user and vehicle for every area. When the area value is selected, default values from the area will propagate to the User and Vehicle fields. |
| Planned start | Expected dispatch date/time of the route from the start point. The start time will come from Routes settings. |
| Vehicle check on route start | Activate vehicle check in the mobile app when the route is being started. |
| Vehicle check on route completion | Activate vehicle check in the mobile app when the route is being completed. |
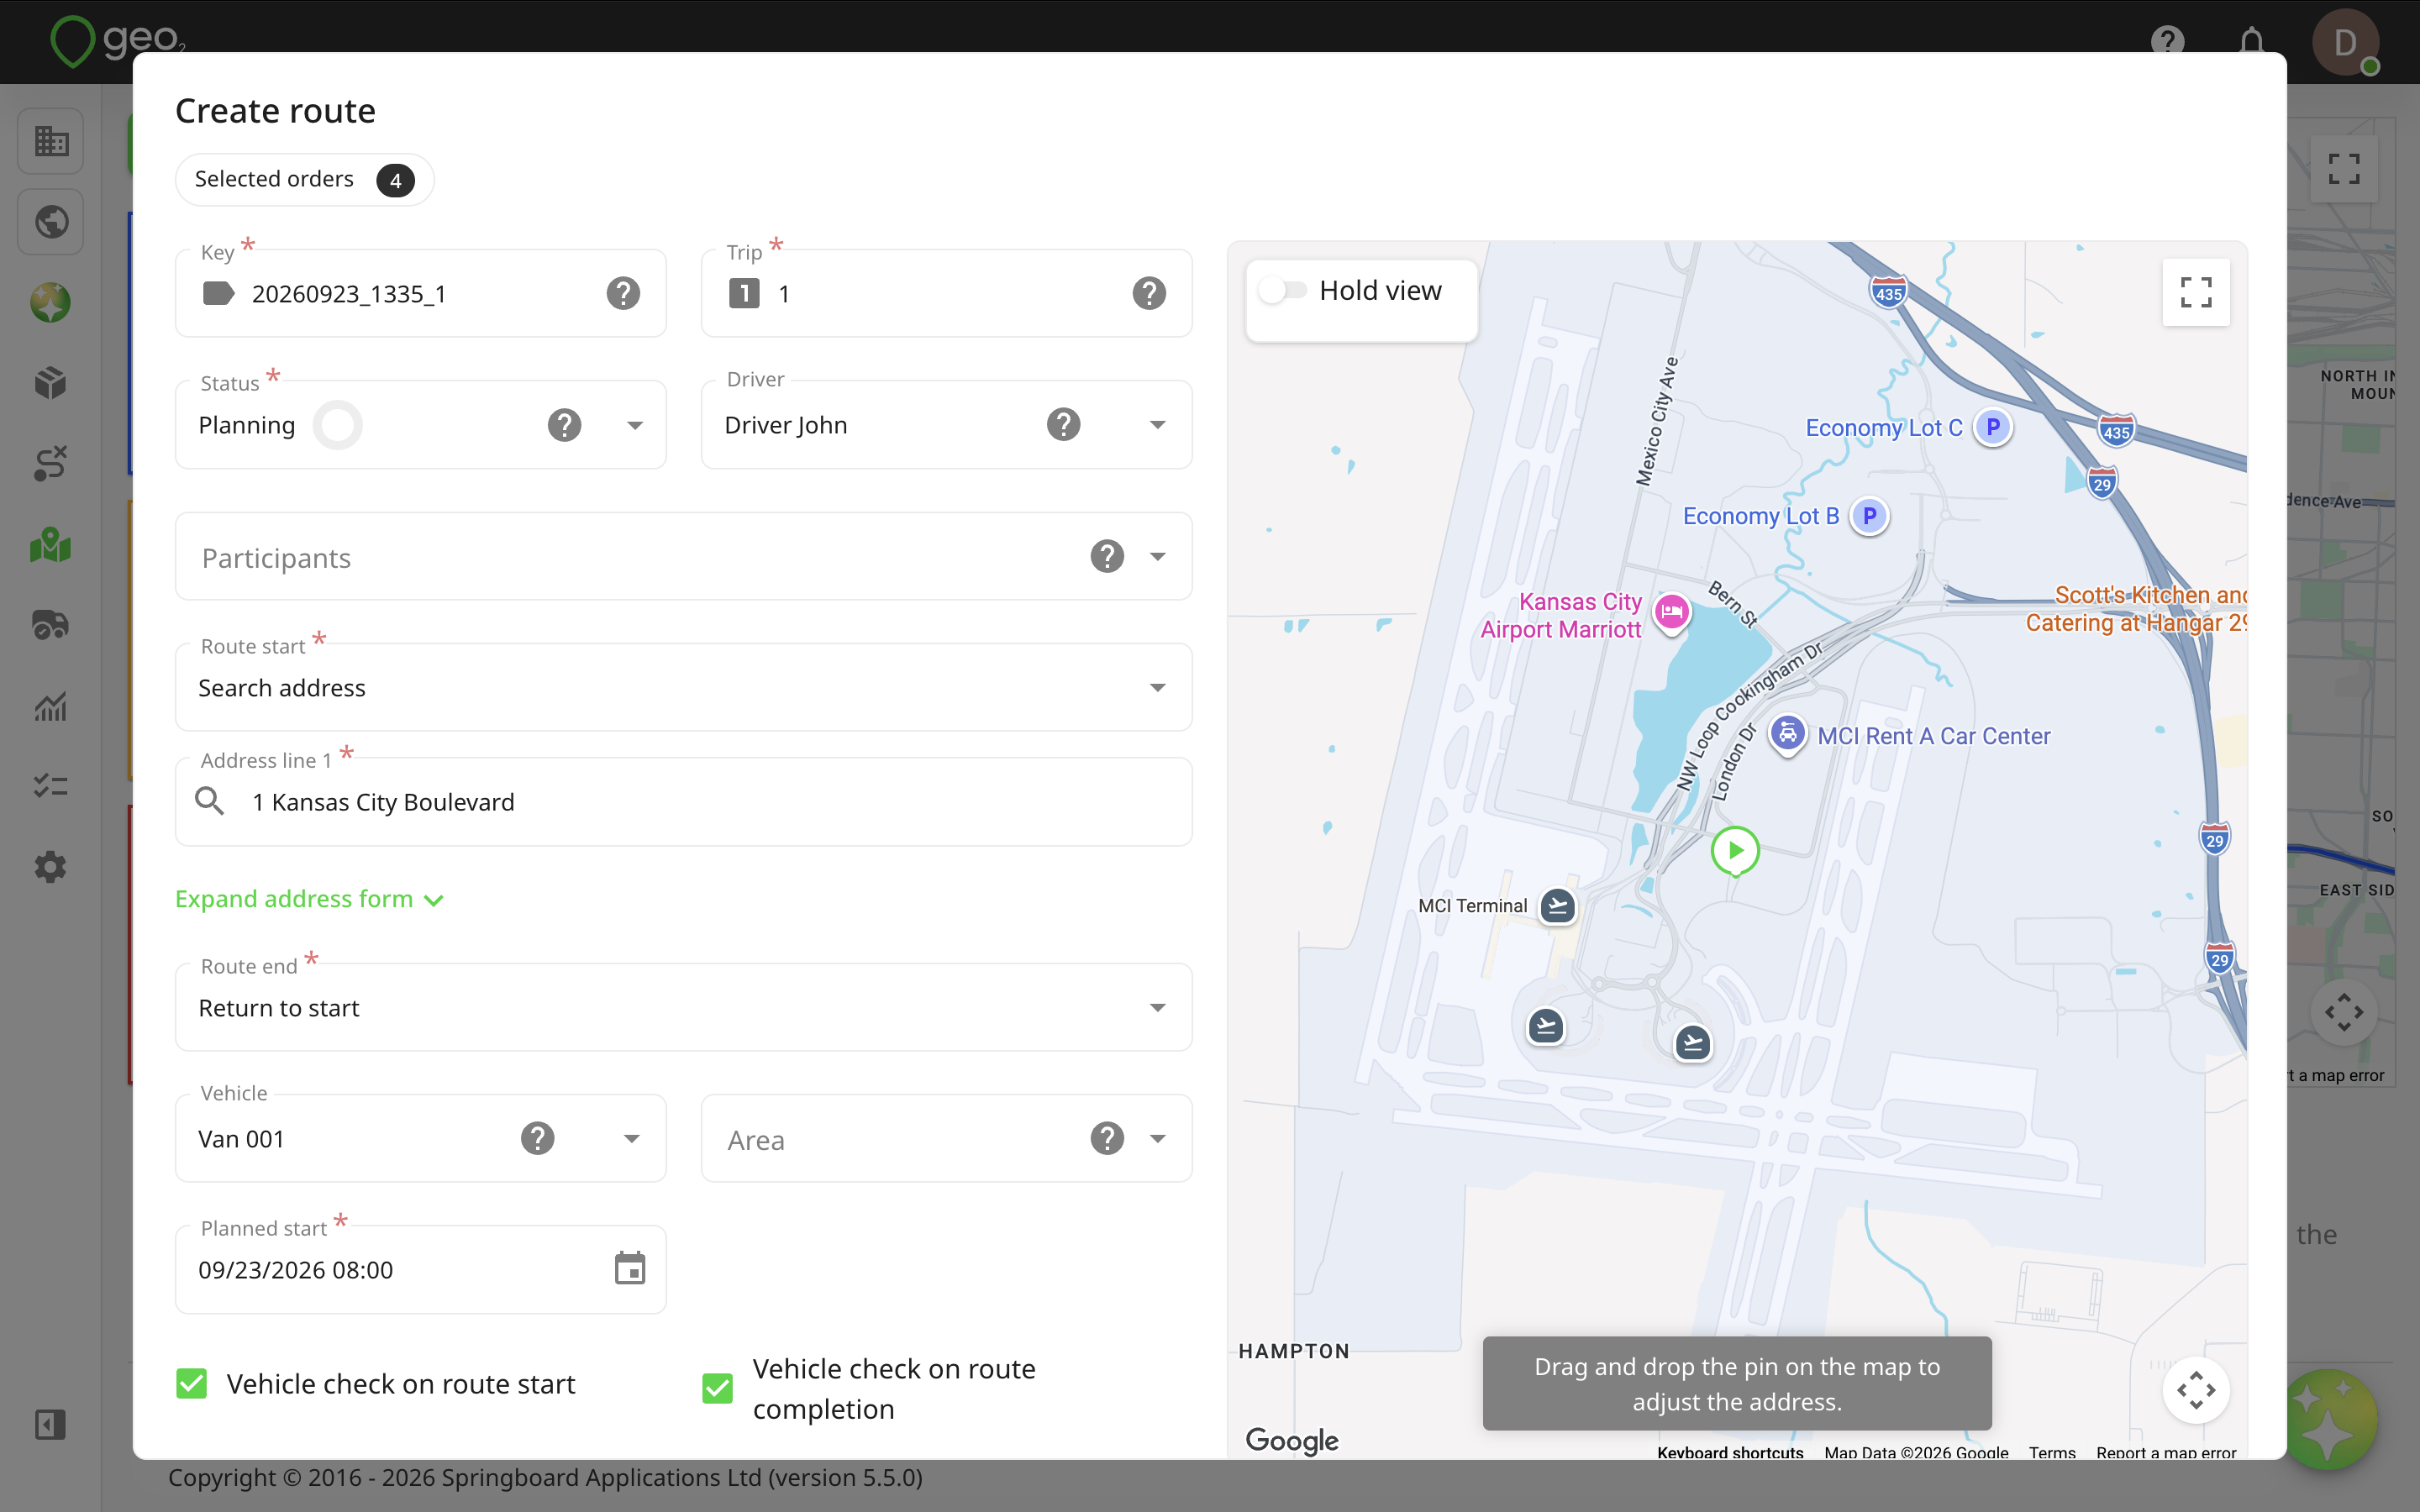
By pressing the Create button, if you selected orders from existing routes, you will be asked to confirm if you want to move them to a newly created route. If a route starts or ends at a depot, orders with depots must match: the delivery depot must align with the start, and the collection depot with the end. Orders without assigned depots can be added to any route, and if a route does not use a depot as its start or end point, any order, with or without a depot, can be added. Once confirmed, a new route will be created and added to the page either to the bottom of the Visible routes column or the Hidden column, if the number of routes in the Visible routes columns already exceeds 40.
Creating Routes
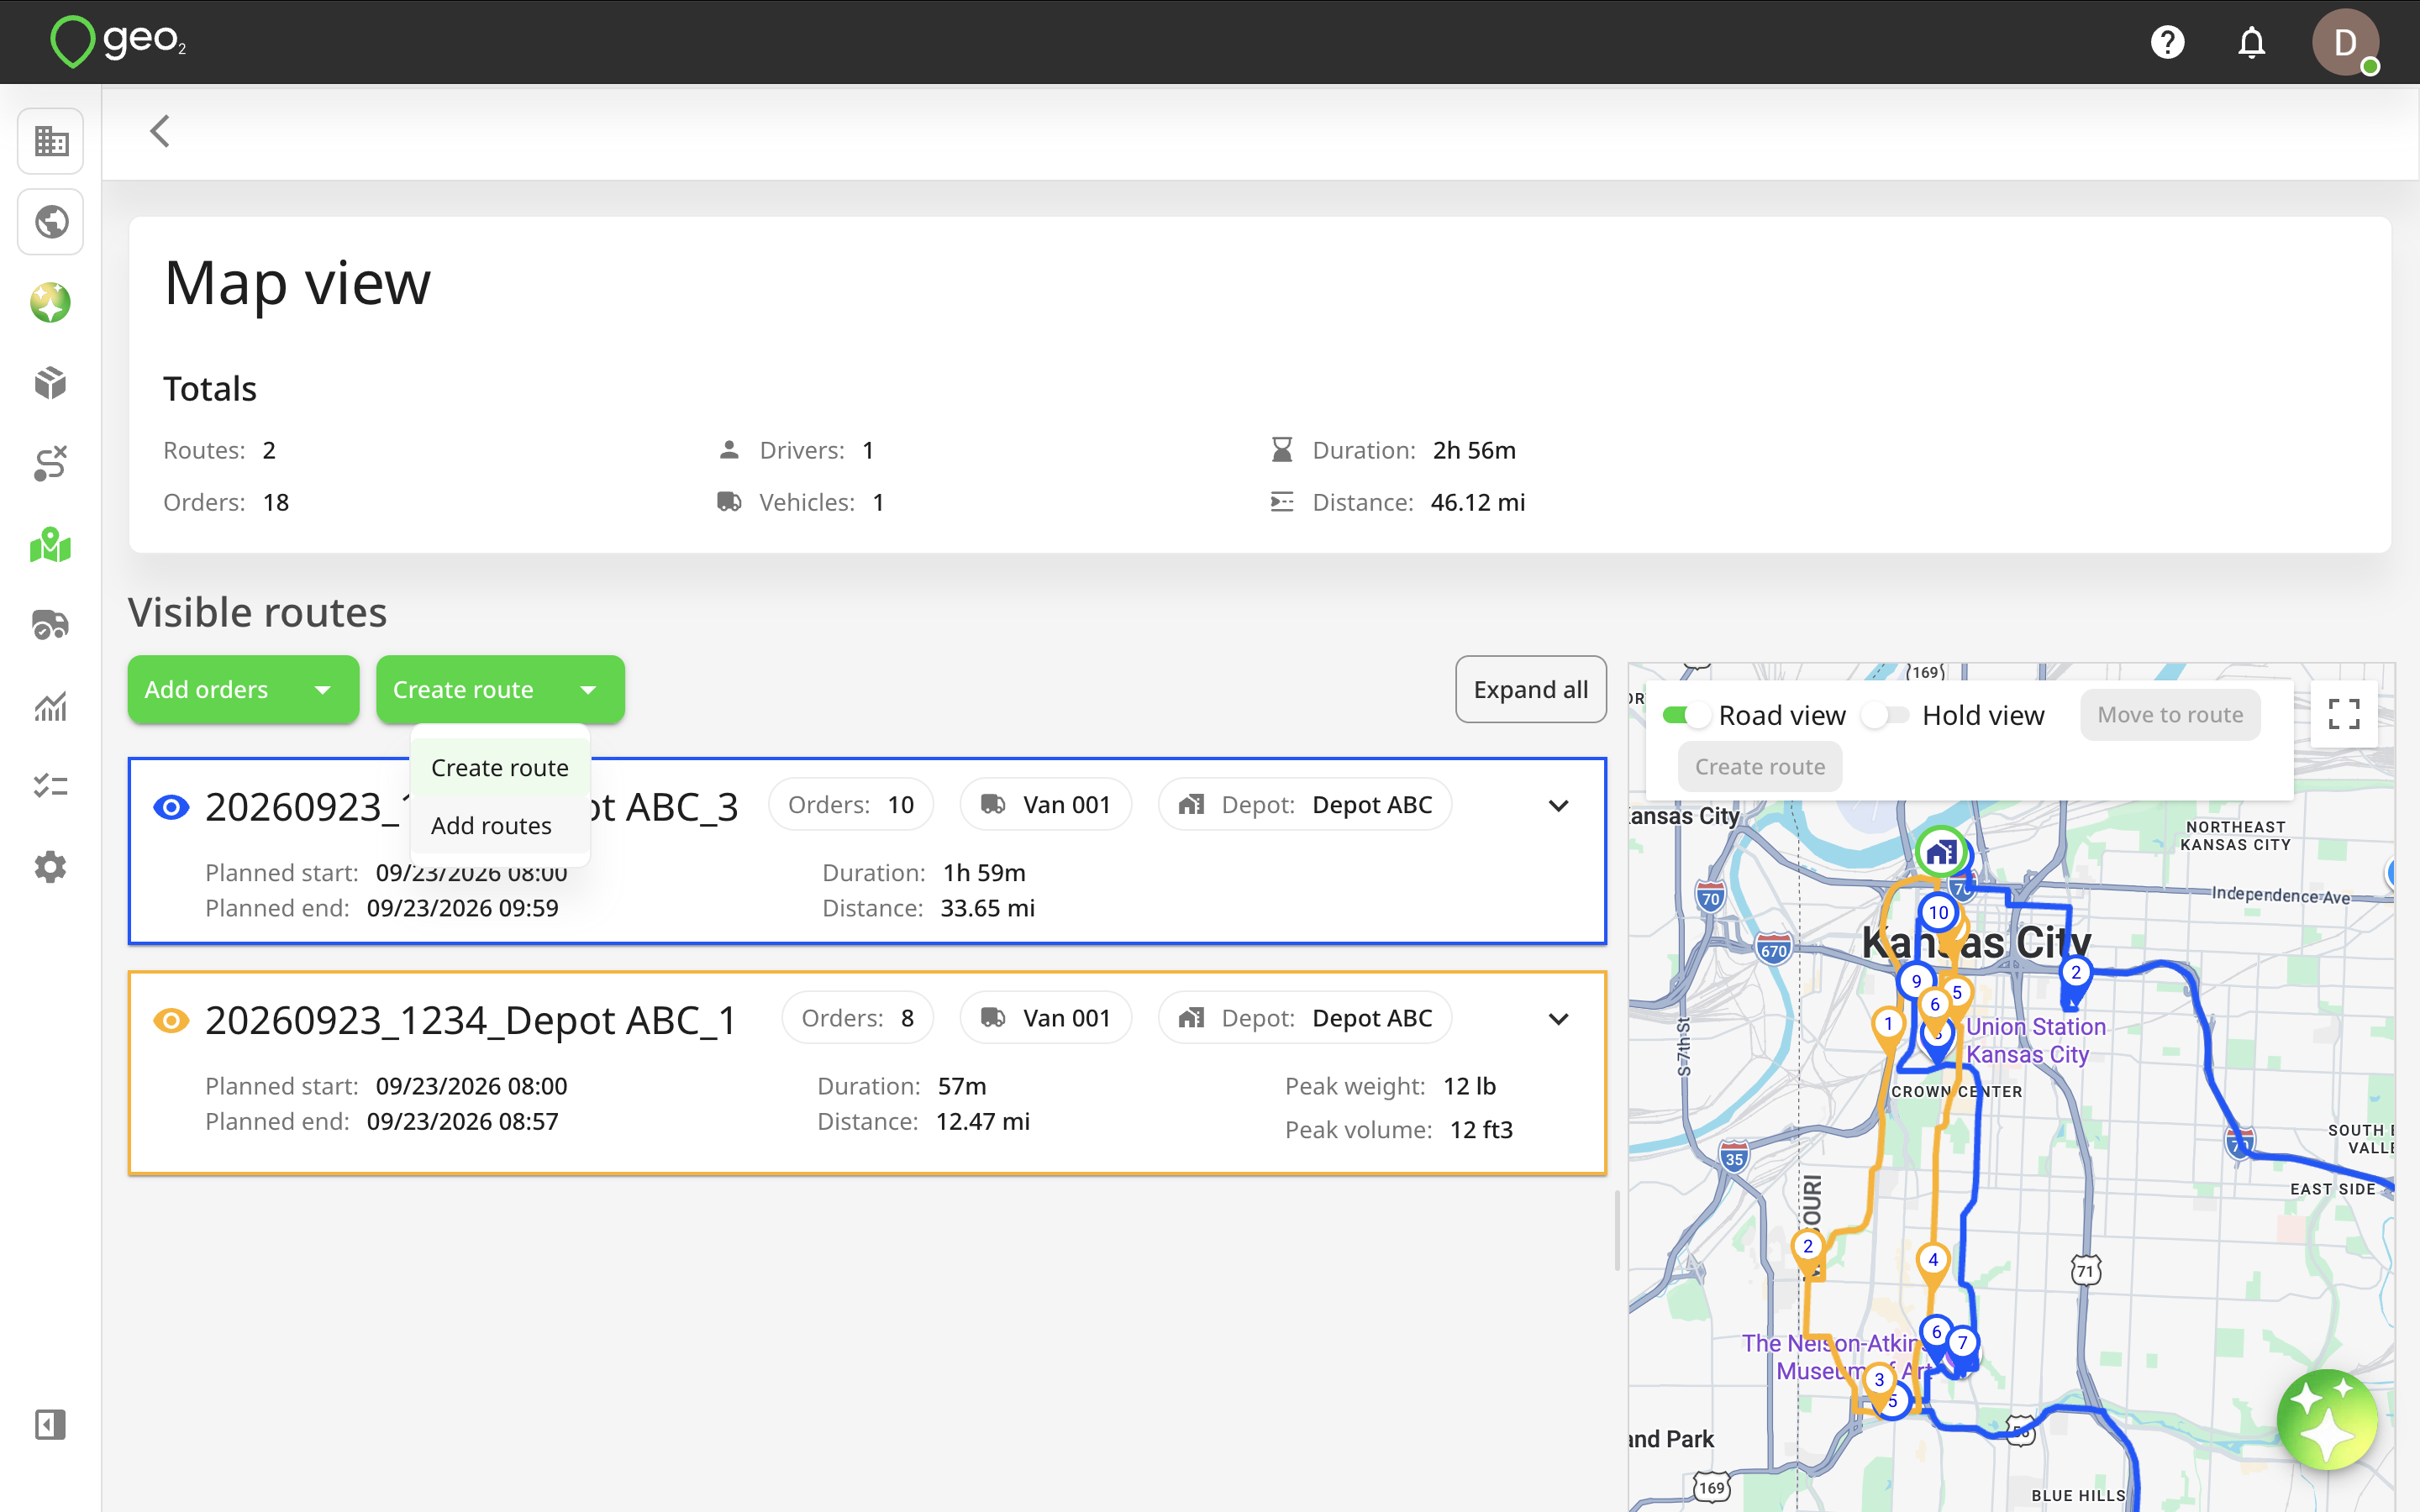
To create a new route, click the Create route button at the top of the Visible routes section on Map view page in Hub.
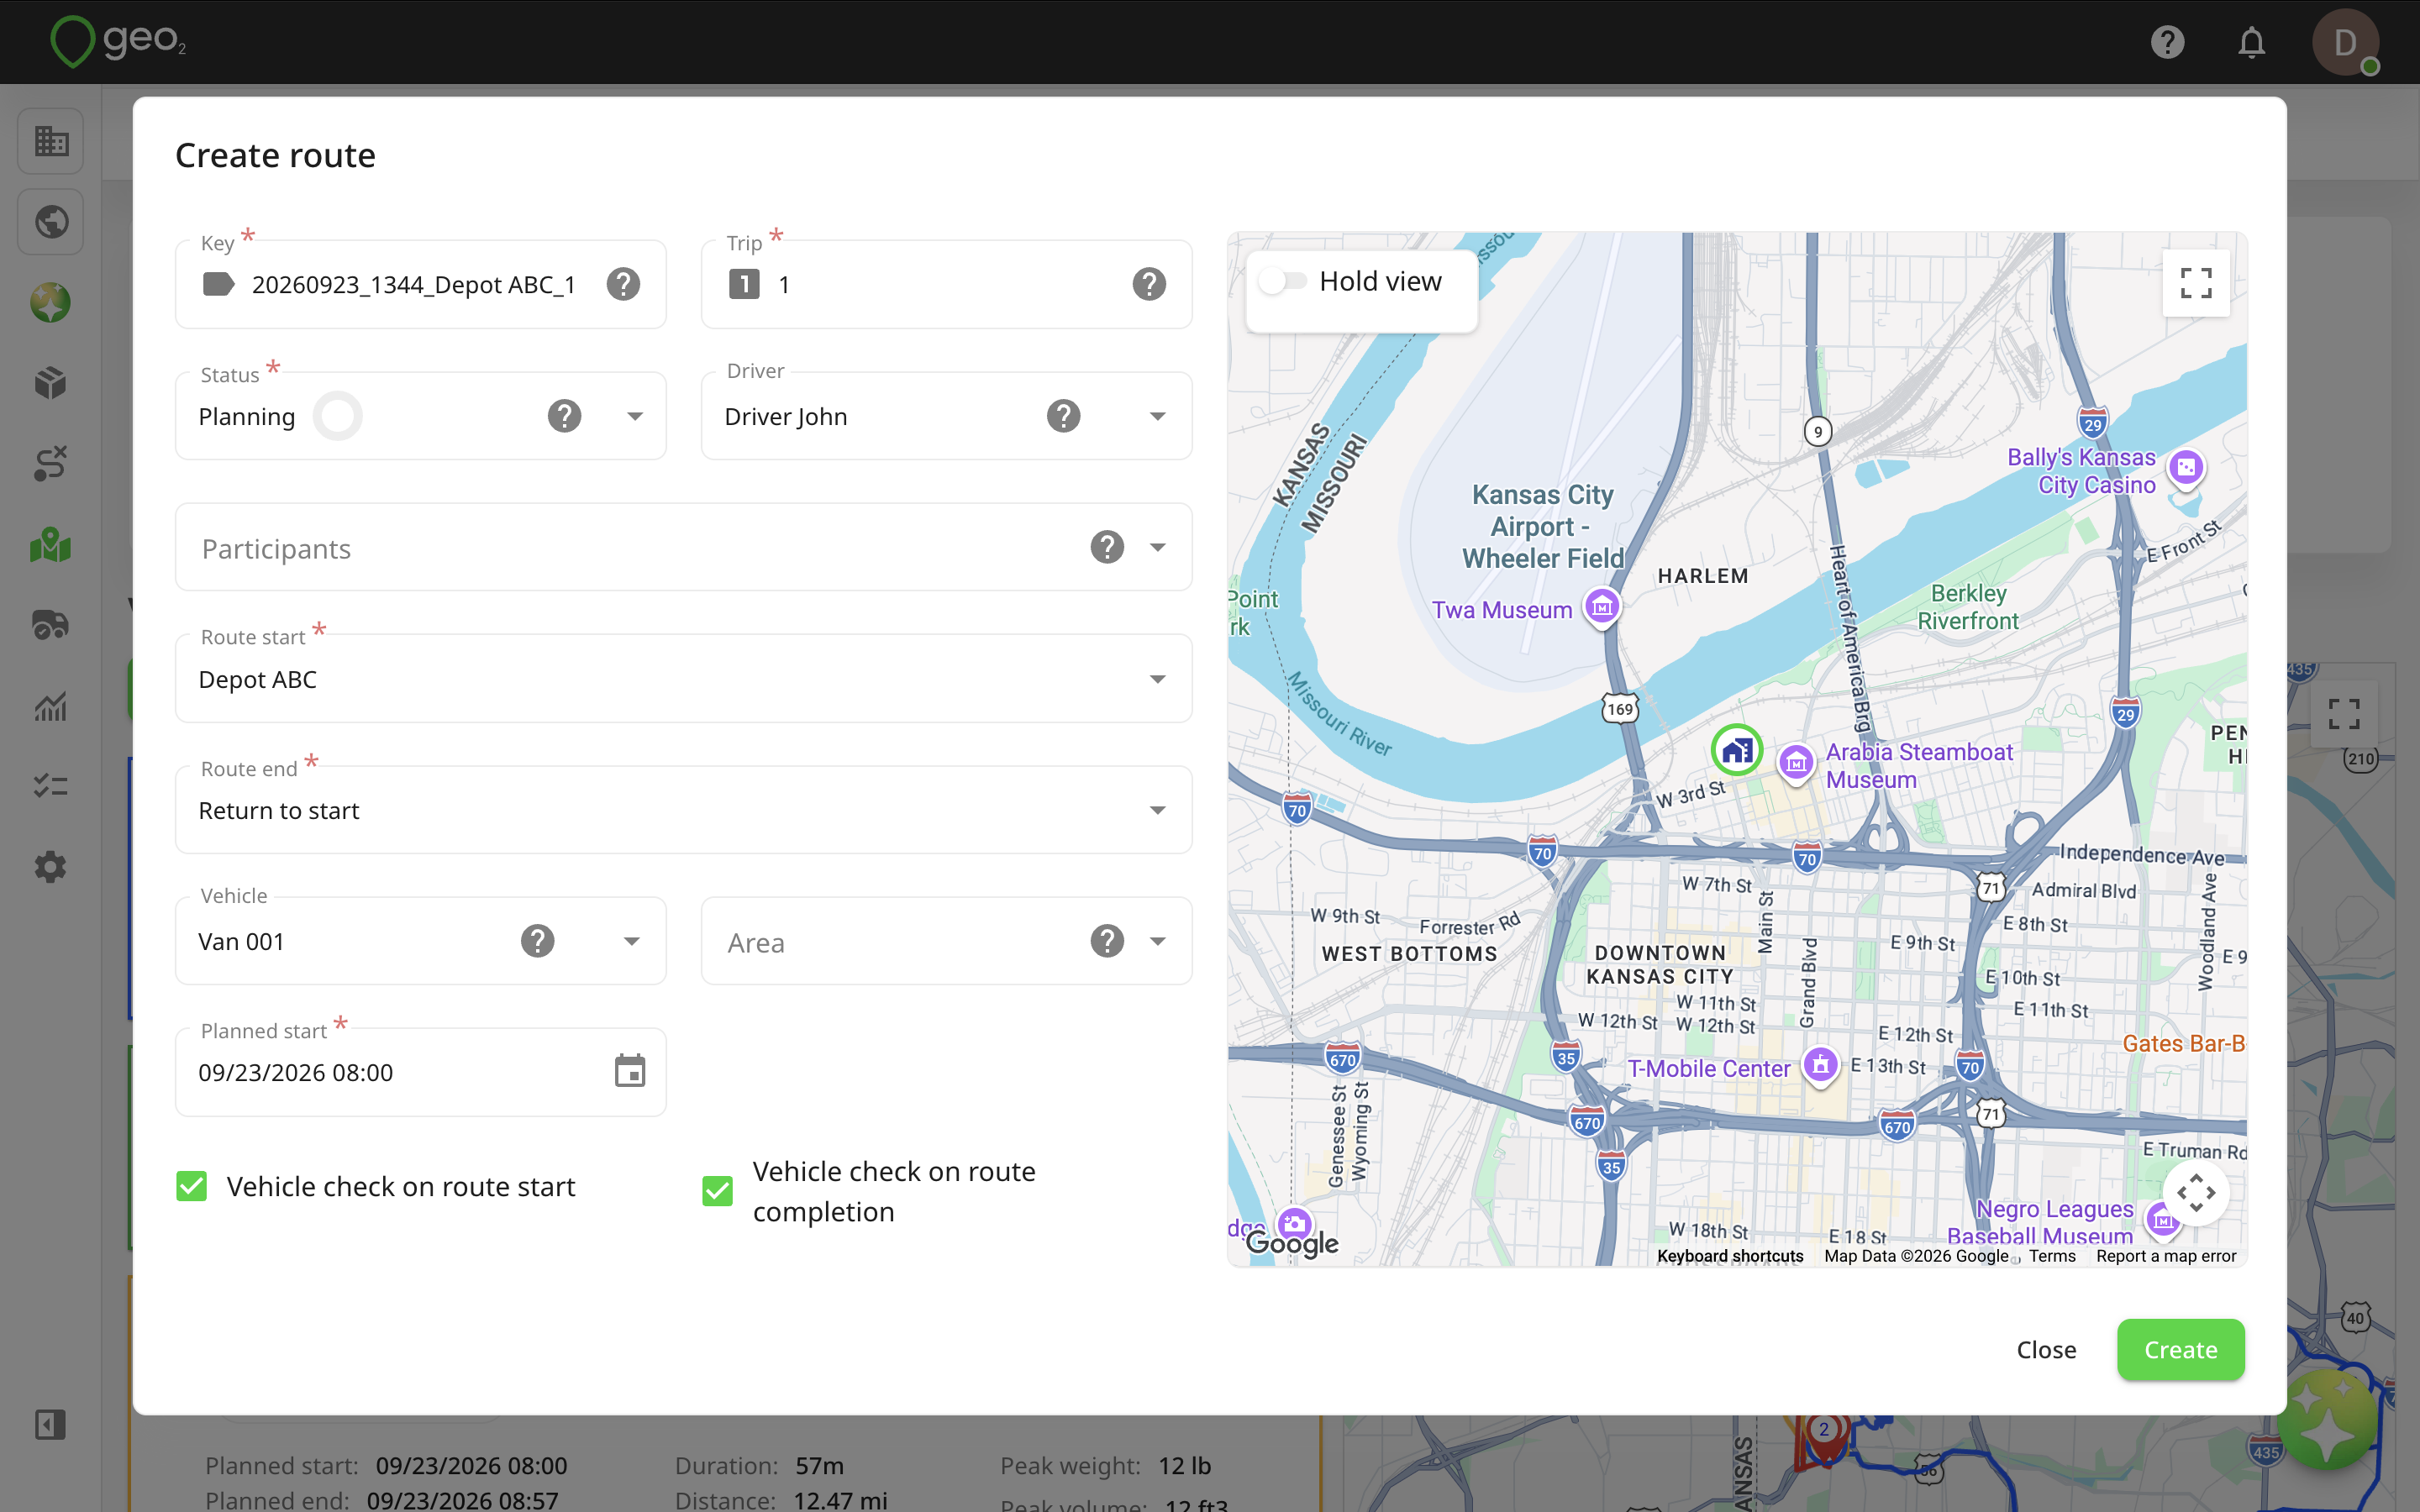
The Create route dialog will be displayed where you provide the following information:
| Property | Description |
|---|---|
| Key | Your unique identifier for the route in this environment. It can be a route number, for example, 1, 2, 3, etc. By default, the route key is generated automatically based on the parameters configured in Settings → Routes → Route key autogeneration. Current date/time, depot, and trip are selected by default. |
| Trip | A number you can use to indicate, for example, the order of routes for the same vehicle on the day, with the first route of the day being 1, a subsequent one being 2, etc. |
| Status | Planning - actively being planned. Planned - planning is completed, but route has not yet been released to a driver. Released - released to a driver, so that they can work with it in the mobile app. Started - indicates the route has left the start point. Completed - all work on the route has been completed; for example, the vehicle has returned to the end point. |
| Driver | User responsible for the route. Once released, the assigned user sees the route in the mobile app. A driver has permission to start/complete the route. Once the route is started and location tracking enabled, the driver’s location will be displayed on Route view and on the Started Route Driver Position on Dashboard page, as well as on the recorded vehicle checks. The driver’s location can also be optionally displayed on Public tracking. However, for POD's, the geolocation of the user who records it will be captured (either the driver or participant). If you use Vehicle categories functionality, the system can match the user’s and vehicle’s categories. Users without categories can only be assigned to vehicles without categories. Vehicles without categories can be assigned to any user. Assigning categories to users and vehicles is optional. |
| Route start | If you set up the default depot in Depots settings, it will be selected by default as a route start but it can be changed. By pressing the Route start field, you can also select other depots from your environment, first stop location (first order recipient’s address), or search address. If you select to search for an address, the Address line 1 field will be displayed below. To enter the address, you can start typing it into Address line 1 and selecting it from the drop-down which appears. If no suitable match is found, press the Expand address form button and continue entering the address in the relevant address fields manually. |
| Route end | By default, the Return to start option is selected for a route end but it can be changed. By pressing the Route start field, you can also select depots from your environment, last stop location (last order recipient’s address), or search address. If you select to search for an address, the Address line 1 field will be displayed below. To enter the address, you can start typing it into Address line 1 and selecting it from the drop-down which appears. If no suitable match is found, press the Expand address form button and continue entering the address in the relevant address fields manually. |
| Vehicle | Vehicle assigned to the route. If you use Vehicle categories functionality, the system can match the user’s and vehicle’s categories. Users without categories can only be assigned to vehicles without categories. Vehicles without categories can be assigned to any user. Assigning categories to users and vehicles is optional. Vehicle dimensions specified in Vehicle settings (“Gross weight”, “Height”, “Width”, and “Length” fields) can be used for route calibration/optimization with vehicle restrictions. The system will factor these dimensions into route building to generate the most efficient outcomes, for example, to avoid bridges with height restrictions, narrow roads unsuitable for wider vehicles, or areas with weight limits that could affect the selected route. |
| Area | Area tag. You can set up the default user and vehicle for every area. When the area value is selected, default values from the area will propagate to the User and Vehicle fields. |
| Planned start | Expected dispatch date/time of the route from the start point. The start time will come from Routes settings. |
| Vehicle check on route start | Activate vehicle check in the mobile app when the route is being started. |
| Vehicle check on route completion | Activate vehicle check in the mobile app when the route is being completed. |
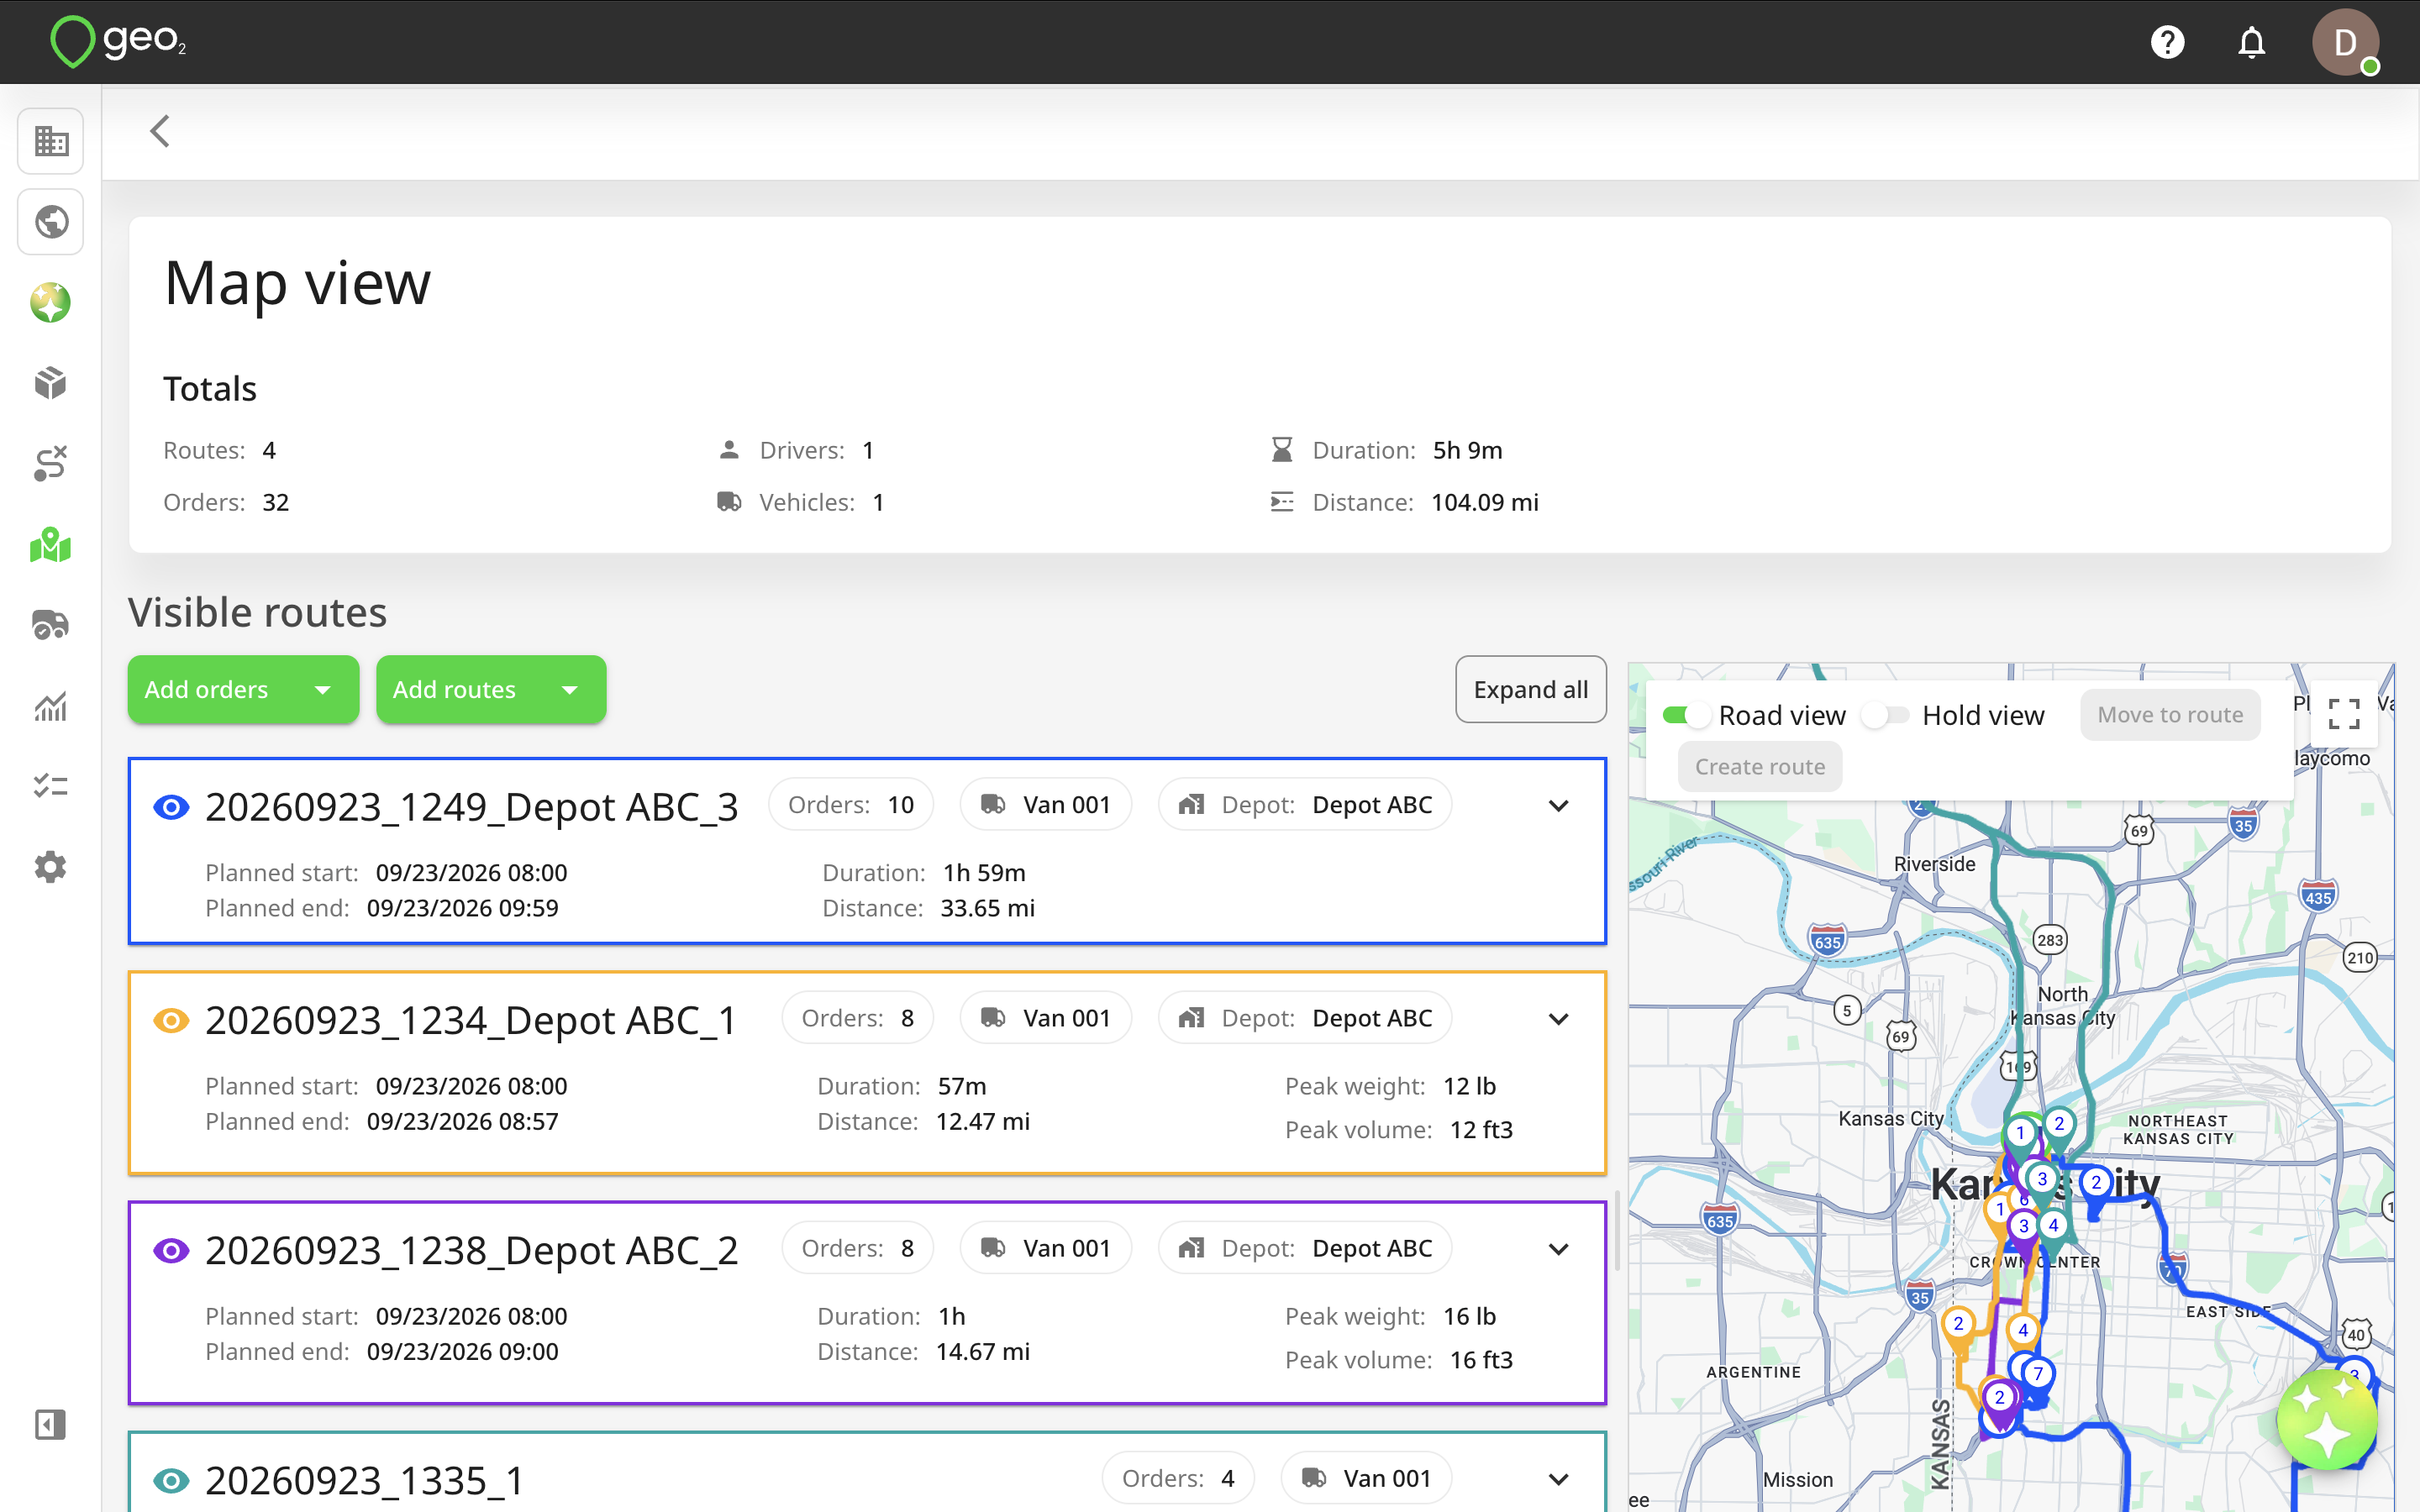
By pressing the Create button, a new route will be created and added to the page either to the bottom of the Visible routes column or the Hidden column, if the number of routes in the Visible routes columns already exceeds 40. You can continue working with it, for example, to add orders, optimize the route, etc.
Adding Routes
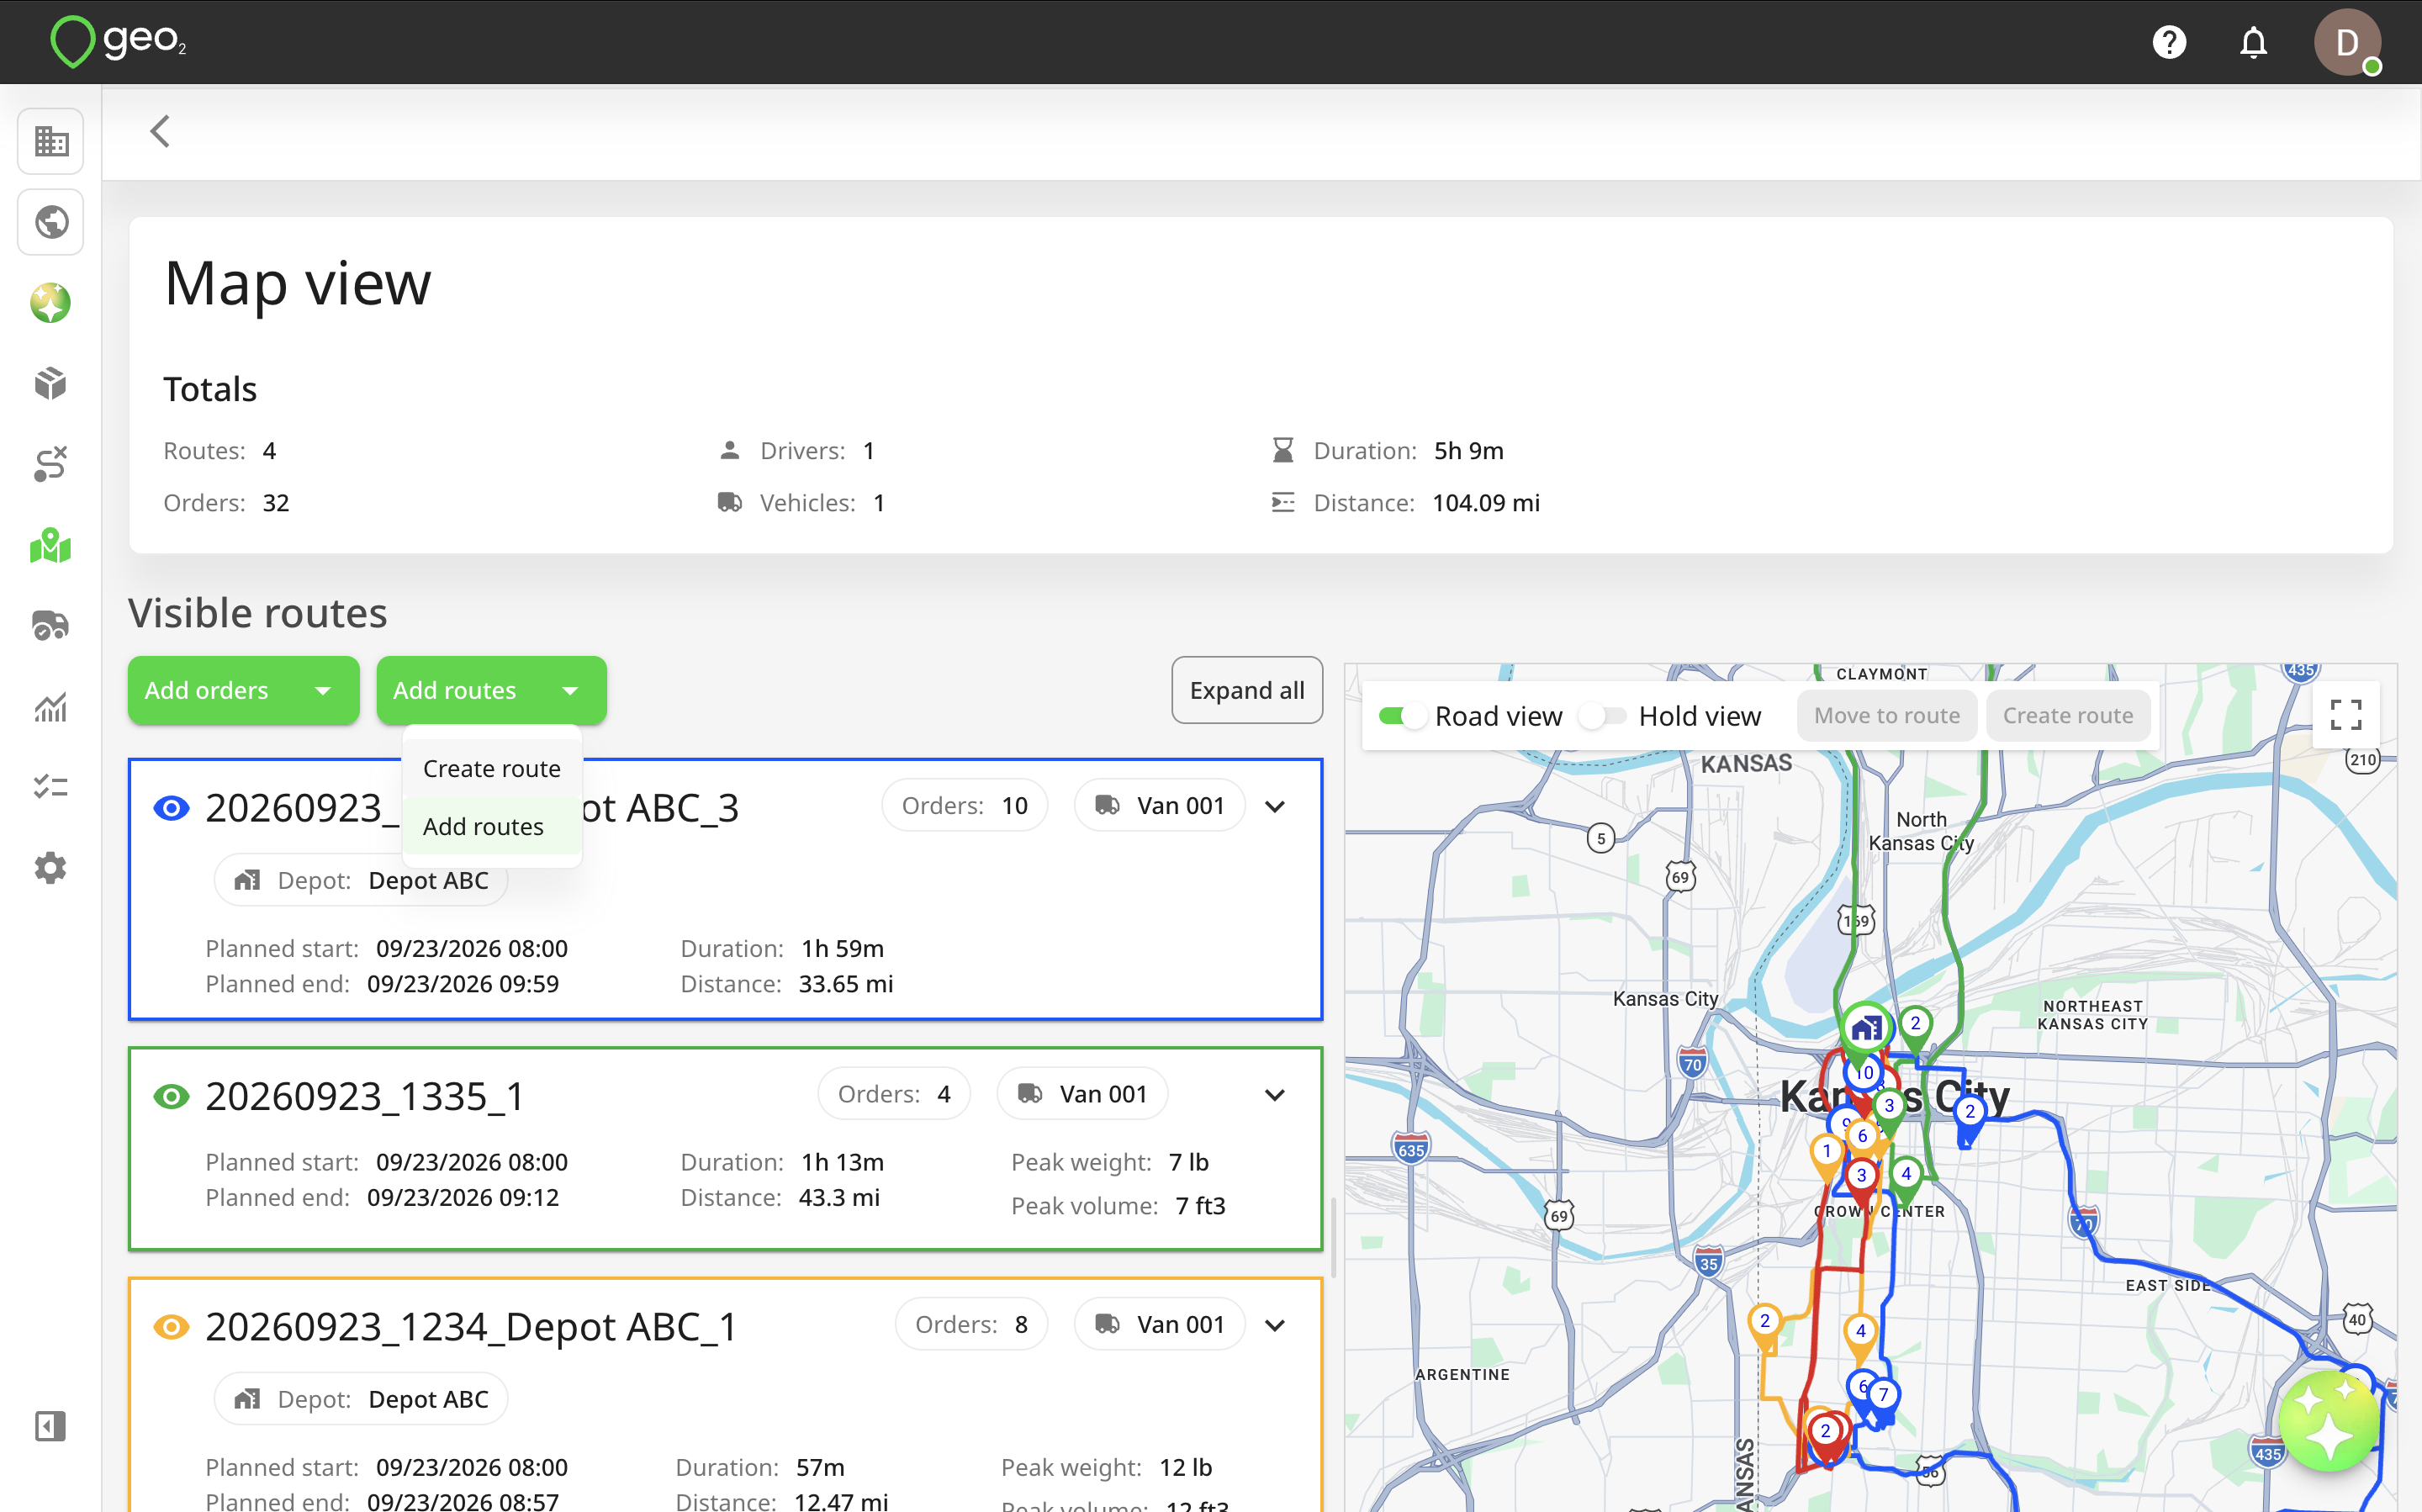
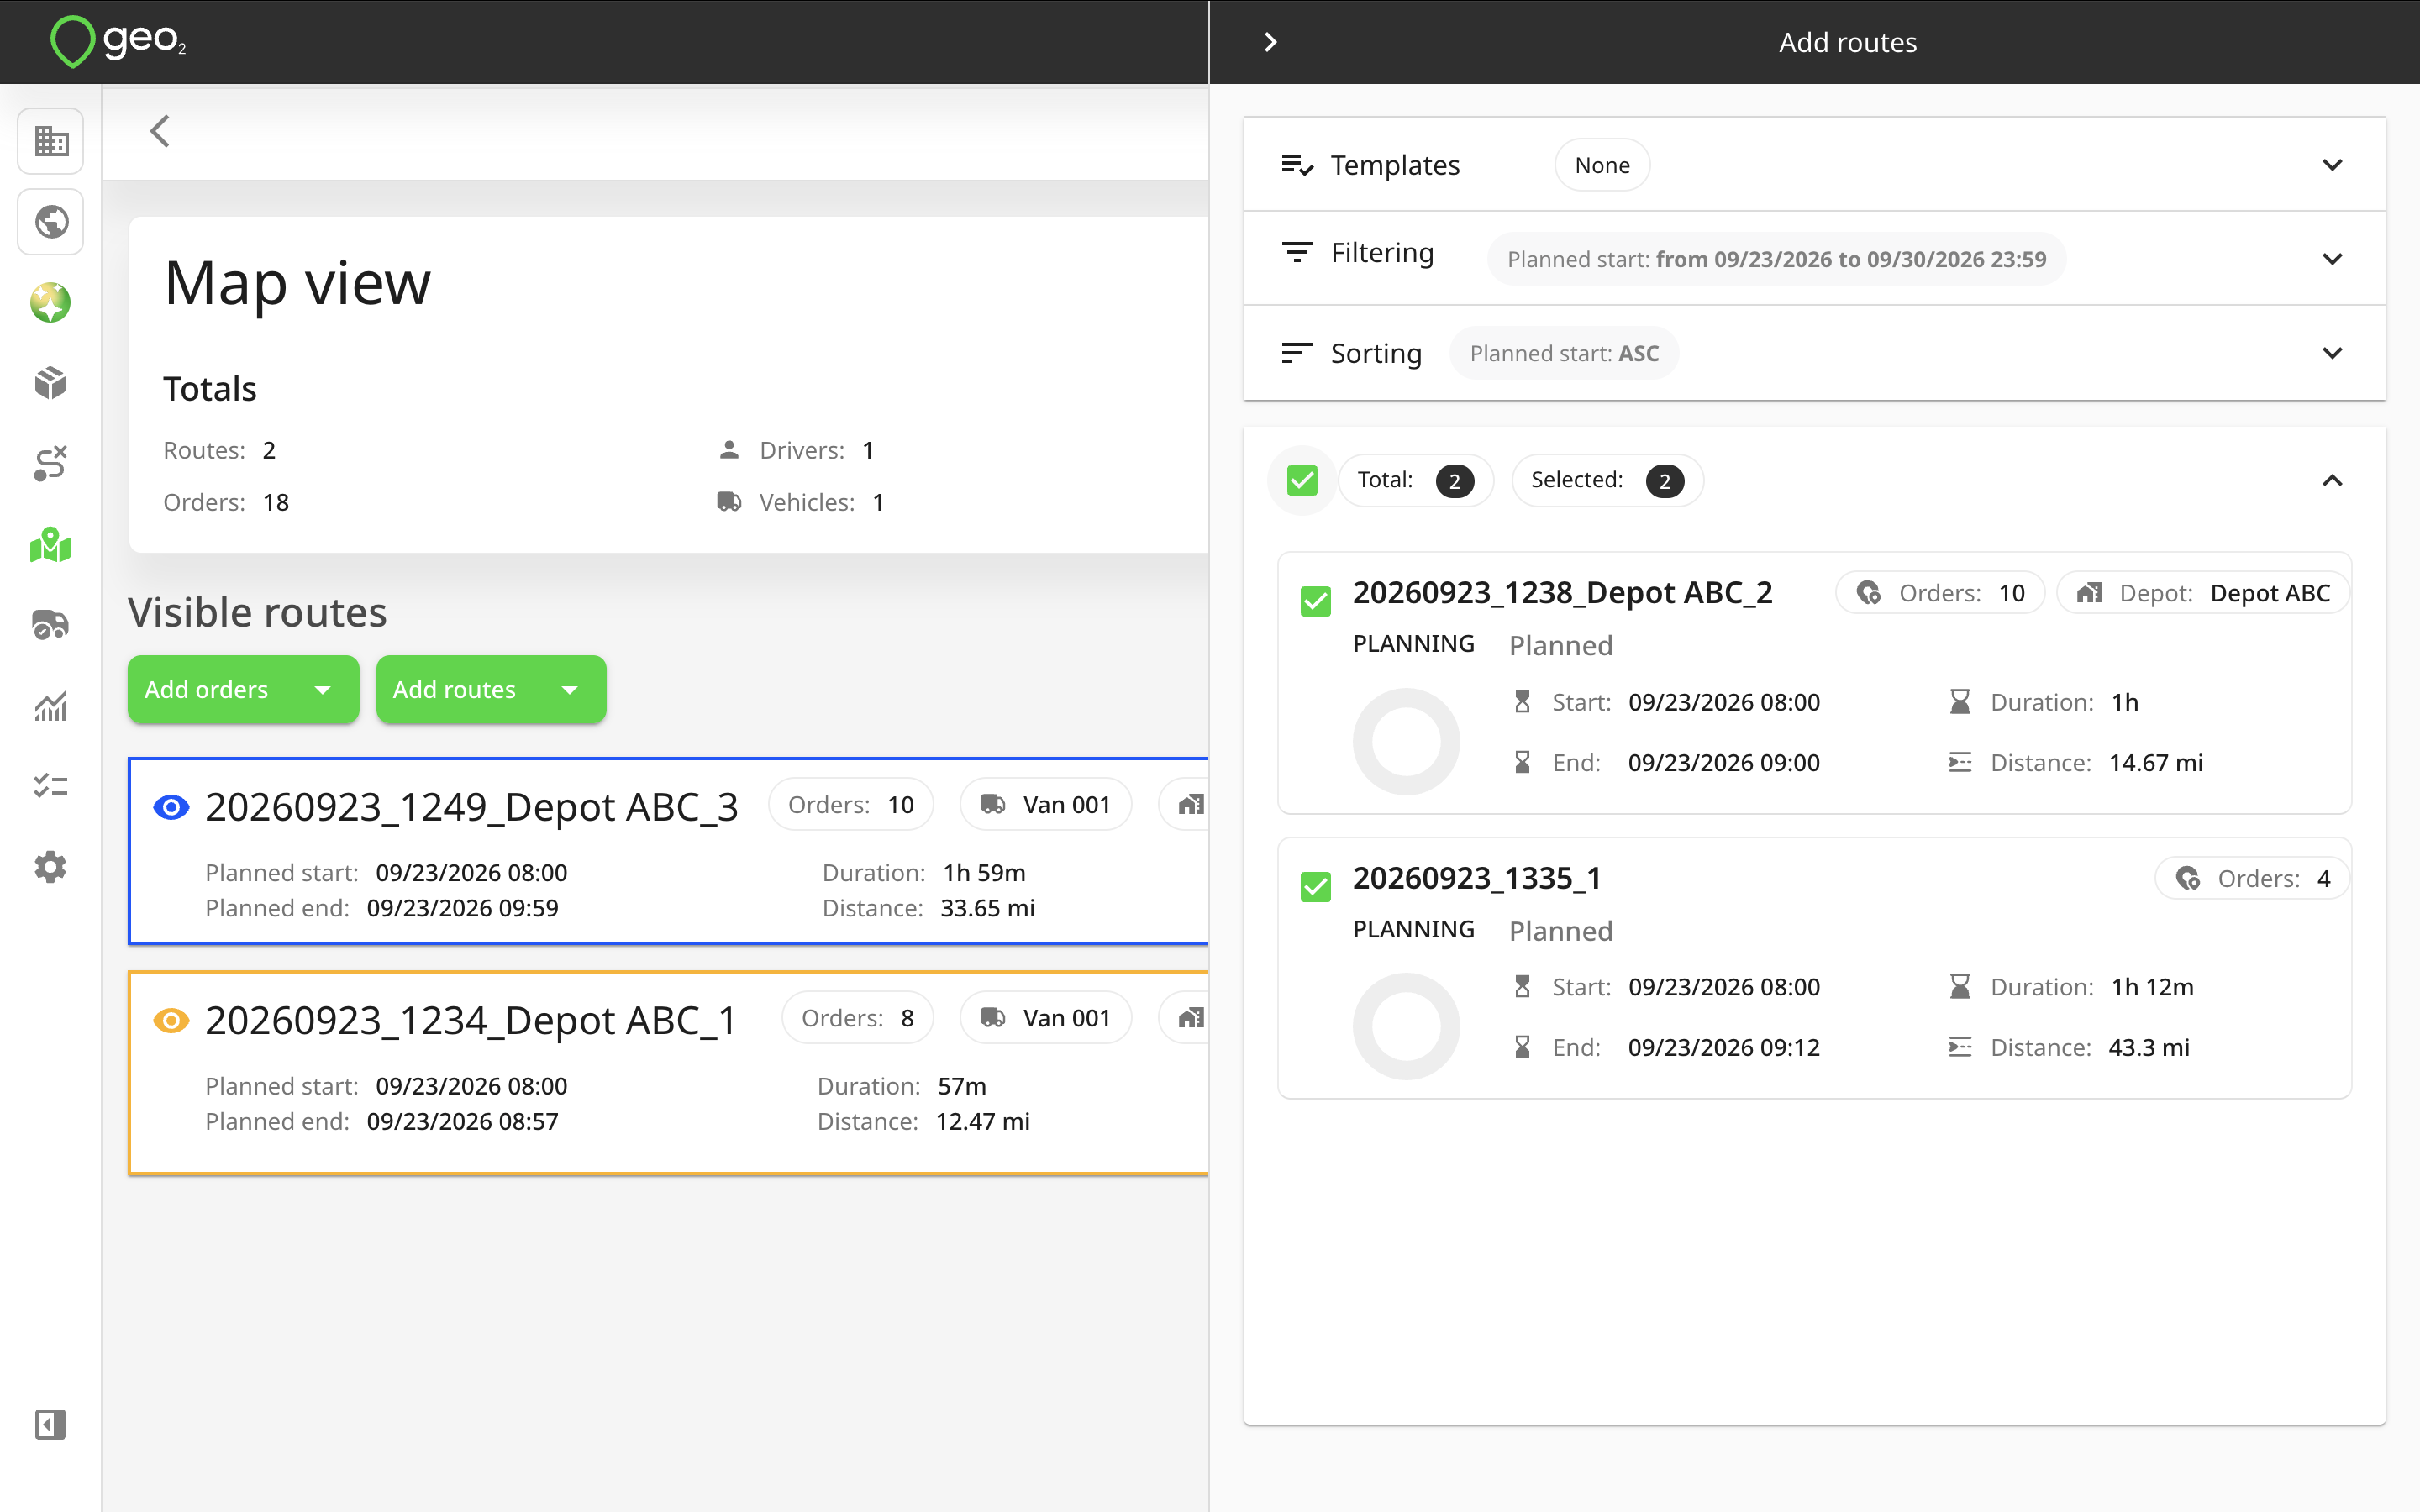
To add existing routes to Map view page in Hub, press the Add routes button at the top of the Visible routes section.
You will see the Add routes dialog where you can select routes to be added to the page. Use checkboxes or Ctrl/Command+click to select routes one-by-one, or Shift+click to select multiple routes at once. If required, drag-and-drop the newly added routes to the Visible routes column. By default, they will be added to the bottom of the column but if that exceeds 40 routes, they will be moved to the Hidden routes column.
Creating Orders
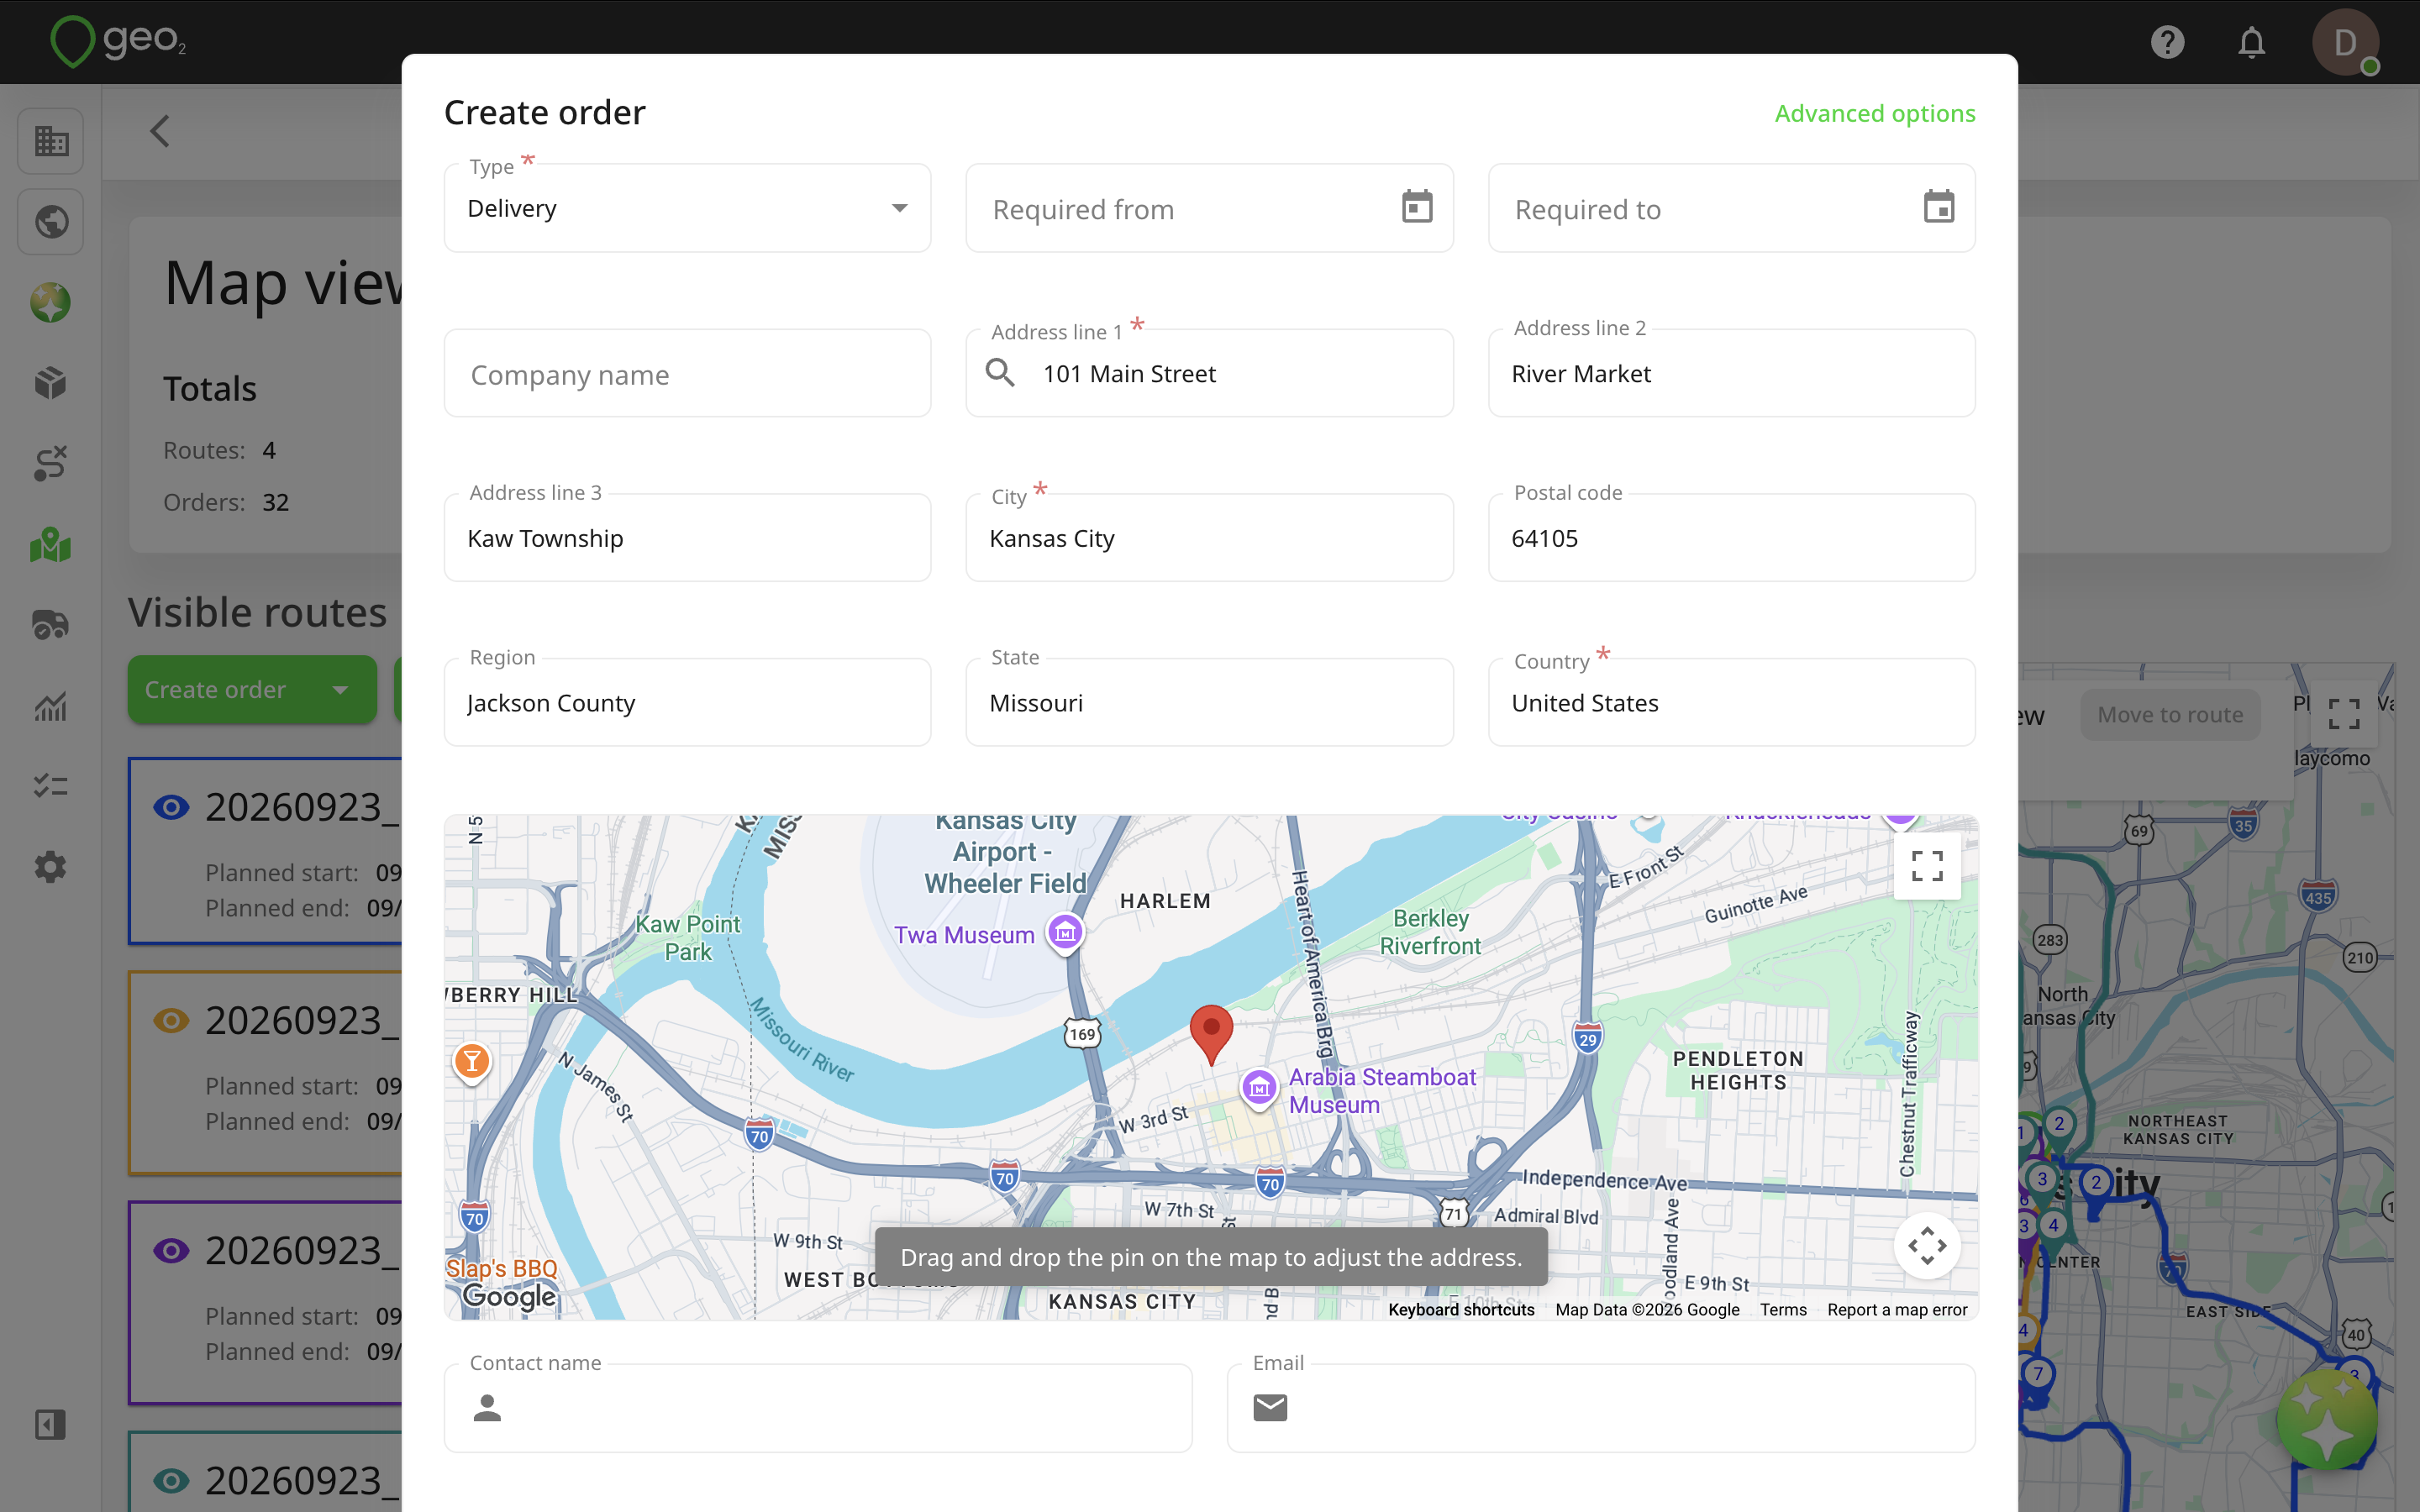
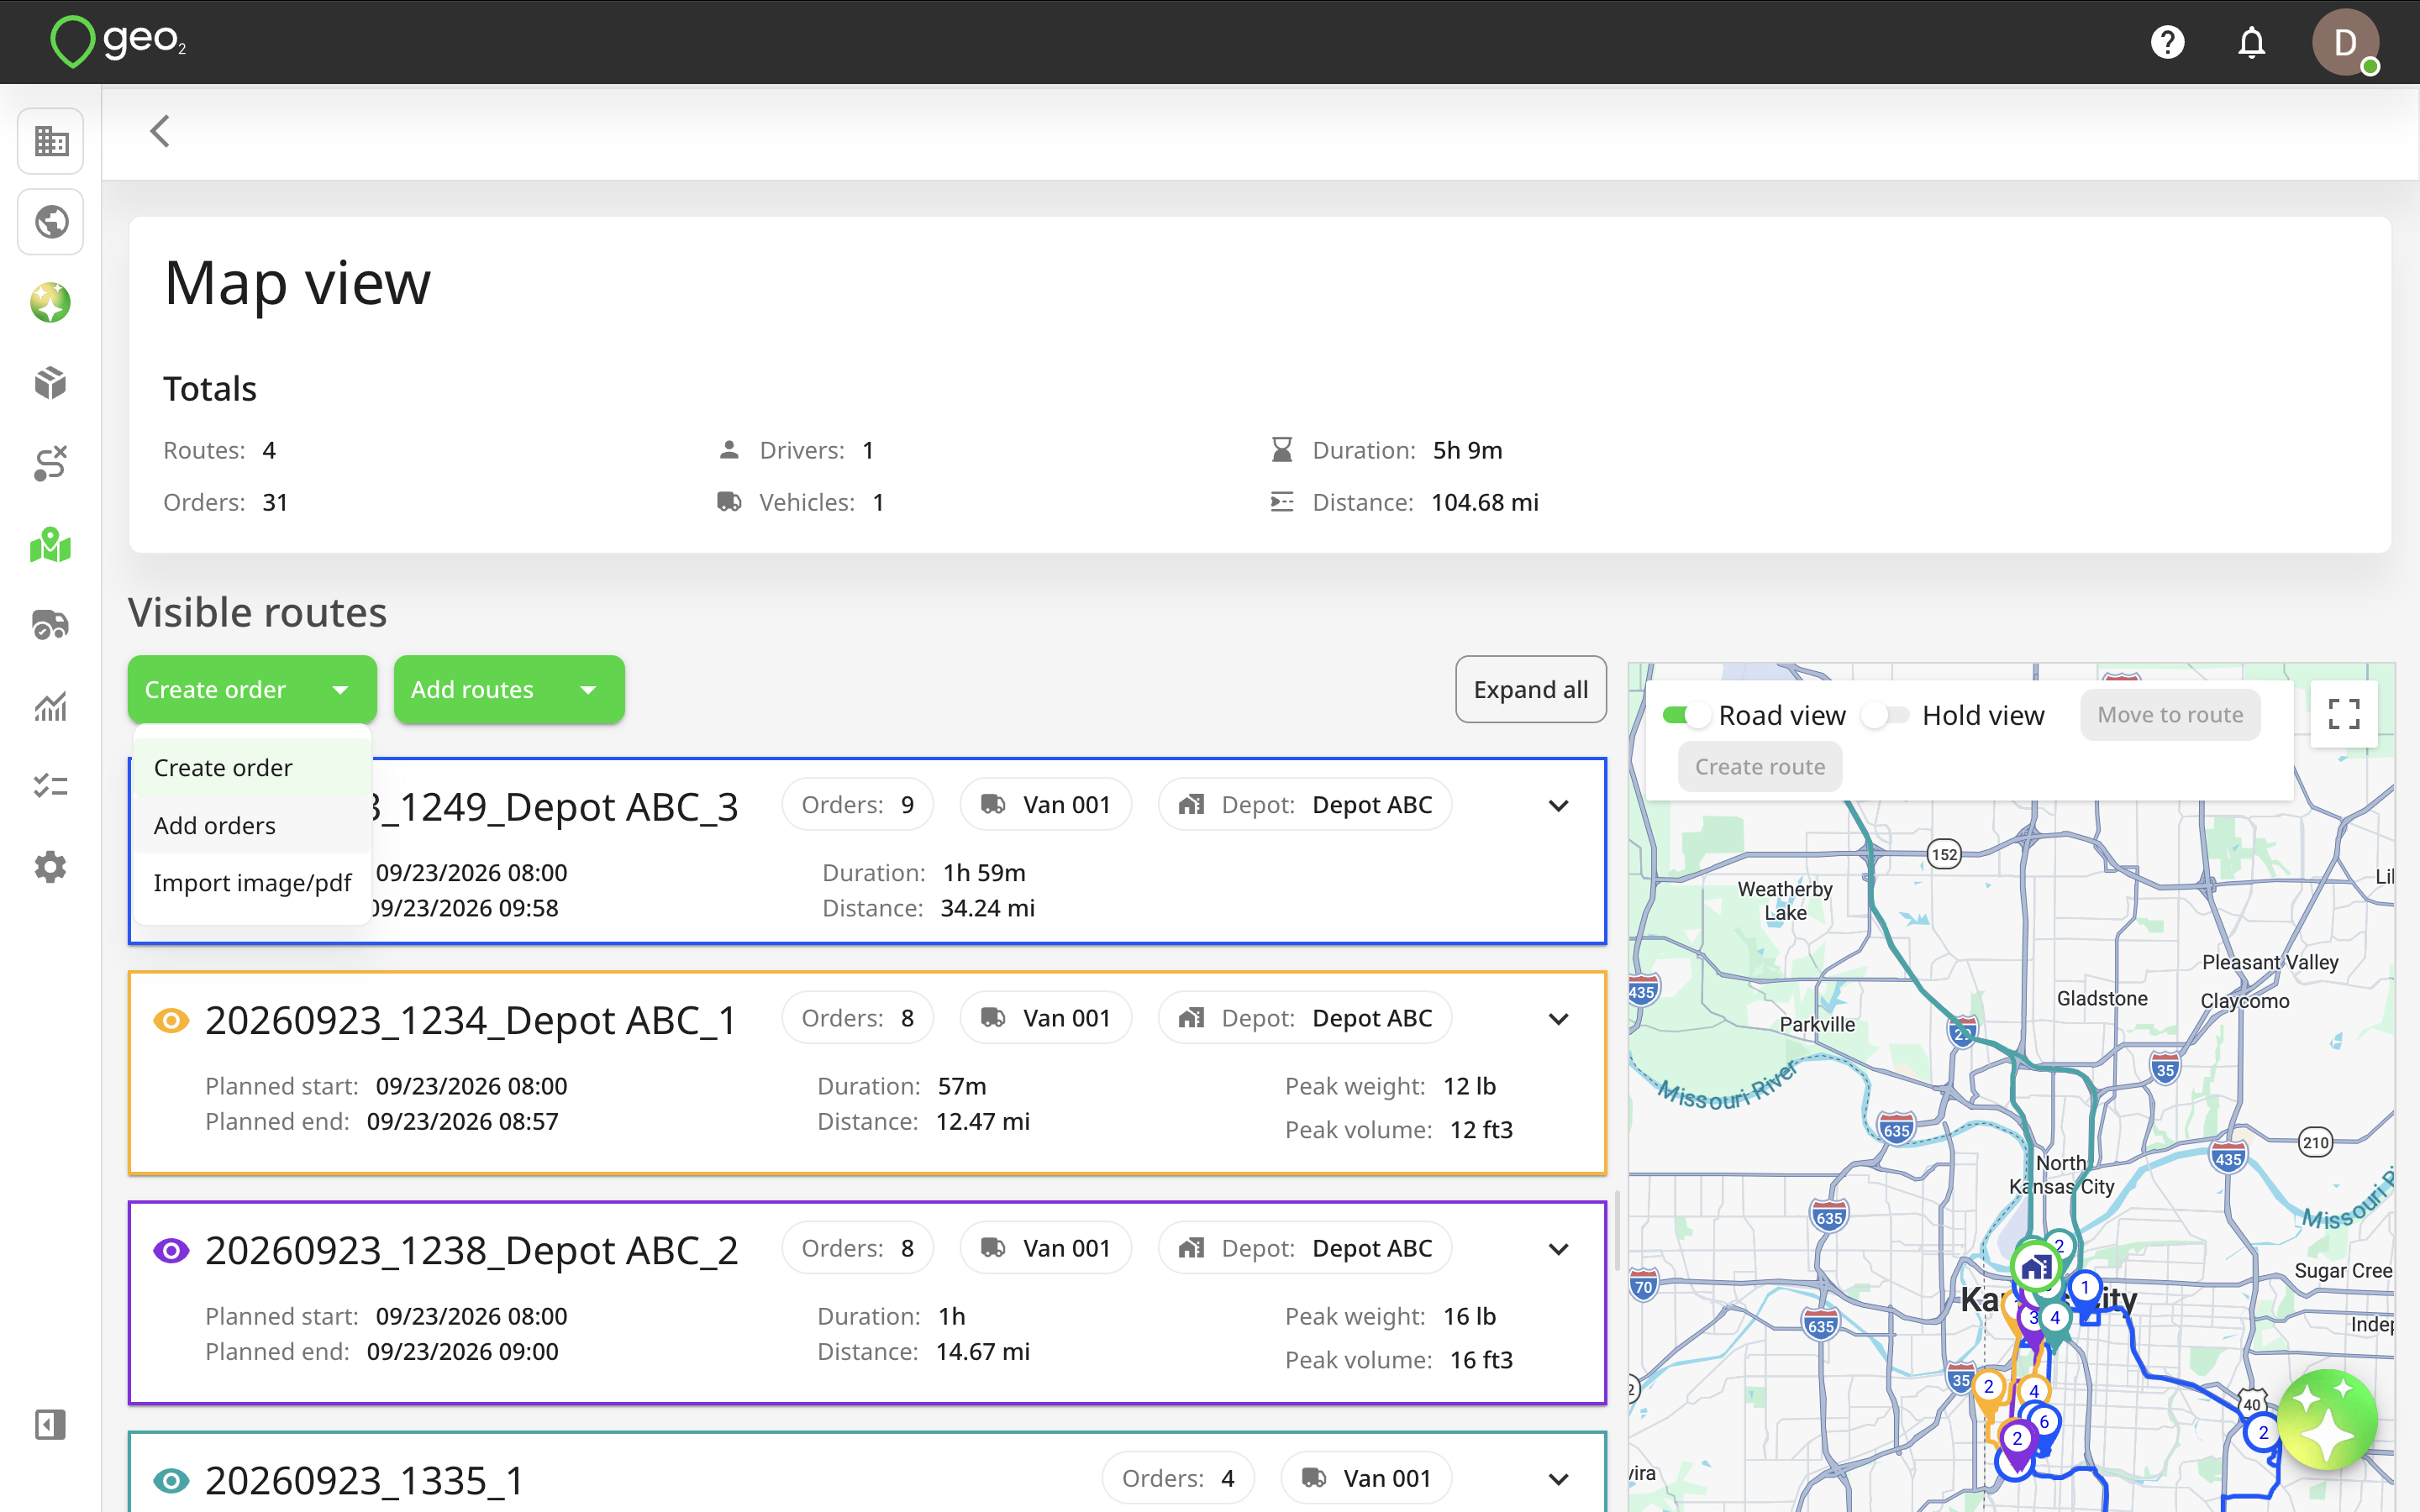
Click the Create order button at the top of the Visible routes section on Map view page in Hub to create a new order.
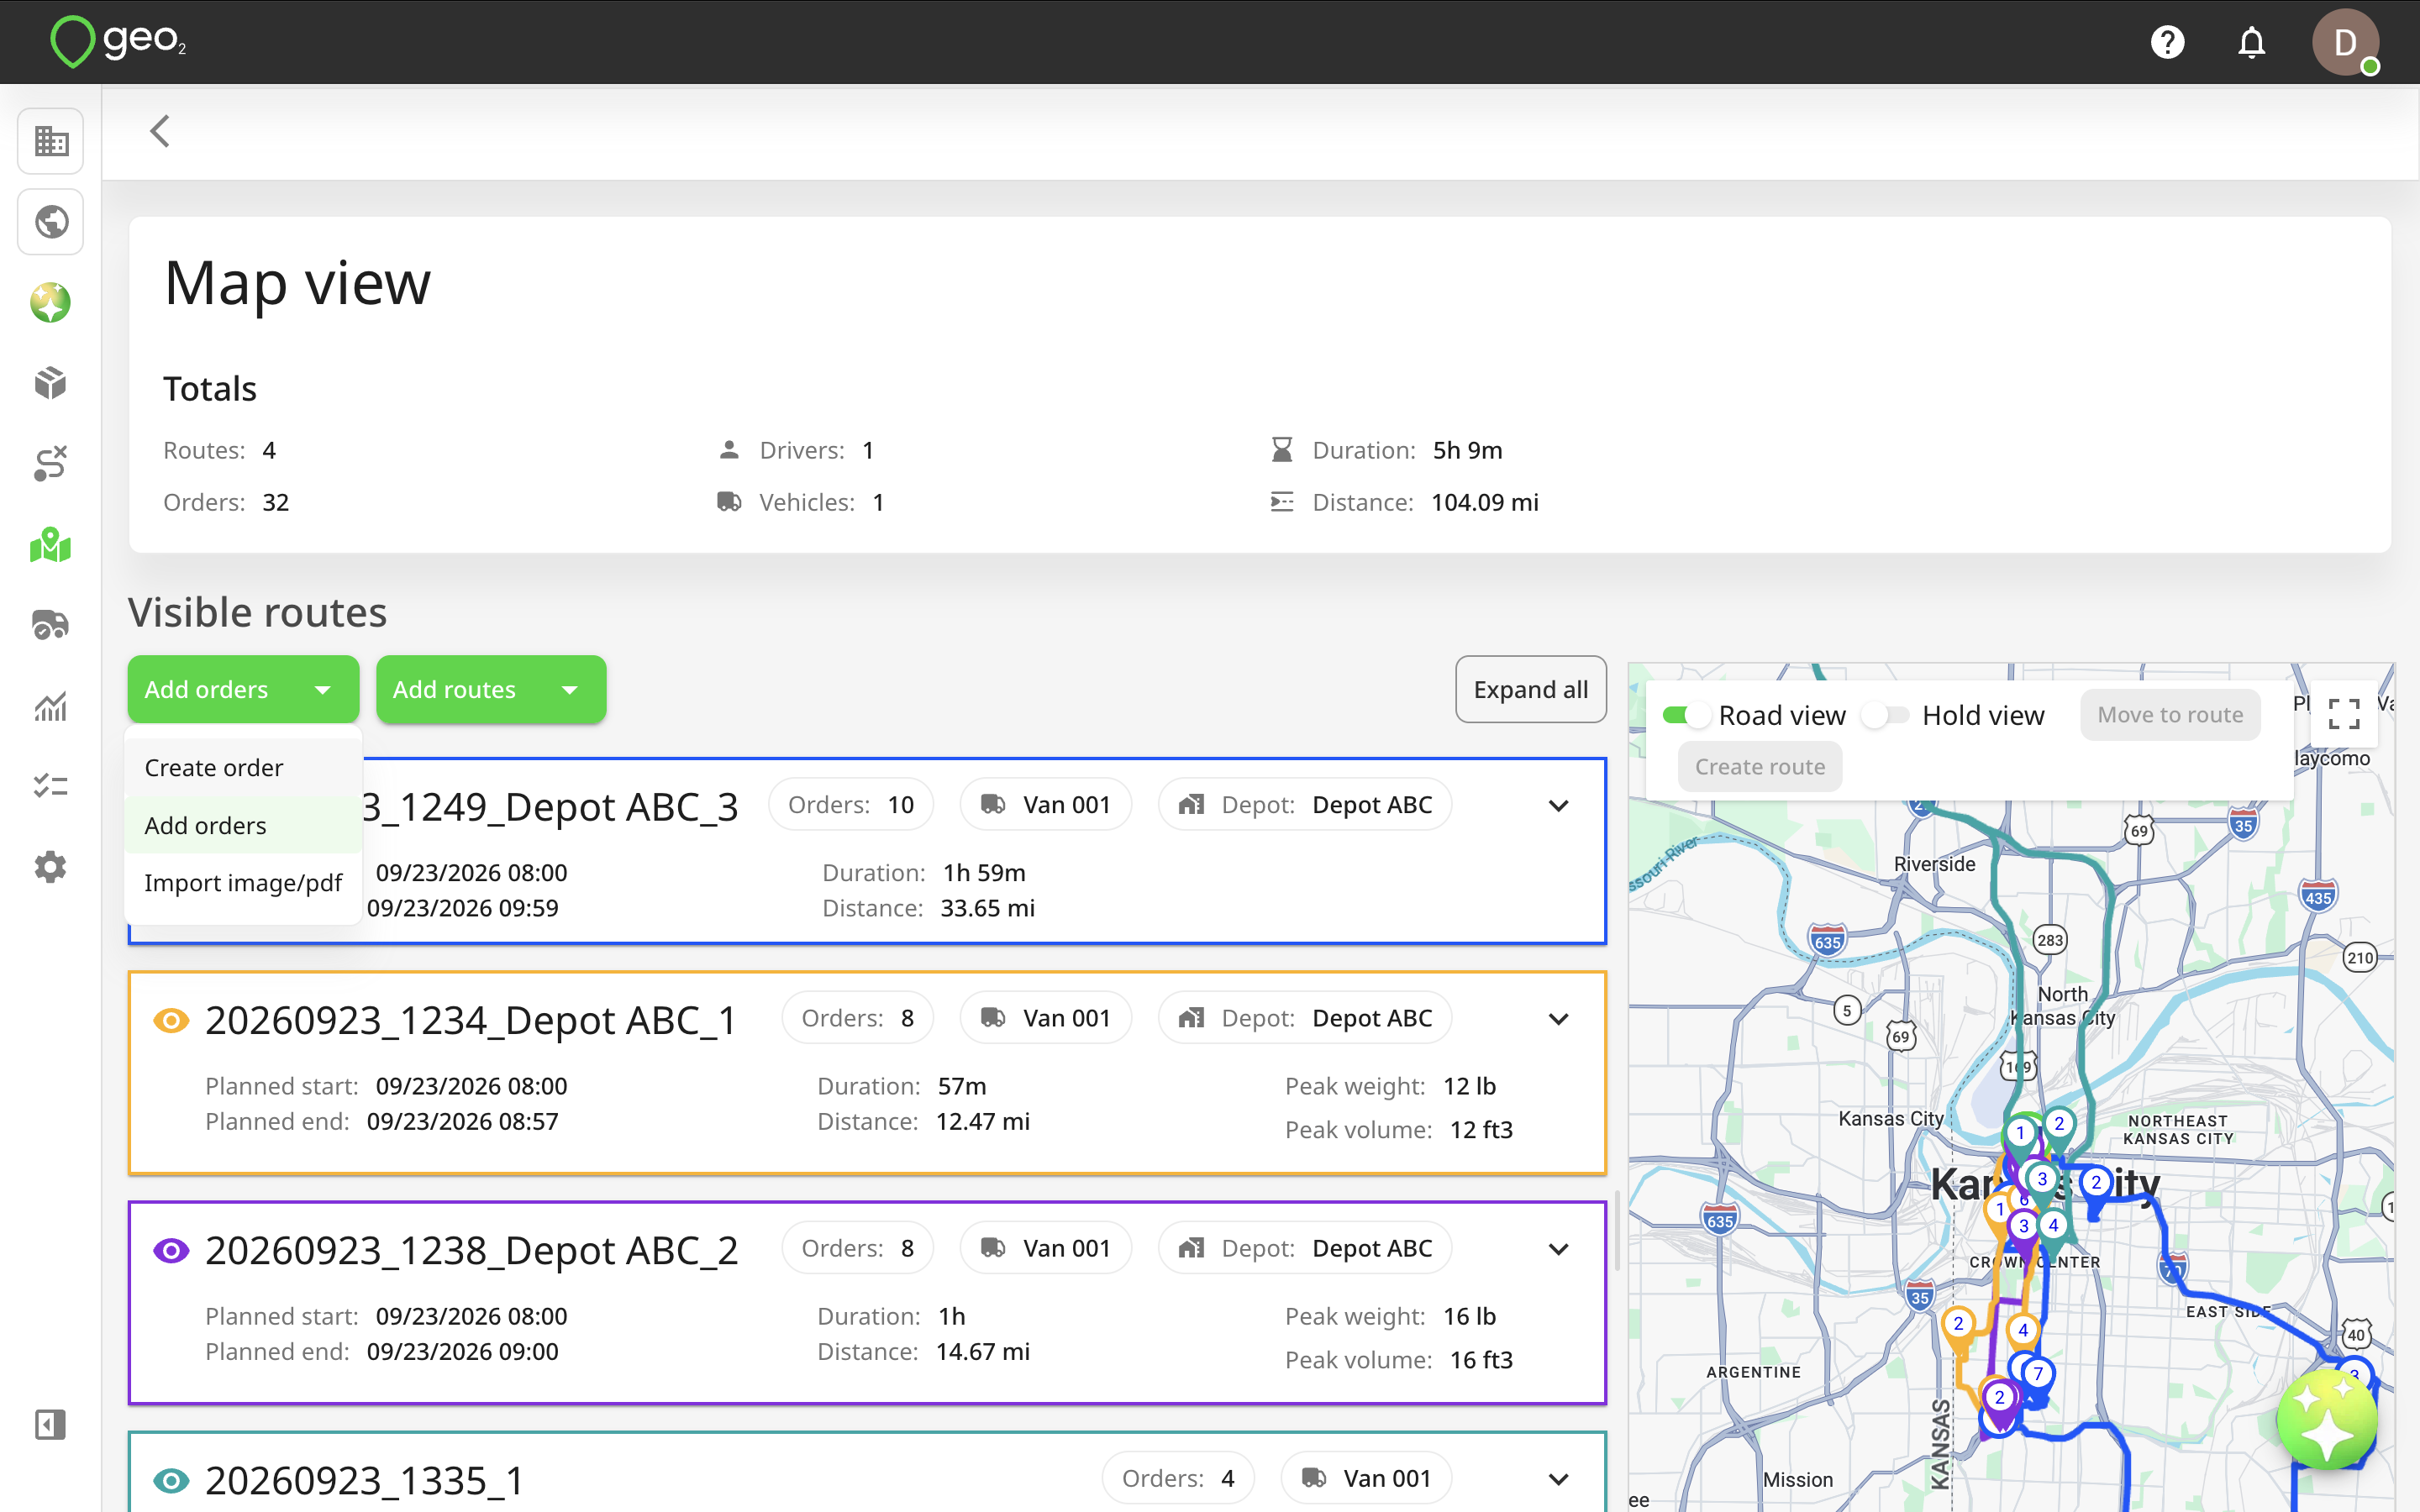
Once selected, the Create order dialog will appear, allowing you to quickly fill in details, provide a recipient’s address, adjust the map pin, and generate an order instantly. Start by typing a recipient’s address into the Address line 1. As you type, matching results will appear automatically. Select the correct address from the list, or click Can’t find address…? to enter it manually if no results match.
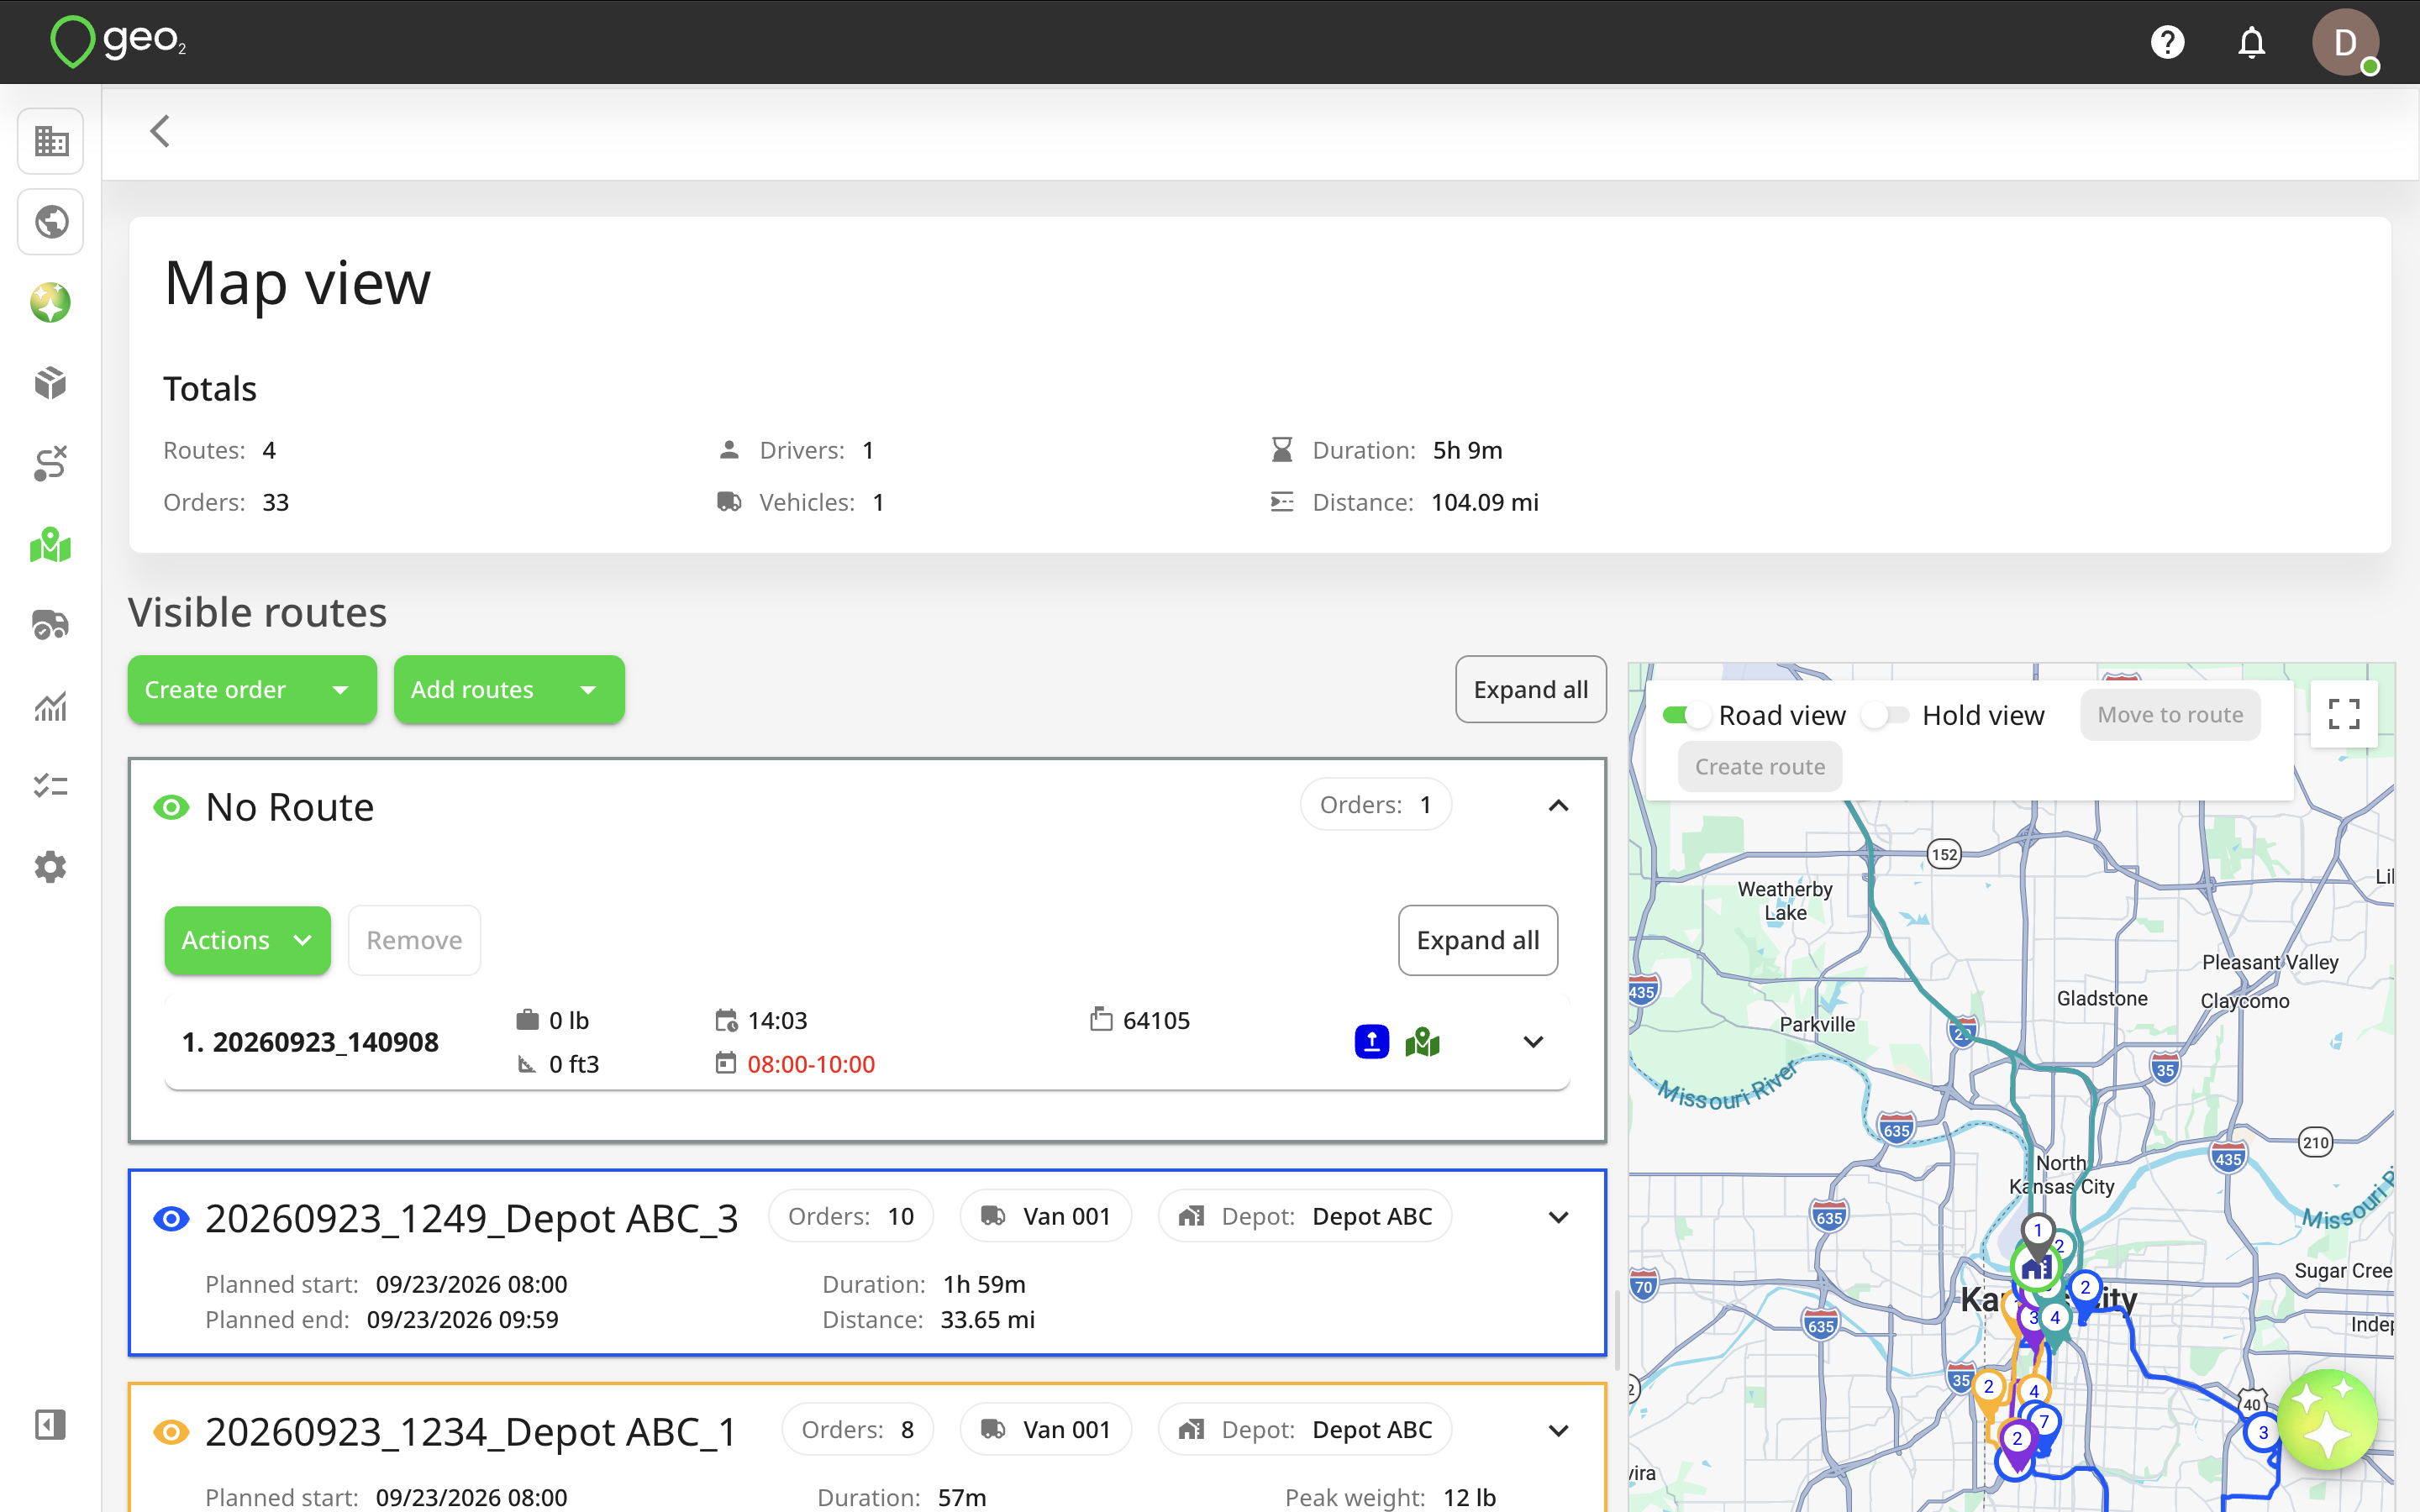
By pressing the Create button, the order will be created with an autogenerated order key (based on the current date and time) and added to No route card. It is displayed in a grey colour on the map. Now, you can create a route for this order or add it to one of existing routes.
Adding Unassigned Orders
To add orders not yet assigned to any route to Map view page, press the Add orders button at the top of the Visible routes section.
You will see the Add orders dialog where you can select orders to be added to the page. Use checkboxes or Ctrl/Command+click to select orders one-by-one, or Shift+click to select multiple orders at once. You can drag selected orders either to an existing route card or the special No route card. To move orders to an existing route, expand the route card and drag-and-drop them to a specific position in the stops list of the route. If a route starts or ends at a depot, orders with depots must match: the delivery depot must align with the start, and the collection depot with the end. Orders without assigned depots can be added to any route, and if a route does not use a depot as its start or end point, any order, with or without a depot, can be added.
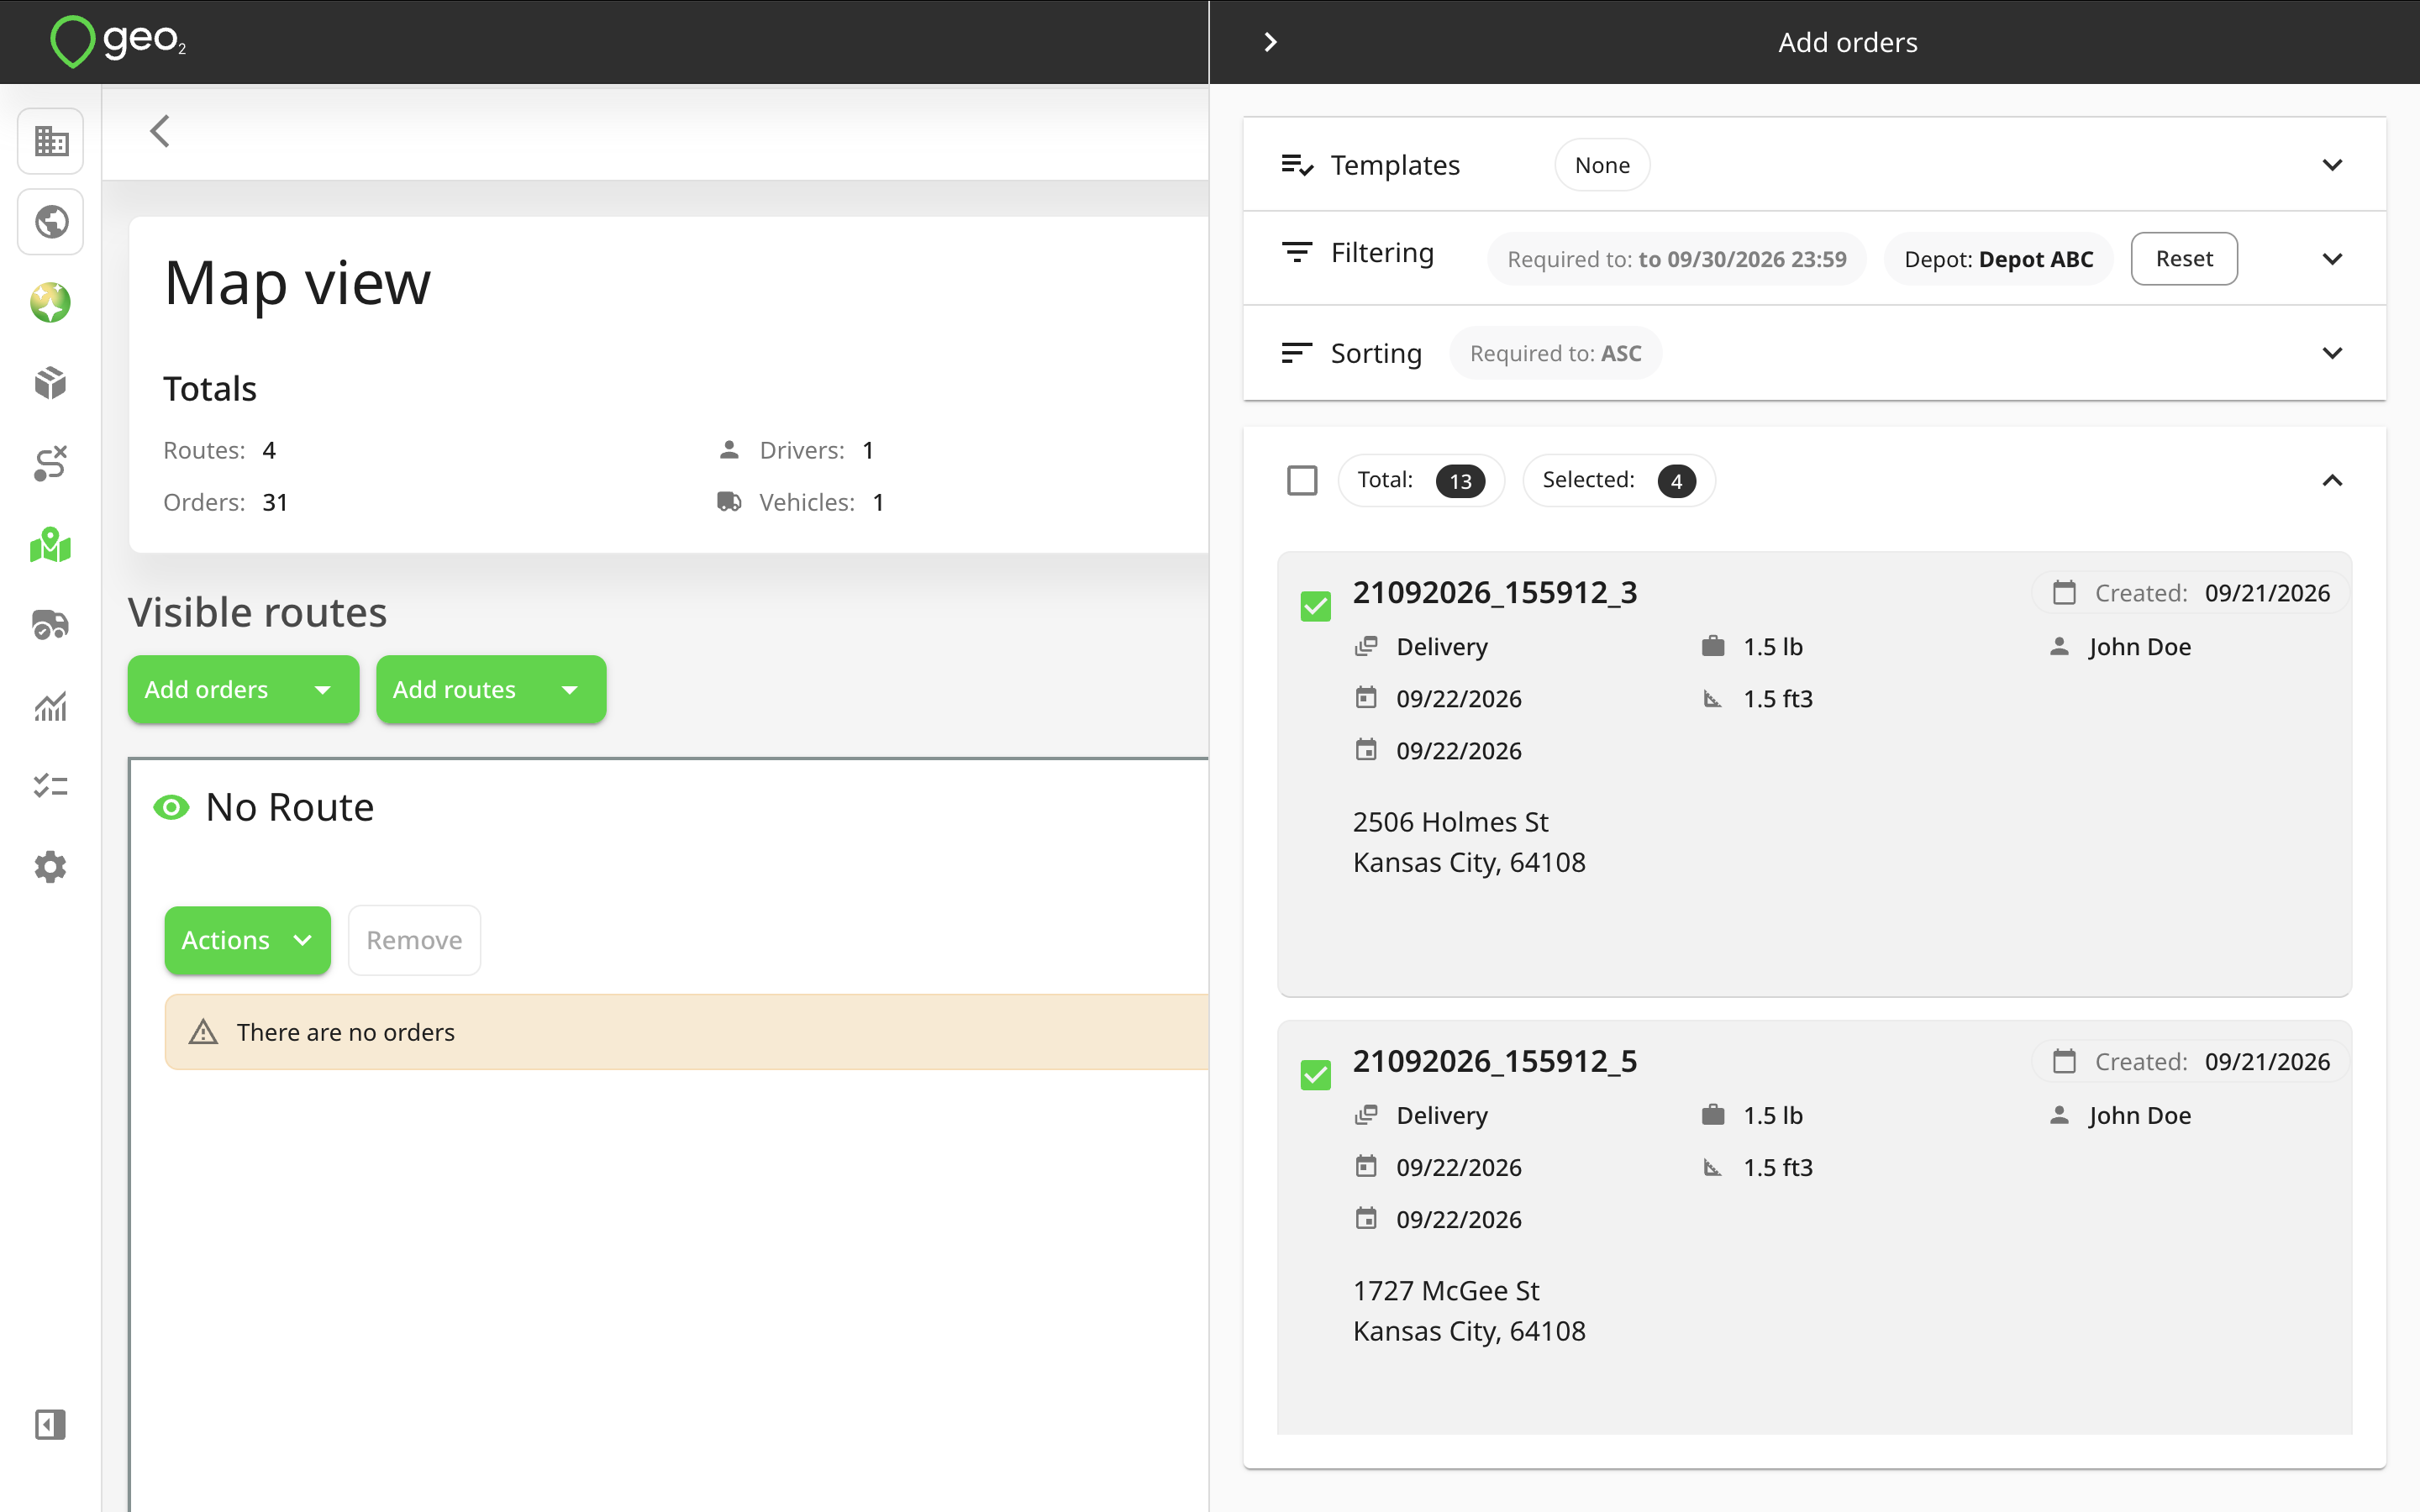
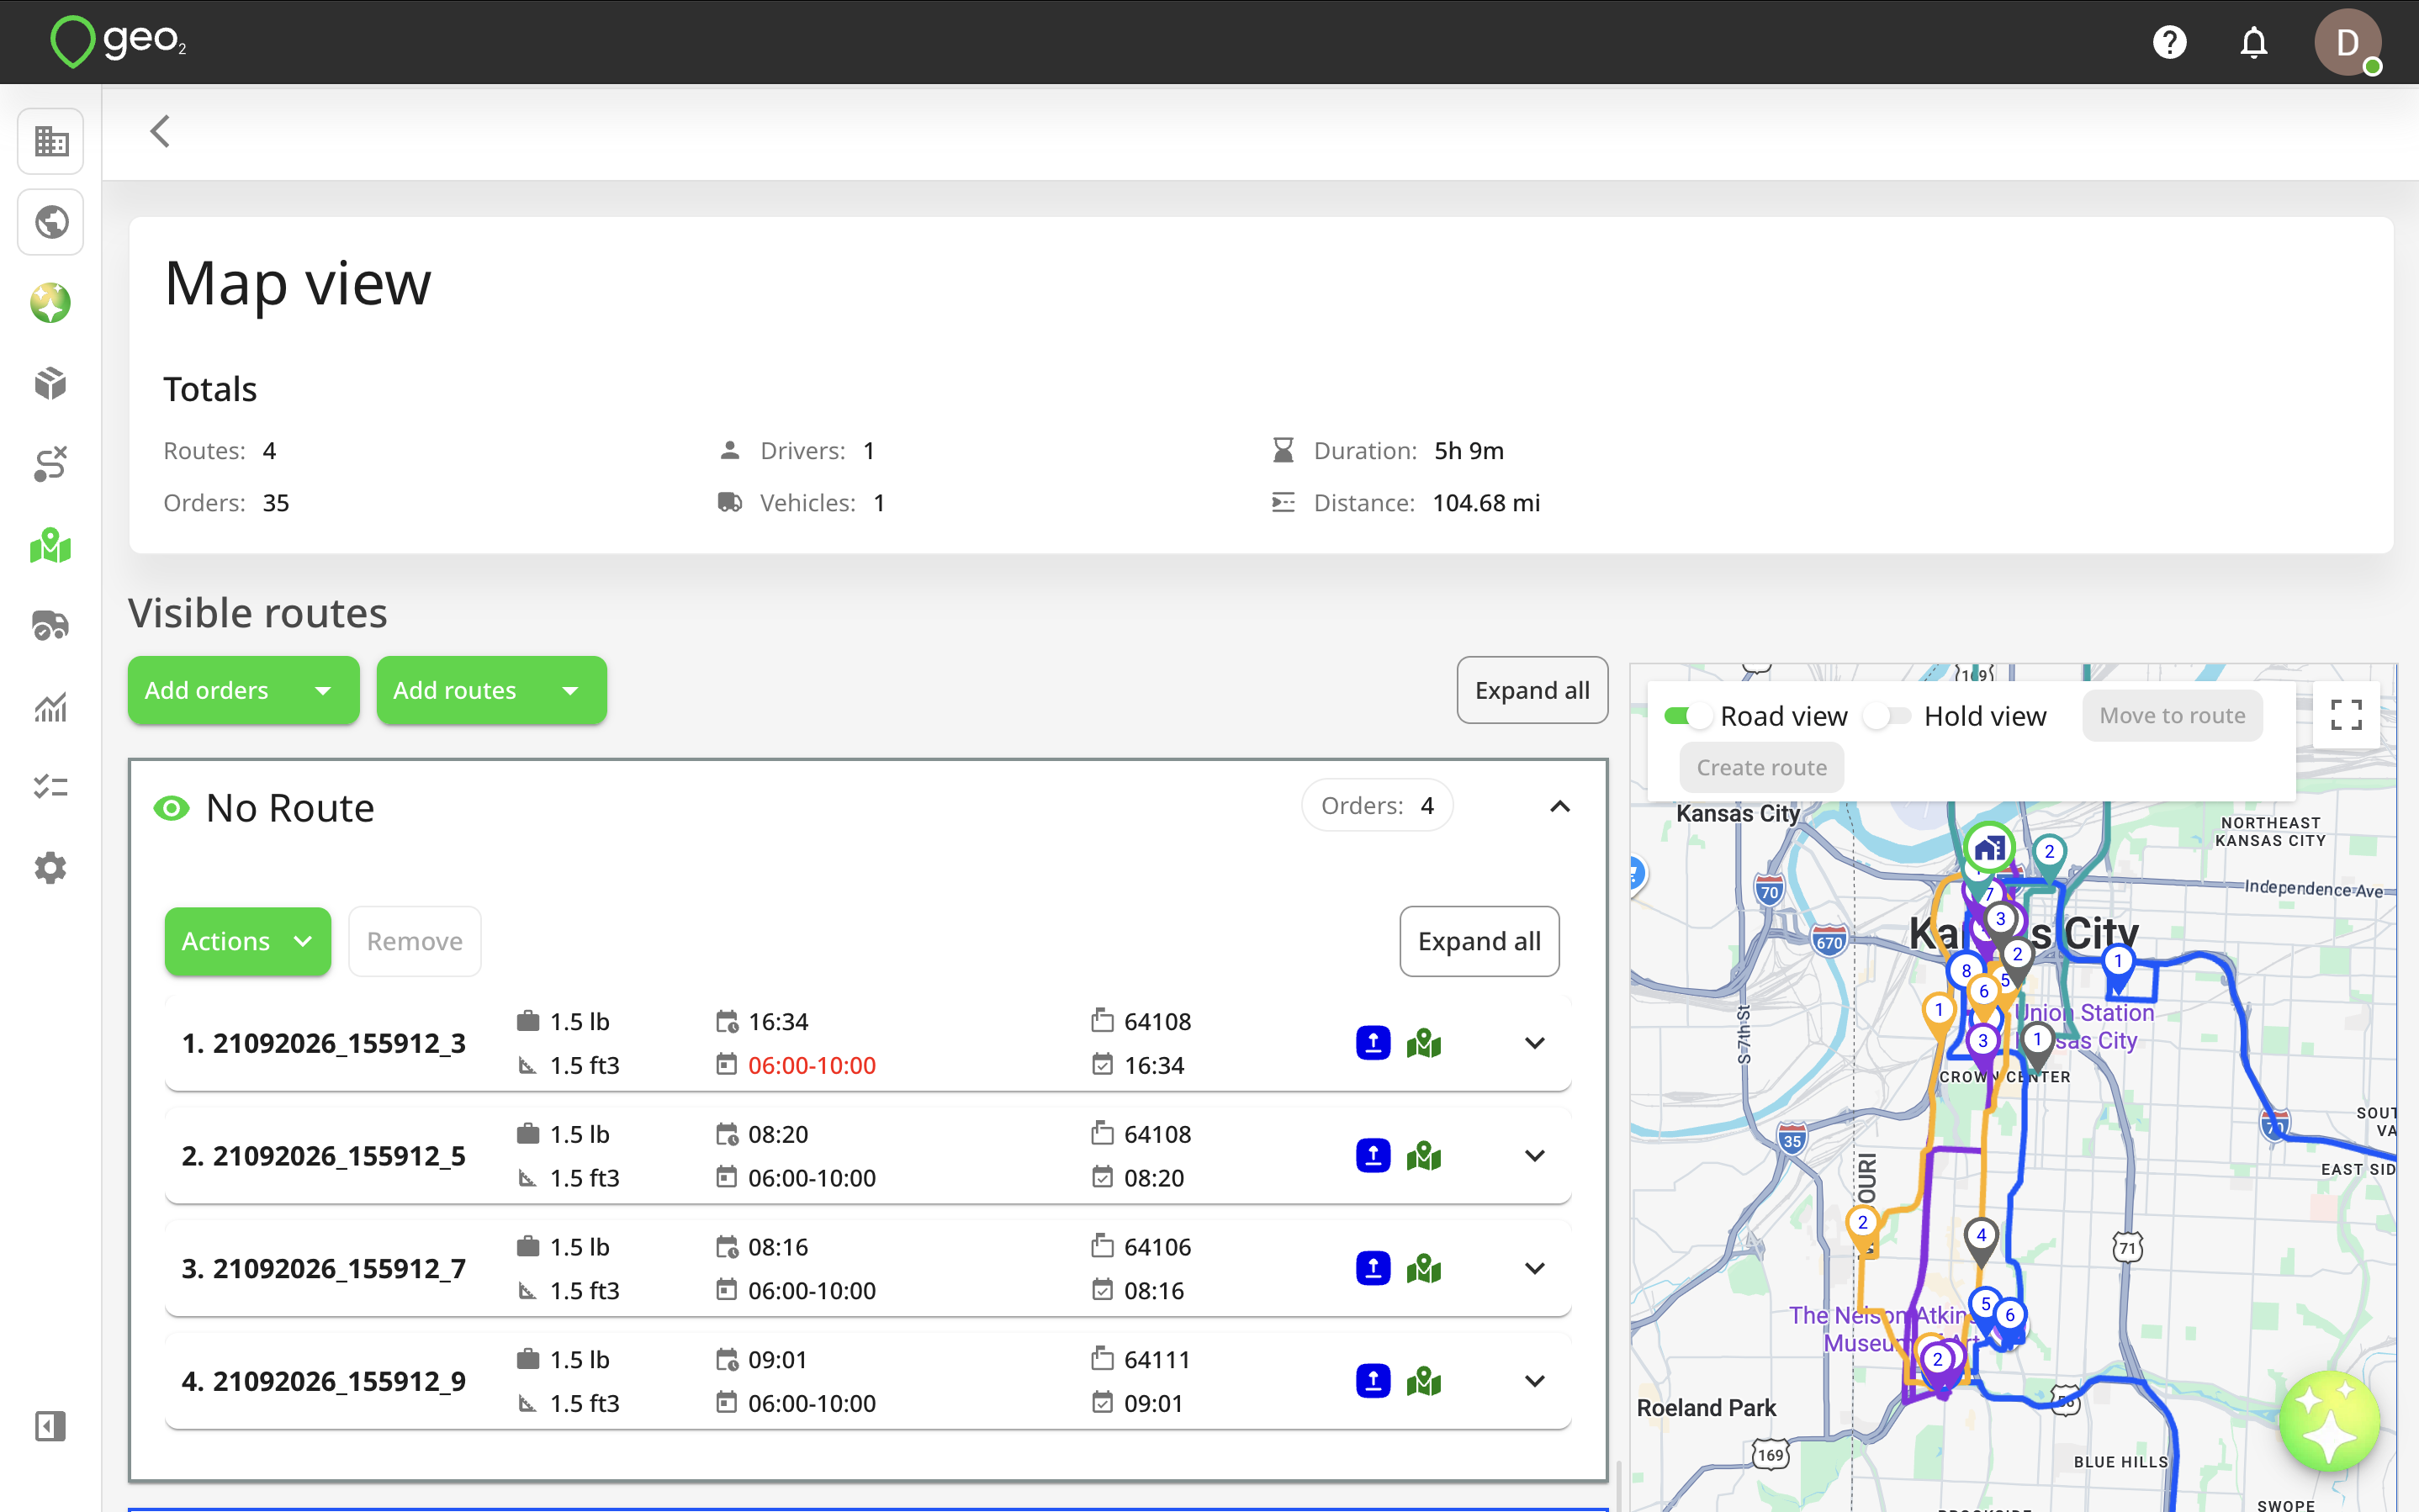
The No route card appears at the top of the Visible routes when you open the Add orders dialog for the first time. Once orders are added to this card, you can press the Actions button and select one of the following options:
- Create a route (for all orders)
- Move to a route (for selected orders)
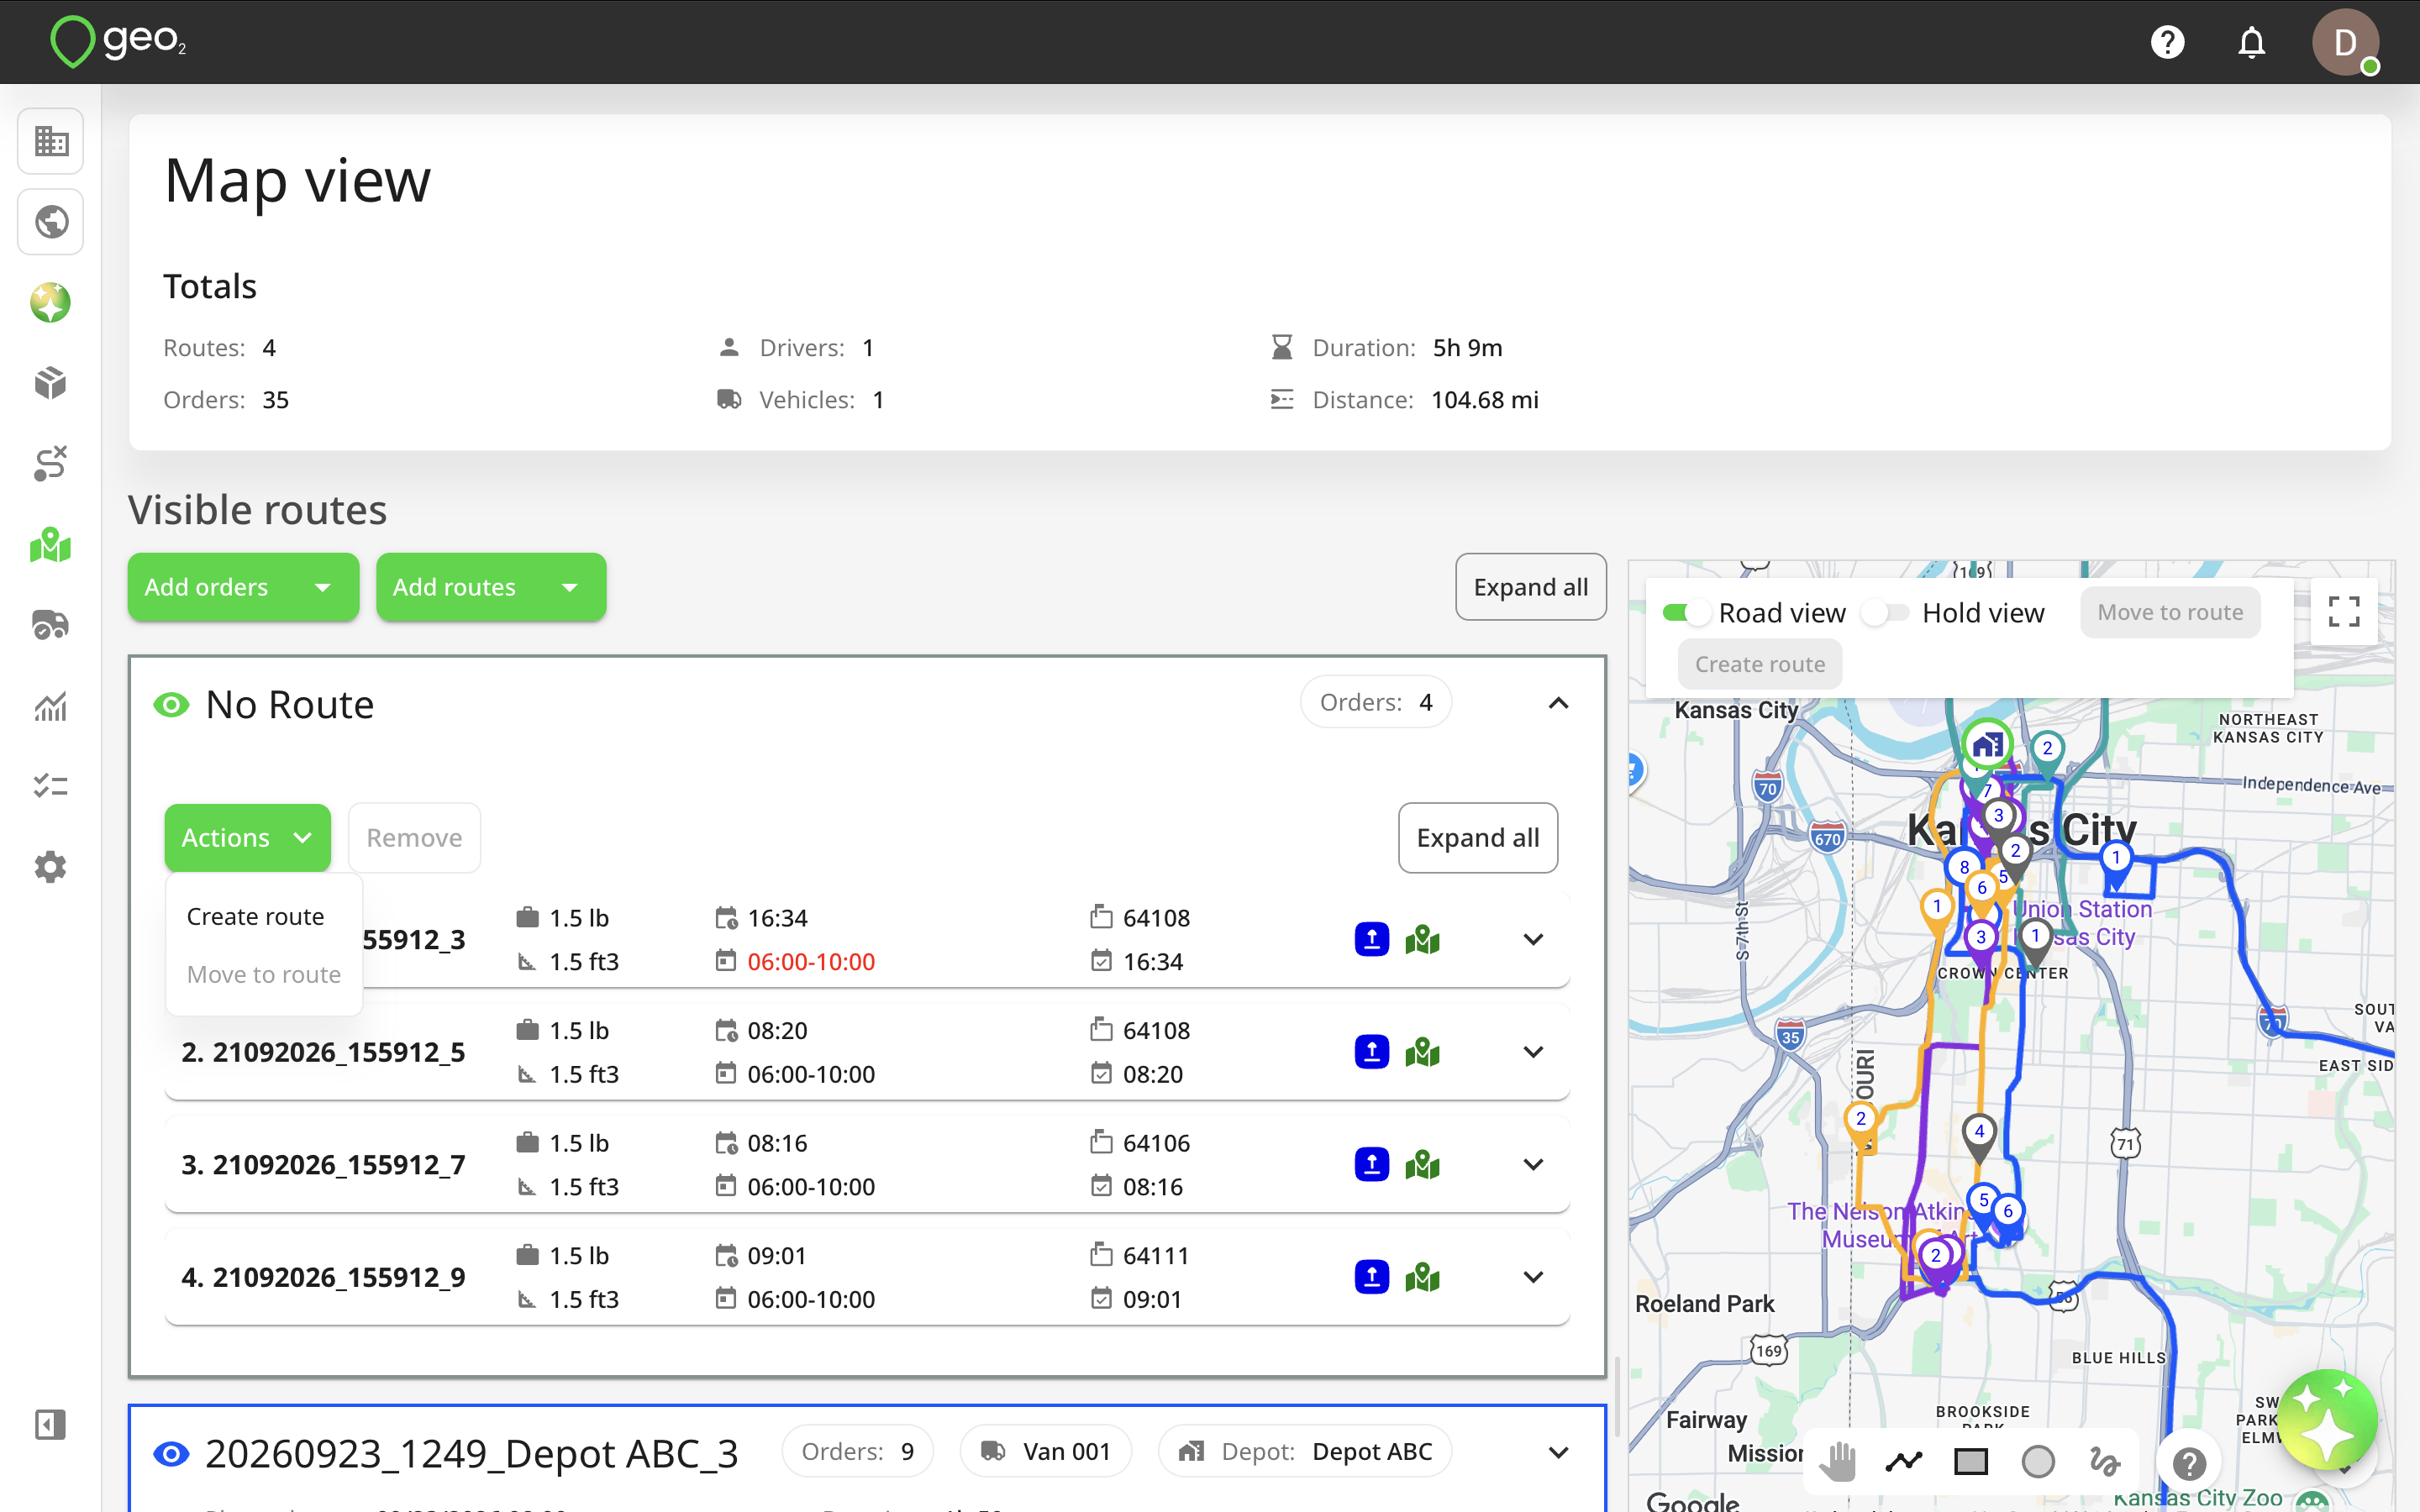
By clicking the Create route button, a Create route dialog will be displayed where you provide the following information:
| Property | Description |
|---|---|
| Key | Your unique identifier for the route in this environment. It can be a route number, for example, 1, 2, 3, etc. By default, the route key is generated automatically based on the parameters configured in Settings → Routes → Route key autogeneration. Current date/time, depot, and trip are selected by default. |
| Trip | A number you can use to indicate, for example, the order of routes for the same vehicle on the day, with the first route of the day being 1, a subsequent one being 2, etc. |
| Status | Planning - actively being planned. Planned - planning is completed, but route has not yet been released to a driver. Released - released to a driver, so that they can work with it in the mobile app. Started - indicates the route has left the start point. Completed - all work on the route has been completed; for example, the vehicle has returned to the end point. |
| Driver | User responsible for the route. Once released, the assigned user sees the route in the mobile app. A driver has permission to start/complete the route. Once the route is started and location tracking enabled, the driver’s location will be displayed on Route view and on the Started Route Driver Position on Dashboard page, as well as on the recorded vehicle checks. The driver’s location can also be optionally displayed on Public tracking. However, for POD's, the geolocation of the user who records it will be captured (either the driver or participant). If you use Vehicle categories functionality, the system can match the user’s and vehicle’s categories. Users without categories can only be assigned to vehicles without categories. Vehicles without categories can be assigned to any user. Assigning categories to users and vehicles is optional. |
| Route start | If you set up the default depot in Depots settings, it will be selected by default as a route start but it can be changed. By pressing the Route start field, you can also select other depots from your environment, first stop location (first order recipient’s address), or search address. If you select to search for an address, the Address line 1 field will be displayed below. To enter the address, you can start typing it into Address line 1 and selecting it from the drop-down which appears. If no suitable match is found, press the Expand address form button and continue entering the address in the relevant address fields manually. |
| Route end | By default, the Return to start option is selected for a route end but it can be changed. By pressing the Route start field, you can also select depots from your environment, last stop location (last order recipient’s address), or search address. If you select to search for an address, the Address line 1 field will be displayed below. To enter the address, you can start typing it into Address line 1 and selecting it from the drop-down which appears. If no suitable match is found, press the Expand address form button and continue entering the address in the relevant address fields manually. |
| Vehicle | Vehicle assigned to the route. If you use Vehicle categories functionality, the system can match the user’s and vehicle’s categories. Users without categories can only be assigned to vehicles without categories. Vehicles without categories can be assigned to any user. Assigning categories to users and vehicles is optional. Vehicle dimensions specified in Vehicle settings (“Gross weight”, “Height”, “Width”, and “Length” fields) can be used for route calibration/optimization with vehicle restrictions. The system will factor these dimensions into route building to generate the most efficient outcomes, for example, to avoid bridges with height restrictions, narrow roads unsuitable for wider vehicles, or areas with weight limits that could affect the selected route. |
| Area | Area tag. You can set up the default user and vehicle for every area. When the area value is selected, default values from the area will propagate to the User and Vehicle fields. |
| Planned start | Expected dispatch date/time of the route from the start point. The start time will come from Routes settings. |
| Vehicle check on route start | Activate vehicle check in the mobile app when the route is being started. |
| Vehicle check on route completion | Activate vehicle check in the mobile app when the route is being completed. |
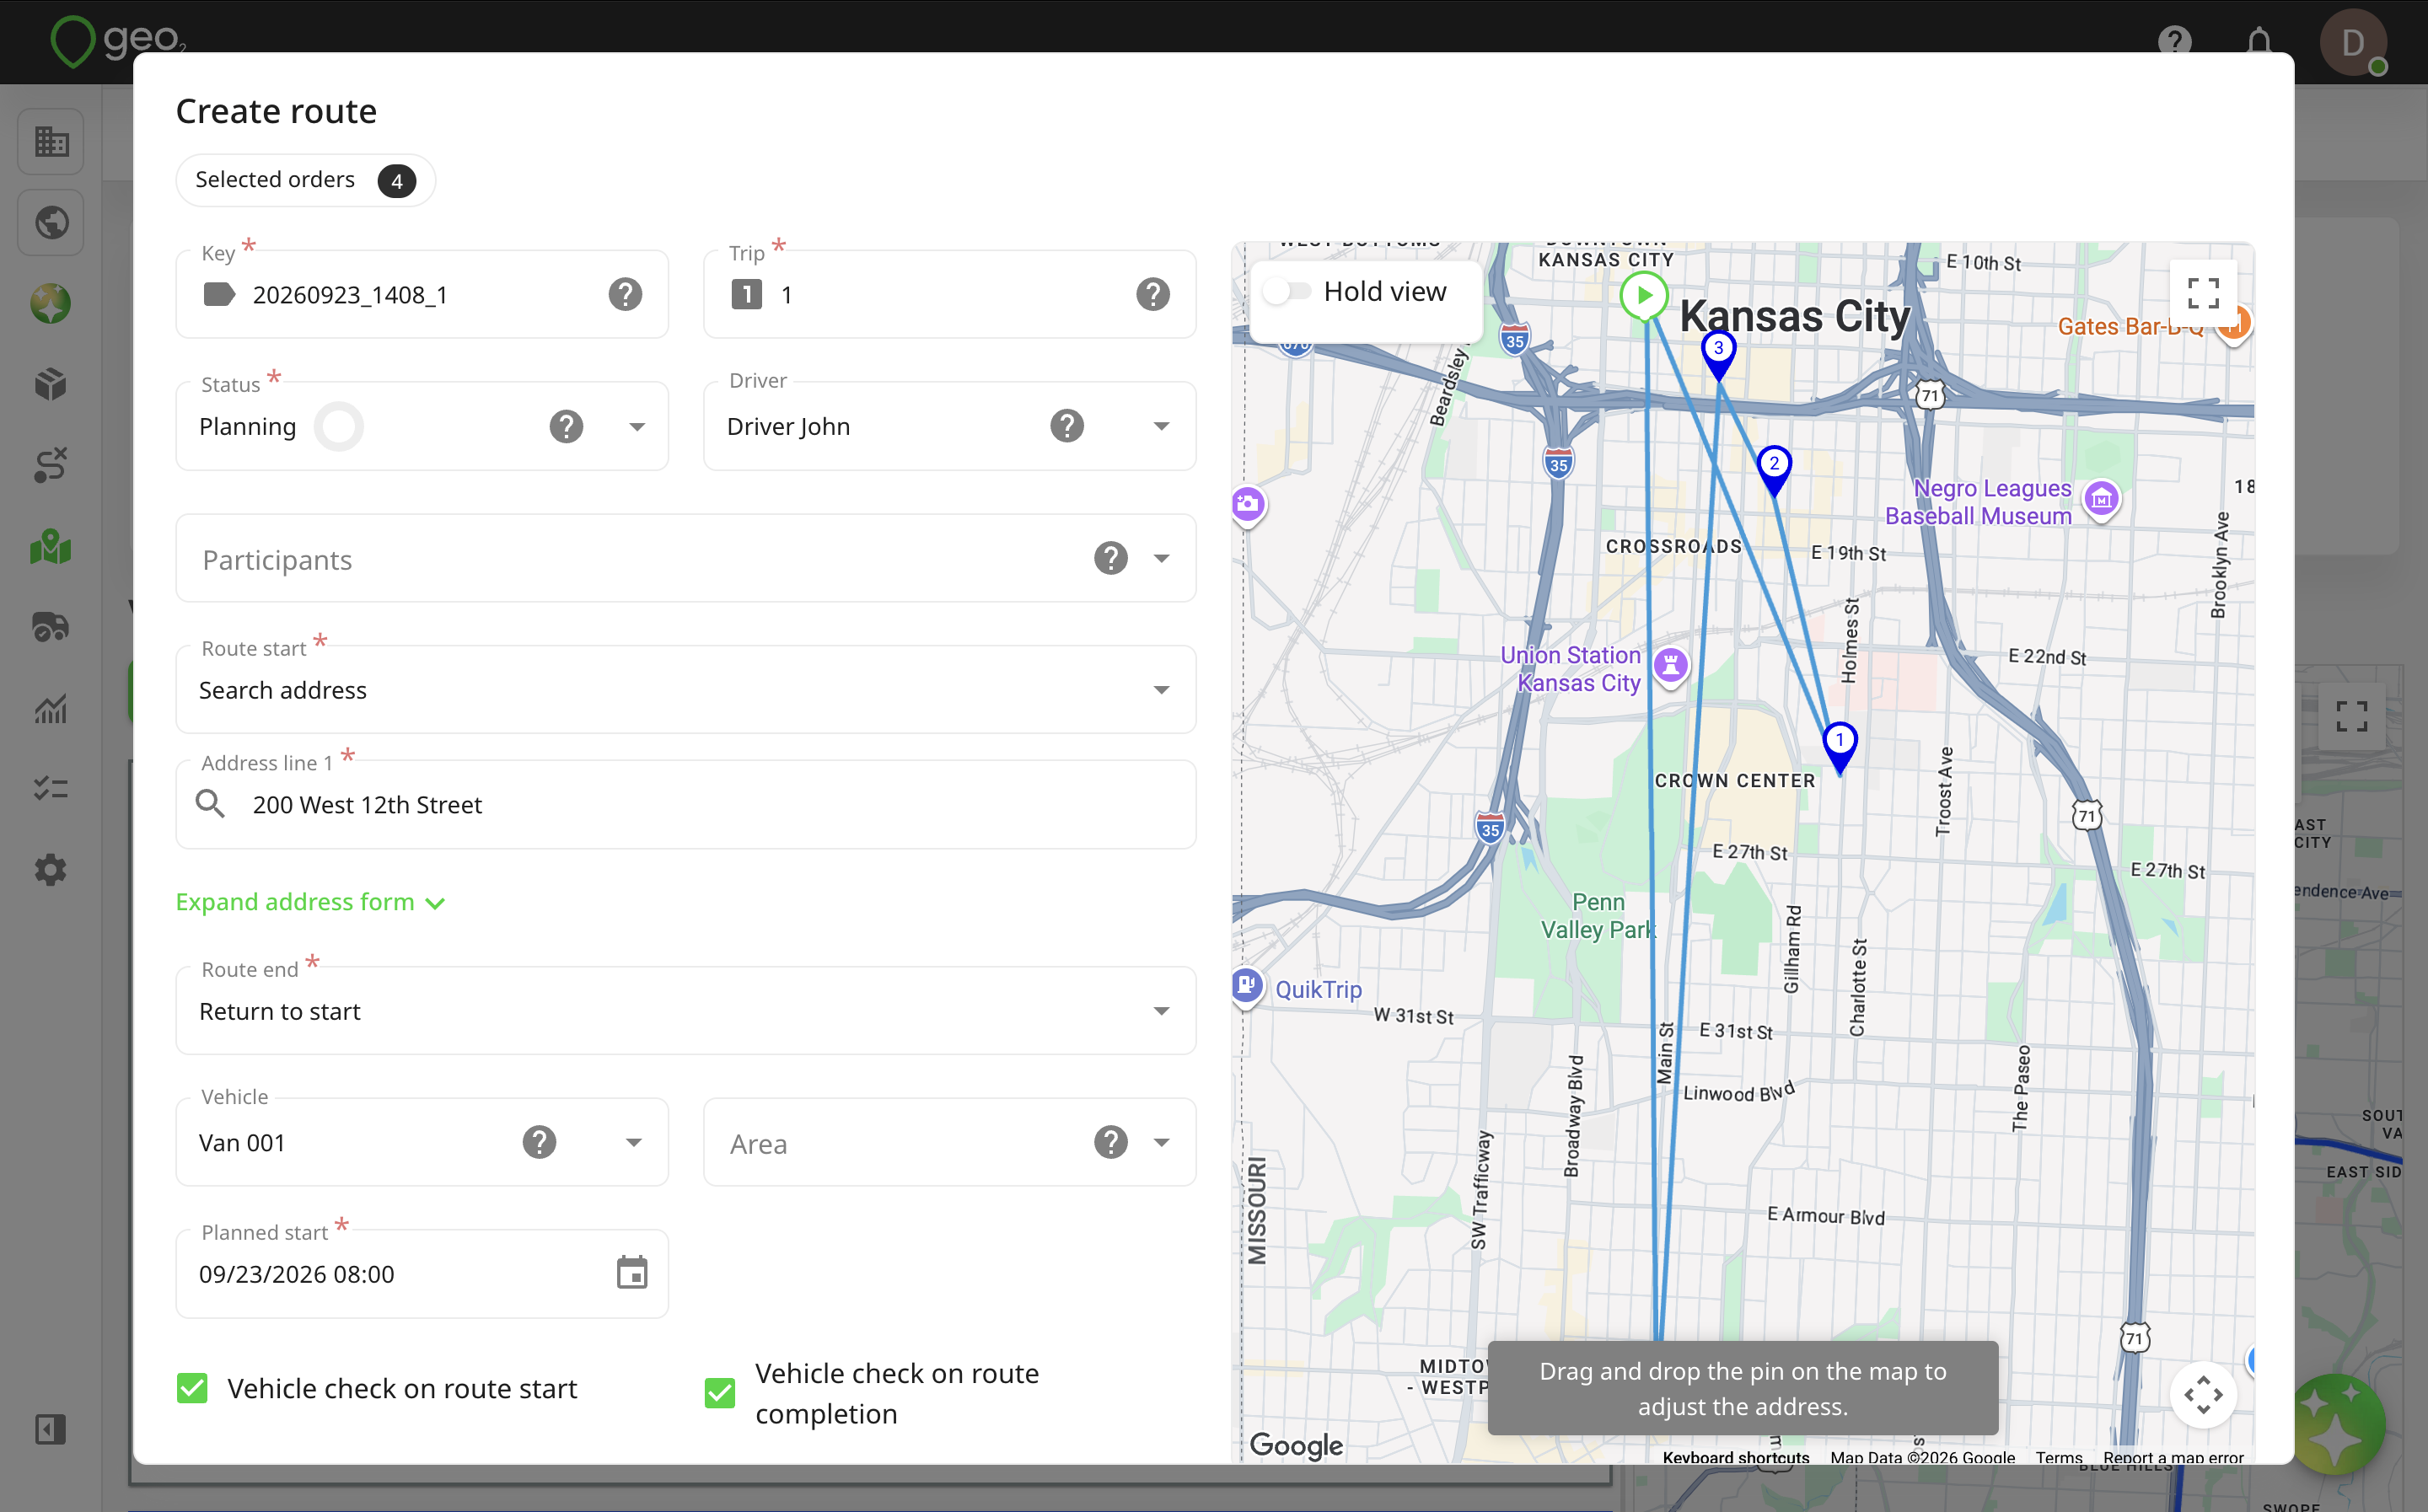
By pressing the Create button, a new route will be created and added to the page either to the bottom of the Visible routes column or the Hidden column, if the number of routes in the Visible routes columns already exceeds 40.