Mobile App: POD - Proof of Delivery
Introduction
The mobile app lets you record a proof-of-delivery in different circumstances:
- Planned - for an existing order in a planned route
- Ad-hoc - without a planned order
- Ad-hoc - for an existing order that is not part of a route
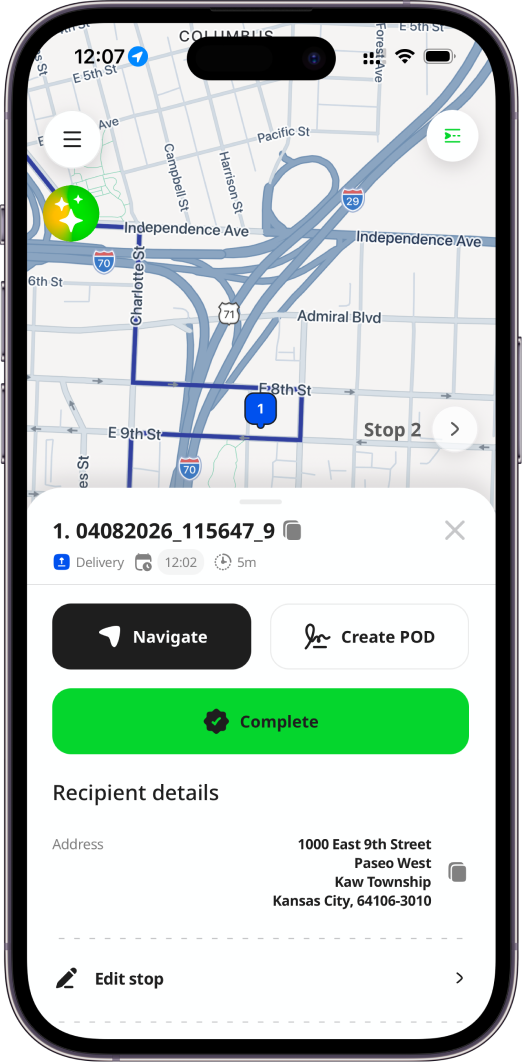
To record a planned POD, open Stop details page and click on the Create POD button. Creating PODs is available on all subscription levels, including Free.
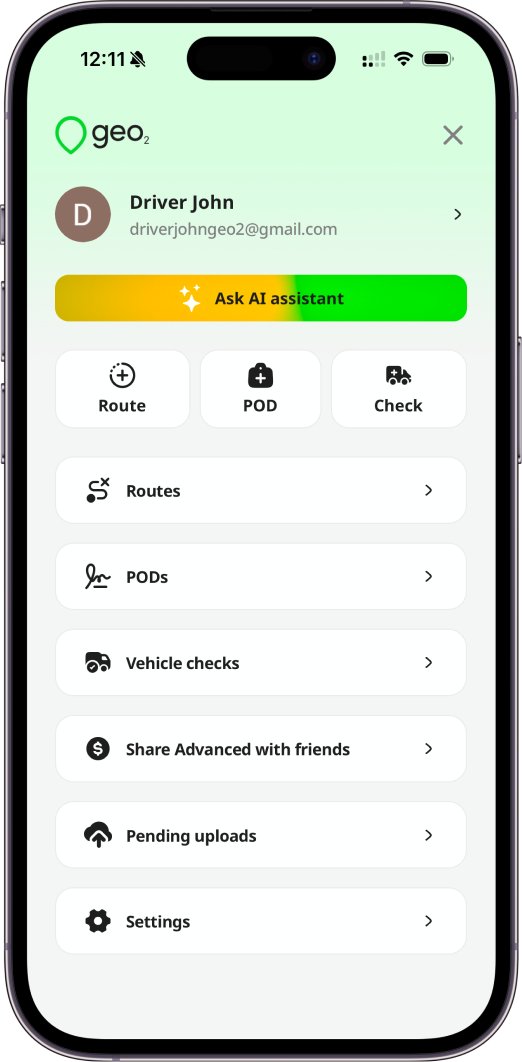
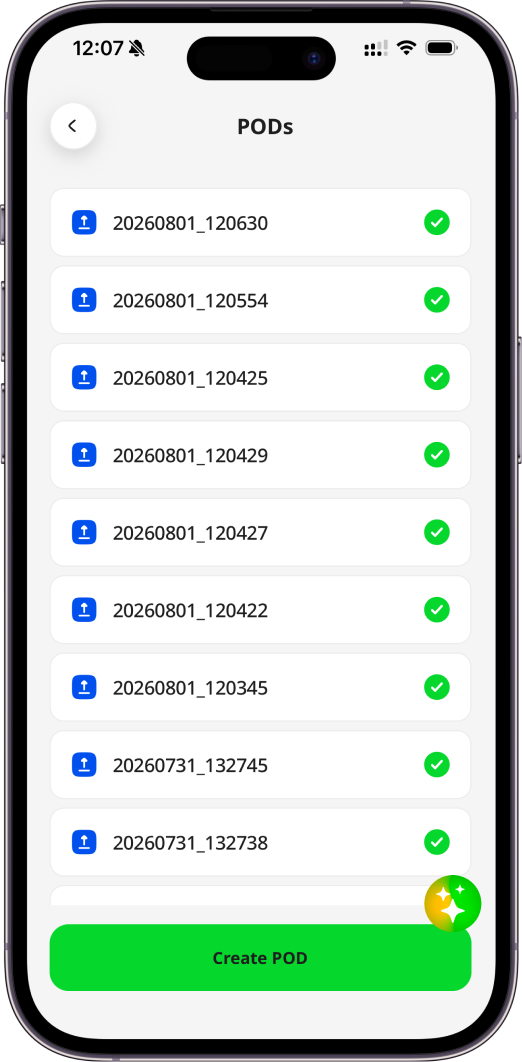
To record an ad-hoc POD, you can press the Create POD button in Menu or on PODs page.
You will be redirected to POD creation page.
Planned POD
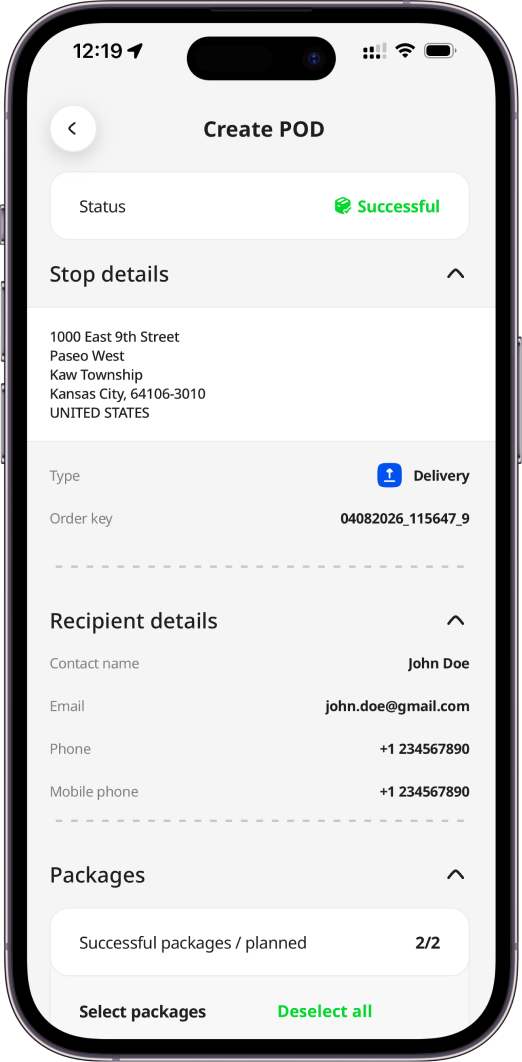
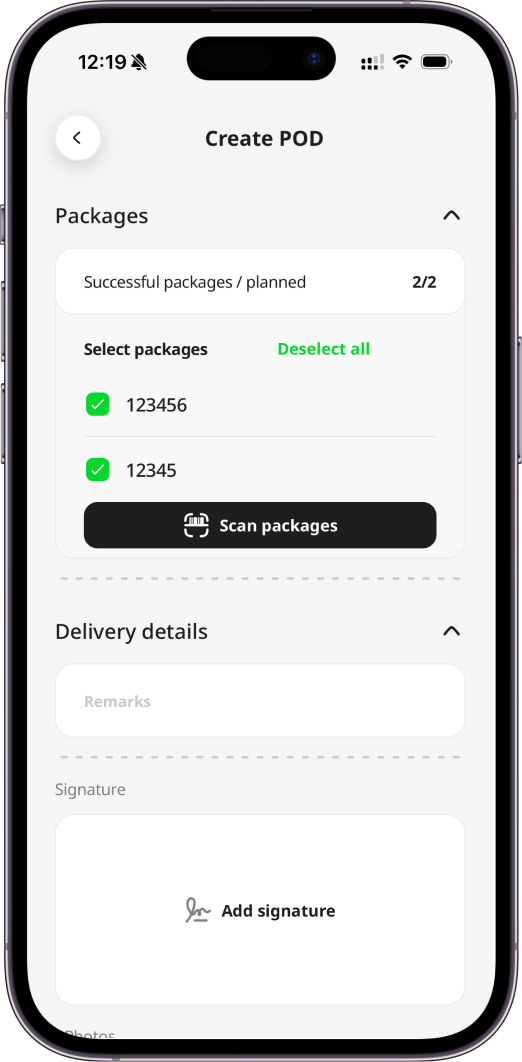
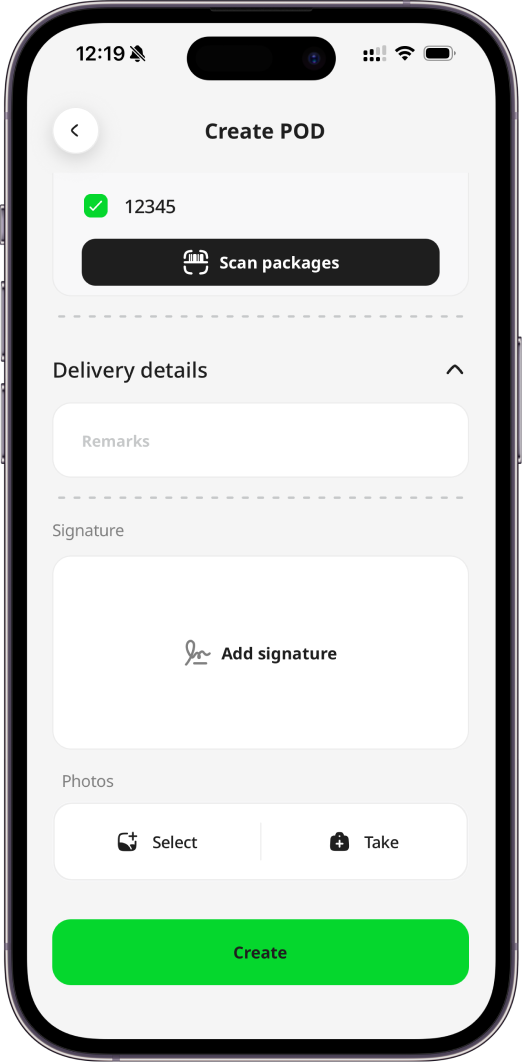
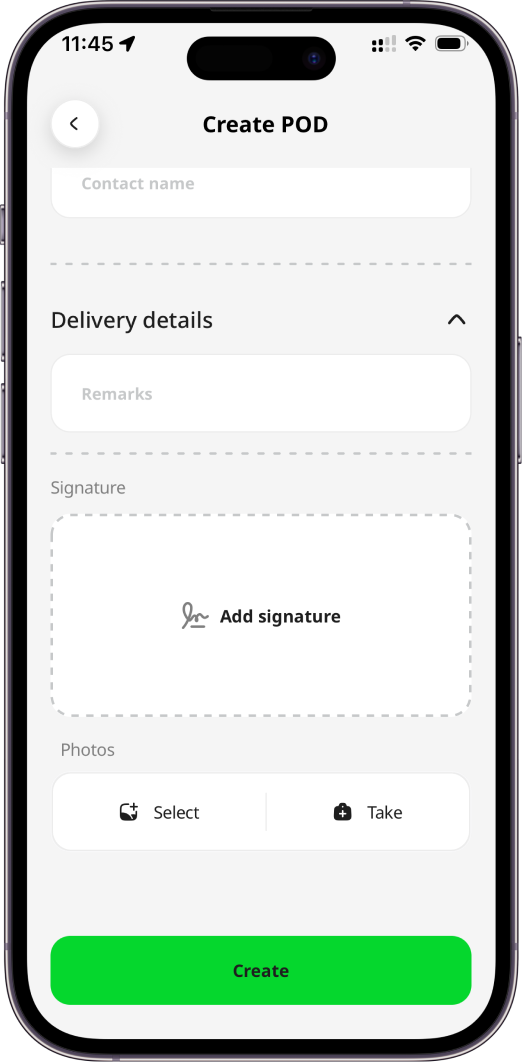
In the Stop details section, you will see the following fields:
| Fields | Description |
|---|---|
| Type | Delivery or Collection. |
| Order key | Order identifier unique within the environment, for example, an order number 1, 2, 3, 4, etc. |
| Address | The app uses the address indicated in the order. |
In the Recipient details section, you will see the following fields:
| Fields | Description |
|---|---|
| Contact name | Name of the person who received the order. |
| Email address for sending the proof-of-delivery email. | |
| Phone number | Phone number of the person who received the order. |
| Mobile number | Mobile phone number of the person who received the order. |
In the Packages section, you can review, add, or scan packages for the stop (order), mark some of them as failed if it is needed. Packages are available only with Advanced and Enterprise subscription levels.
In the Delivery details section, you can add remarks. In the mobile app, Settings → Proof of delivery lets you configure remarks requirements for successful, partially successful, and failed PODs.
Details such as type, order key, contact name, email and address will be pre-populated from the stop (order) for which you are creating the POD. You can edit remarks and provide contact name if it was not pre-populated from the stop (order). Under Settings → Proof of delivery in the mobile app, you can choose whether a contact name is required for each POD status: successful, partially successful, or failed.
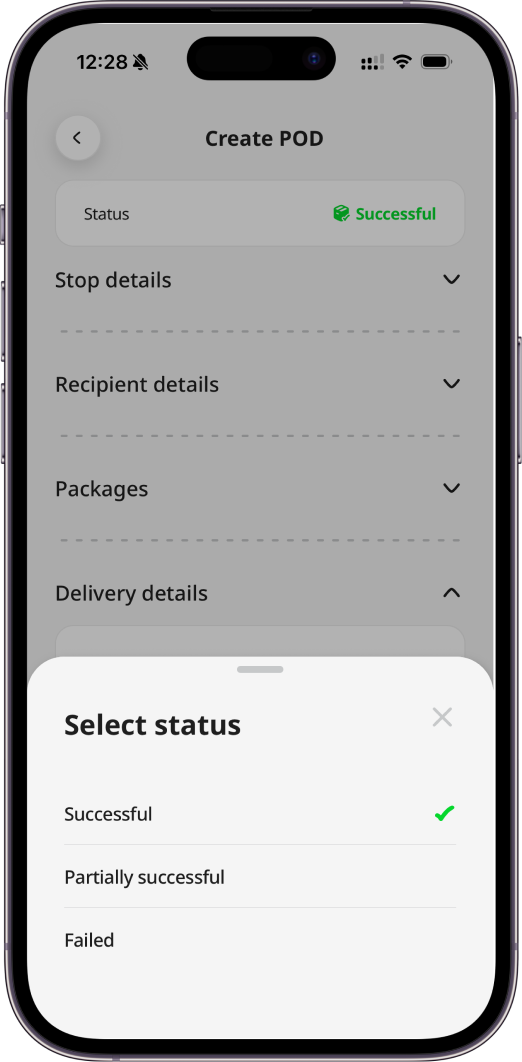
You can select the POD status:
- Successful - order has been successfully delivered/collected.
- Partially successful - part of the order has been delivered/collected.
- Failed - delivery/collection has failed.
In the Signature section, record the recipient’s signature by pressing the Add signature button and saving the recorded signature. In the mobile app, Settings → Proof of delivery lets you configure signature requirements for successful, partially successful, and failed PODs. In the Photos section, you can take or select pictures for the proof-of-delivery. As with signatures, you can configure whether photos are required for each POD status (successful, partially successful, or failed) in the mobile app under Settings → Proof of delivery.
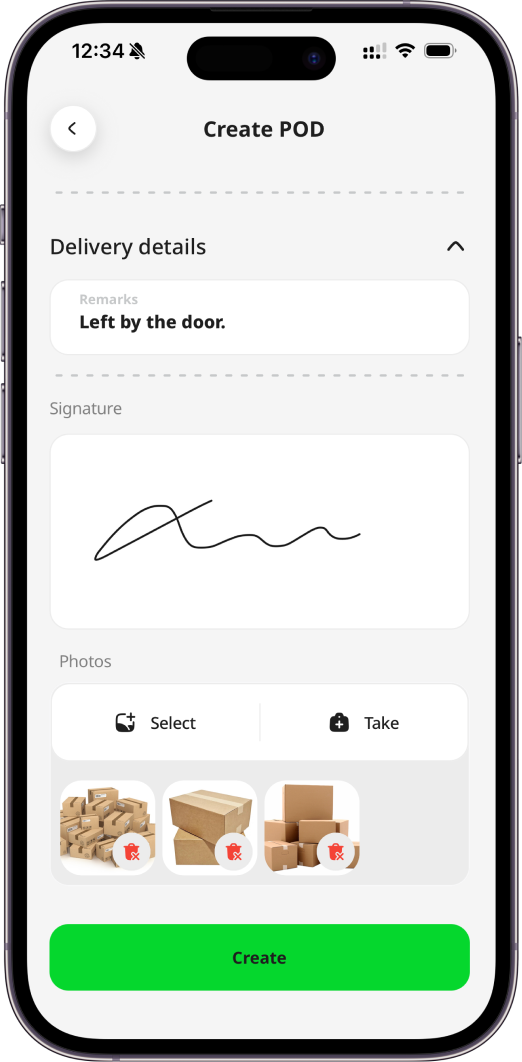
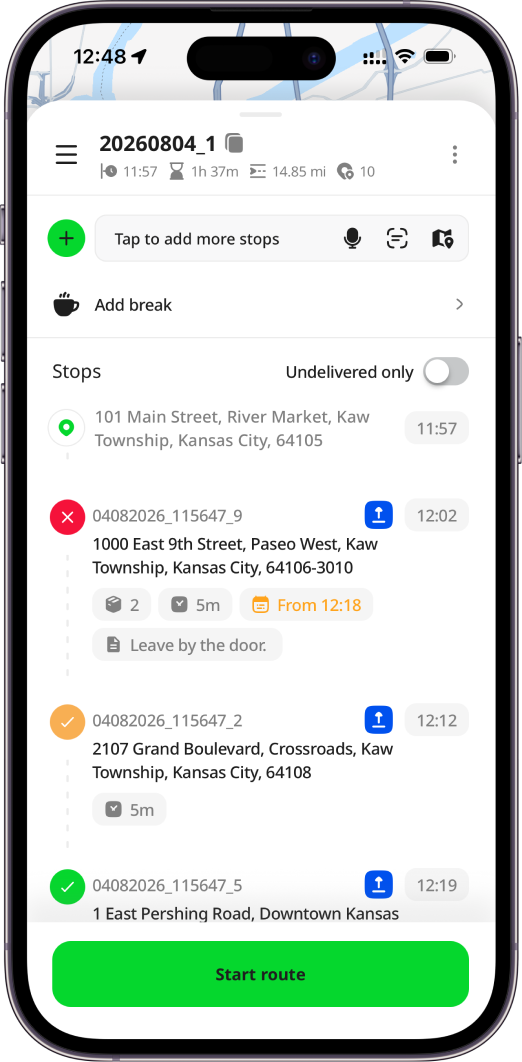
After filling in the information, press the Create button to save the POD. When the POD is created, you will be redirected back to Stop details. In Stop details page, you will see in the right corner:
- a green "done" icon for “Successful” POD status
- a yellow “done” icon for “Partially successful” POD status
- a red “cross” icon for “Failed” POD status
A green “refresh” icon means that there are pending signatures/photos inside a POD. Once they will be successfully uploaded, the icon will be changed accordingly to one of the relevant statuses described above.
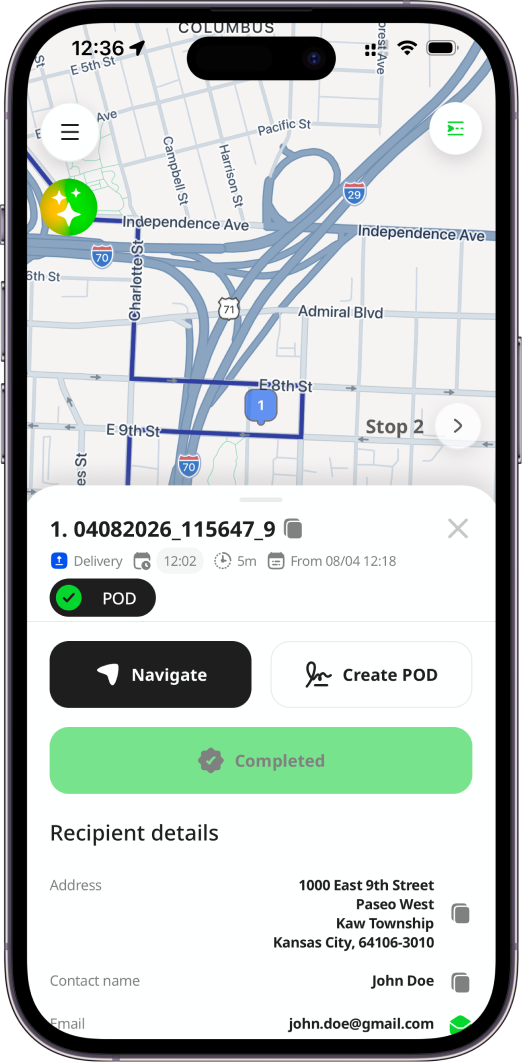
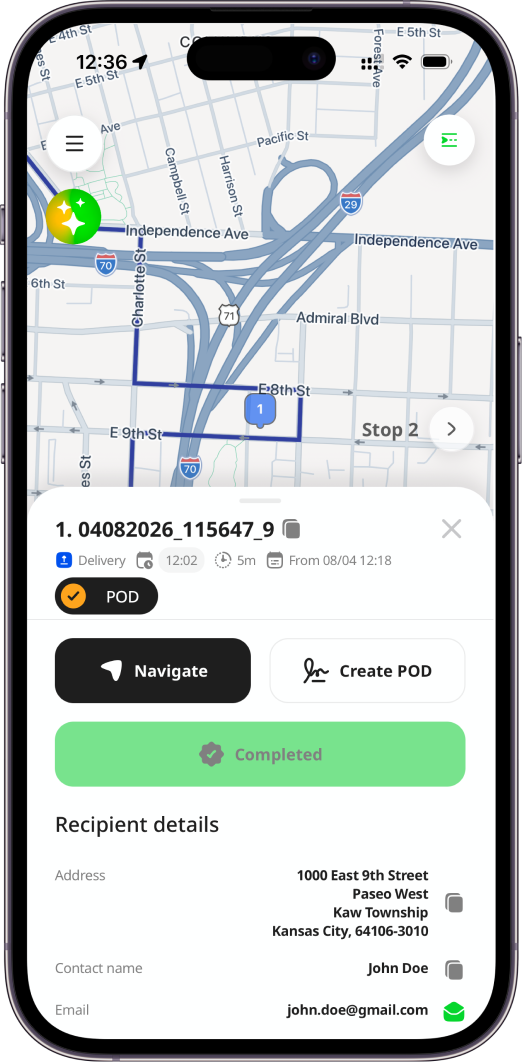
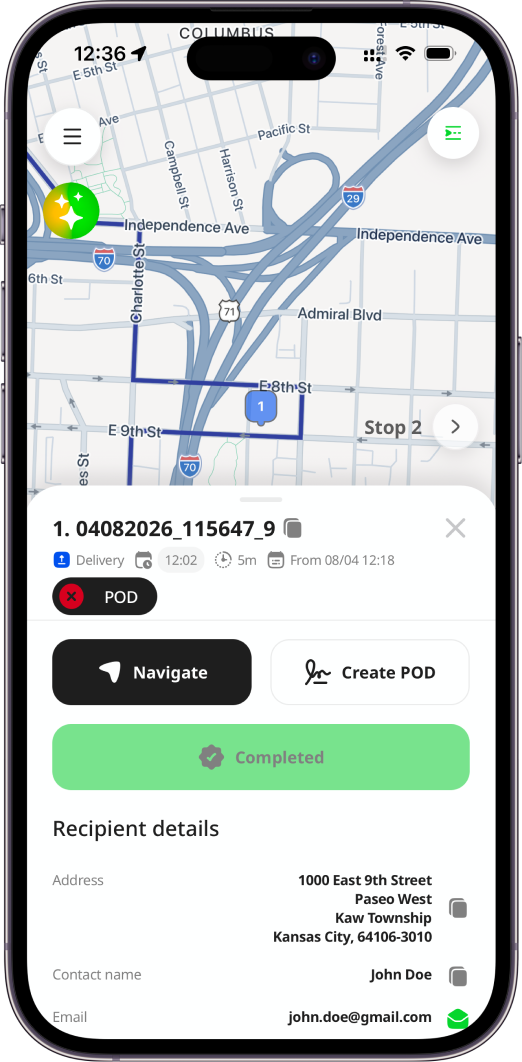
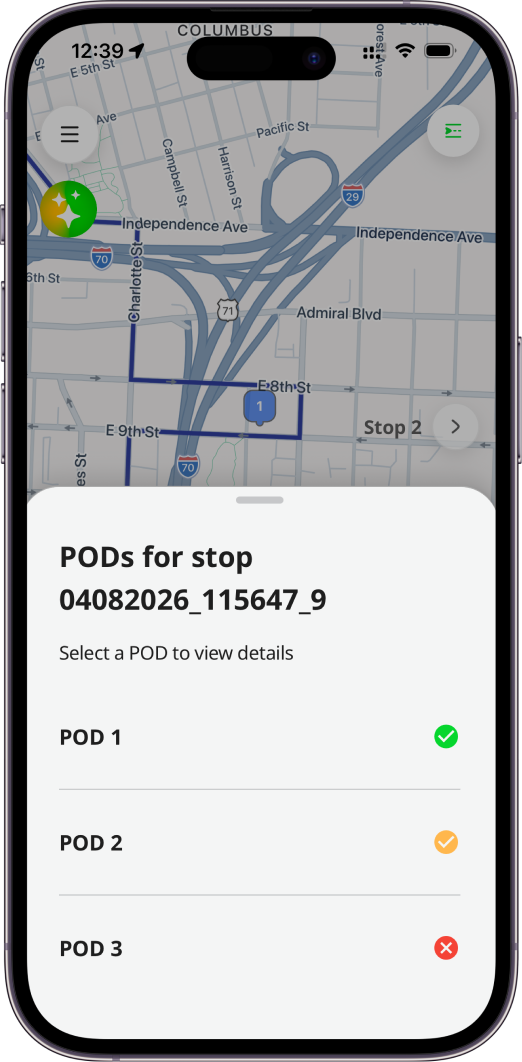
You can click the POD icon to view POD details. If the order has only one POD, its details will open immediately. If there are multiple PODs, a dialog will appear first so you can select the POD you want to view.
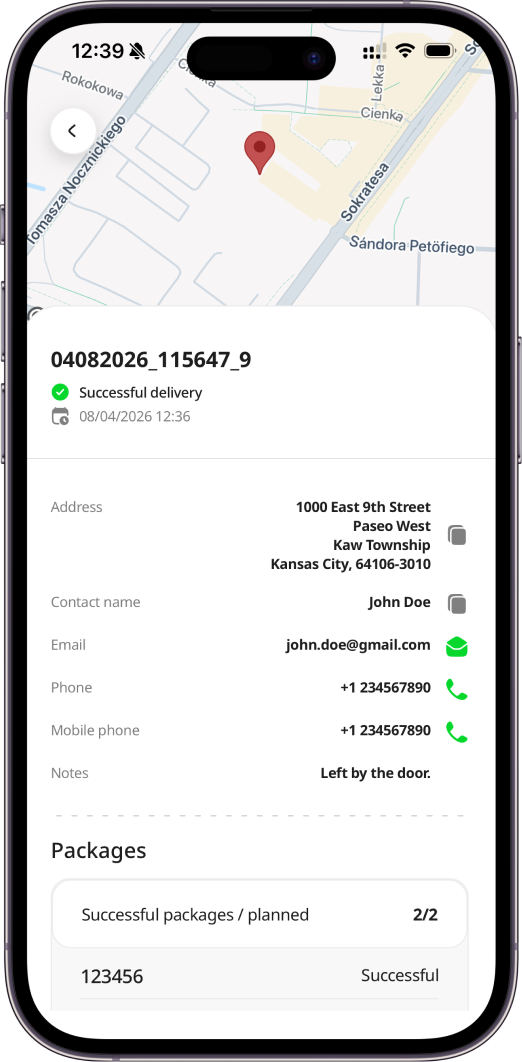
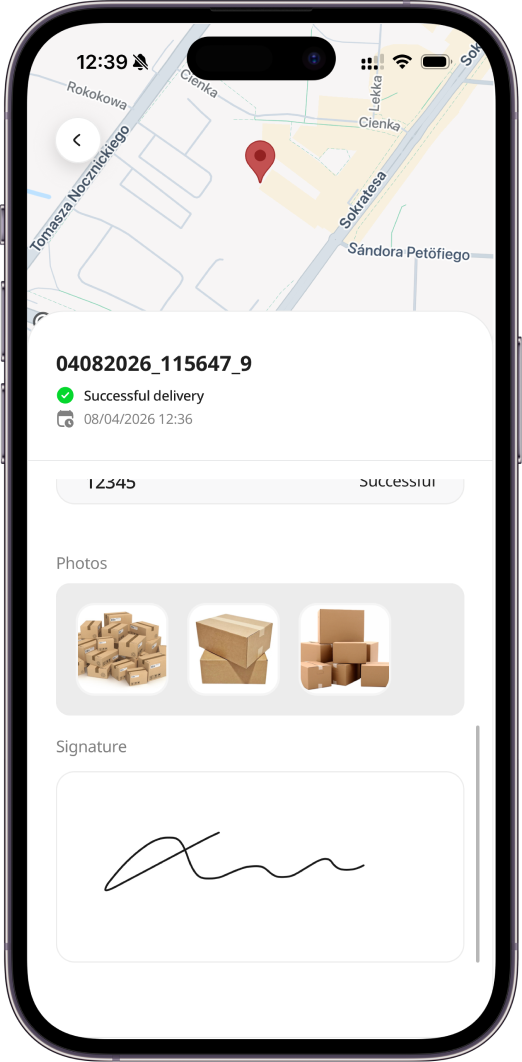
Also, the created POD will be saved in the POD history on the PODs page.
POD statuses (successful, partially successful, failed, no POD) are also displayed alongside the stops in Route plan page. The POD icon on stop cards on Route view page is not clickable. To view POD details, open the order and click the POD icon, or check the PODs page.
Order Packages
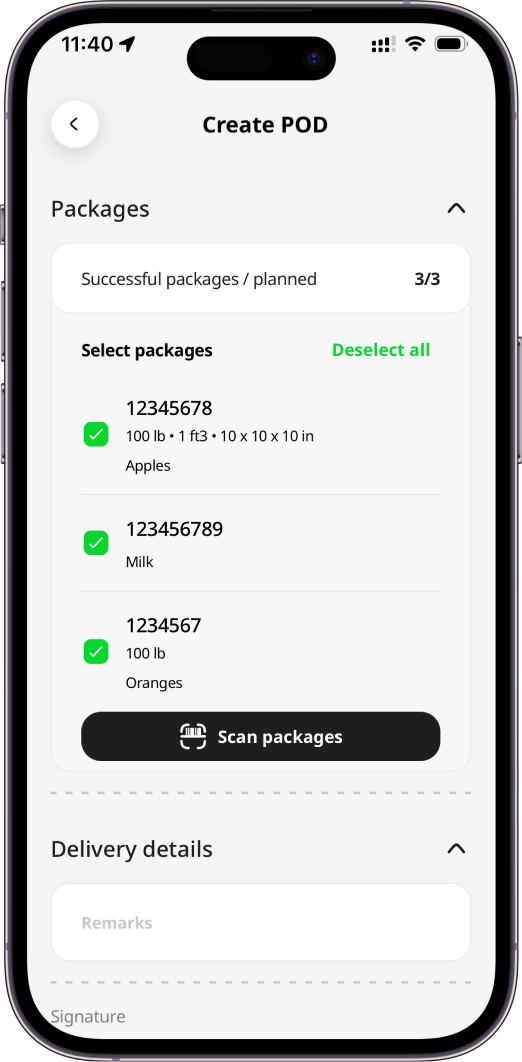
When the order has pre-defined packages, they are displayed in the Packages section. On each package card, a barcode, description, height, width, depth, weight, and volume can be displayed depending on the data provided Hub: Orders, mobile app or API for an order. Adding/scanning/marking packages as failed is available only with Advanced or Enterprise subscription level.
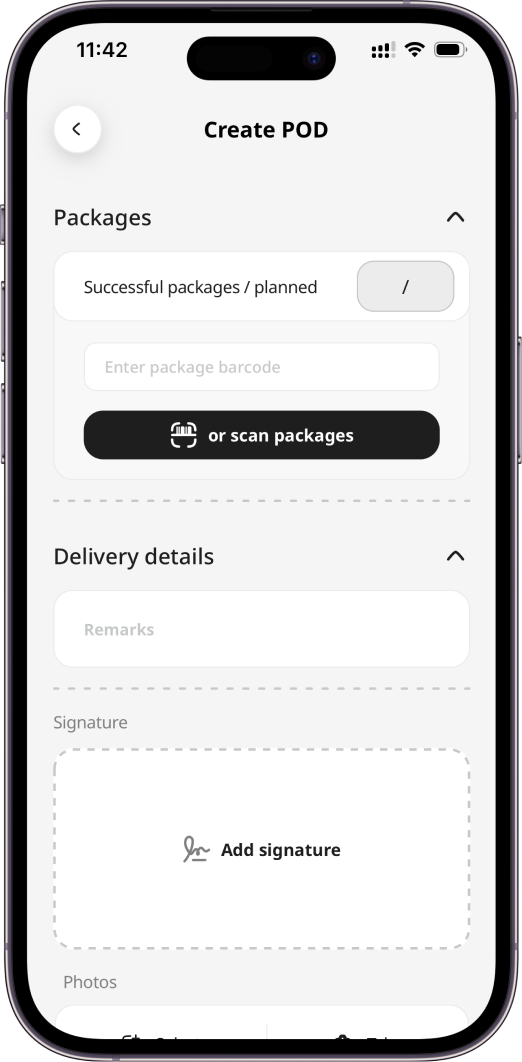
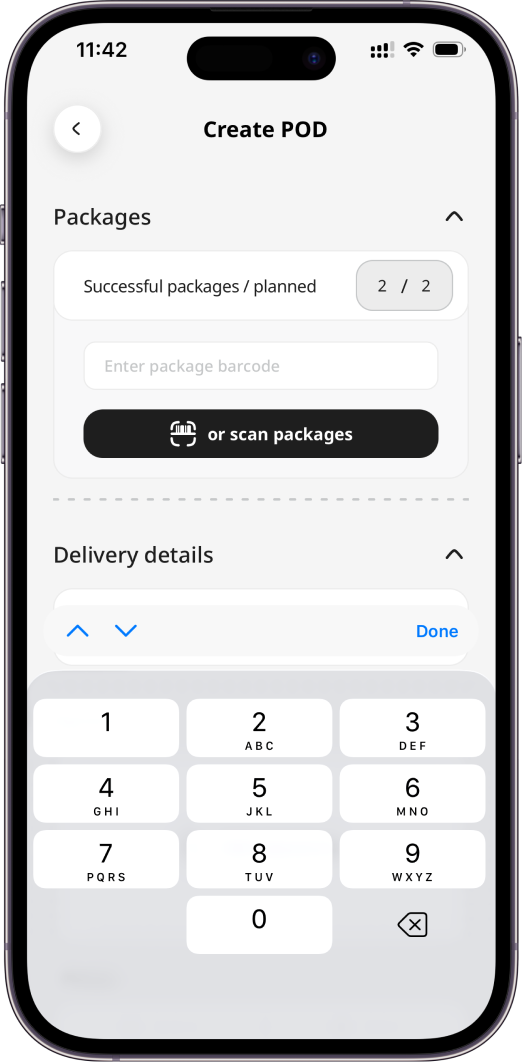
When the order doesn't have packages, the Packages section is collapsed by default. You can expand it, provide the number of successfully delivered/collected packages out of the total planned and add packages by typing a barcode manually or scanning package barcodes.
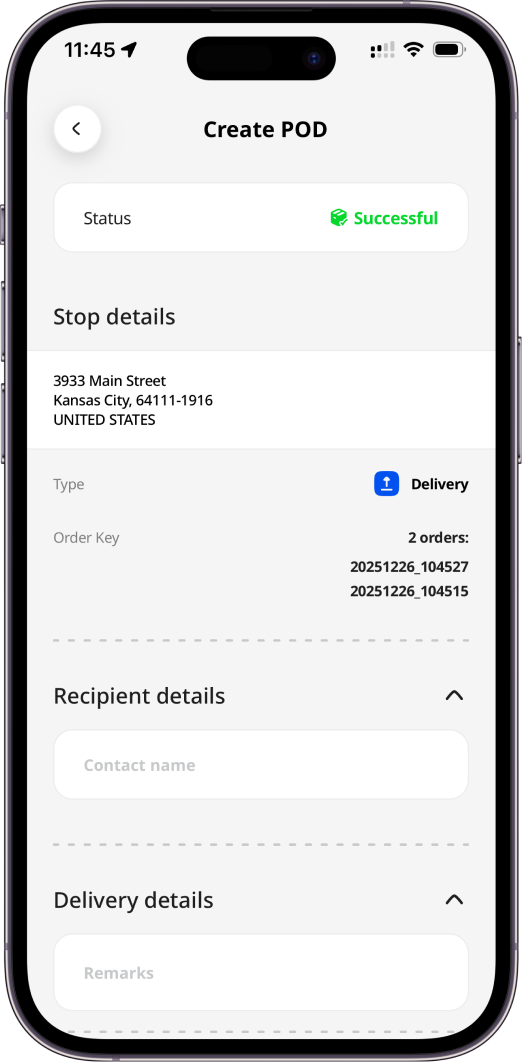
When you create a POD for multiple orders, the Packages section is hidden.
By default, packages are marked as delivered (checkboxes are selected). See Mobile App: POD - Proof of Delivery on marking packages as failed.
Order Products
When the order has pre-defined products, they are displayed in the Products section. On each product card, a product code, description, quantity, and weight can be displayed depending on the data provided in Hub: Orders or via the API for an order. Adding/marking products as failed is available only with Enterprise subscription level.
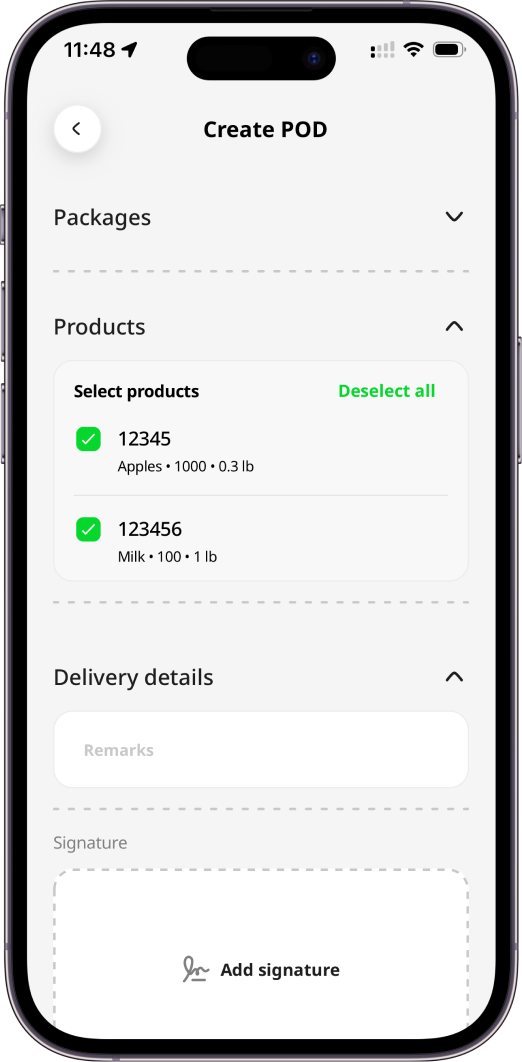
When the order doesn't have products, the Products section is not displayed. When you create a POD for multiple orders, the Products section is hidden.
By default, products are marked as delivered (checkboxes are selected). See Mobile App: POD - Proof of Delivery on marking products as failed.
Order Packages with Products
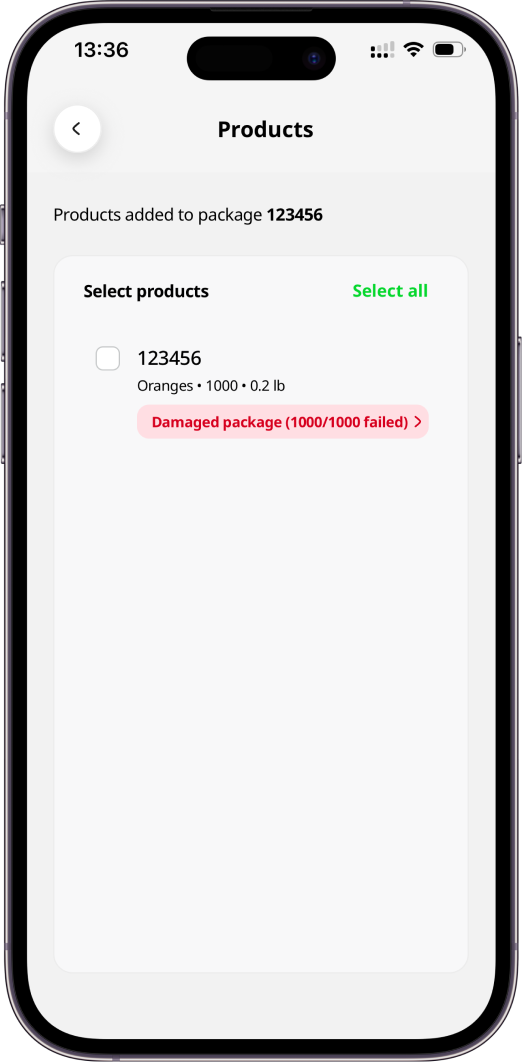
When the order has pre-defined products and packages linked, they are displayed in the Packages and products section. For a package, a barcode, height, width, depth, volume, and weight can be displayed depending on the data provided in Geo2 Hub, mobile app or API. For a product, a product code, description, quantity, and weight can be displayed depending on the data provided in Geo2 Hub or API. To check products added to a package, press the Products button on a package. The list of products added to the package will be displayed. Press Back to return to Create POD page.
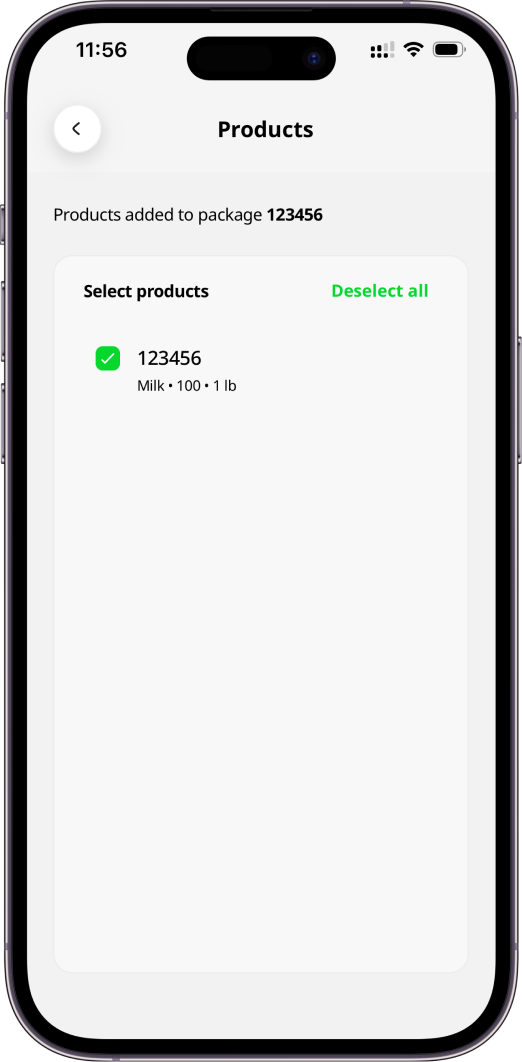
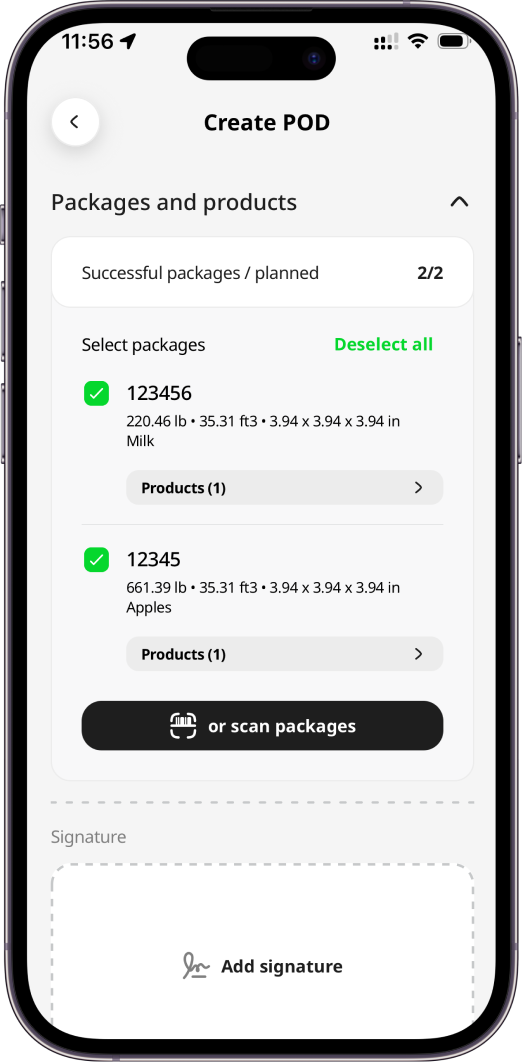
When you create a POD for multiple orders, the Packages and products section is hidden.
By default, packages with products inside are marked as delivered (checkboxes are selected). See Mobile App: POD - Proof of Delivery on marking packages with products as failed.
Ad-hoc/Unplanned POD
You can create an ad-hoc POD for an existing order by specifying its key. If the order key does not yet exist, a skeleton order will be created in the background (depending on Hub: Environment Settings). If you provide the key of an existing order, details such as type, key, contact name, email, and address are pre-populated. You can edit remarks and contact name.
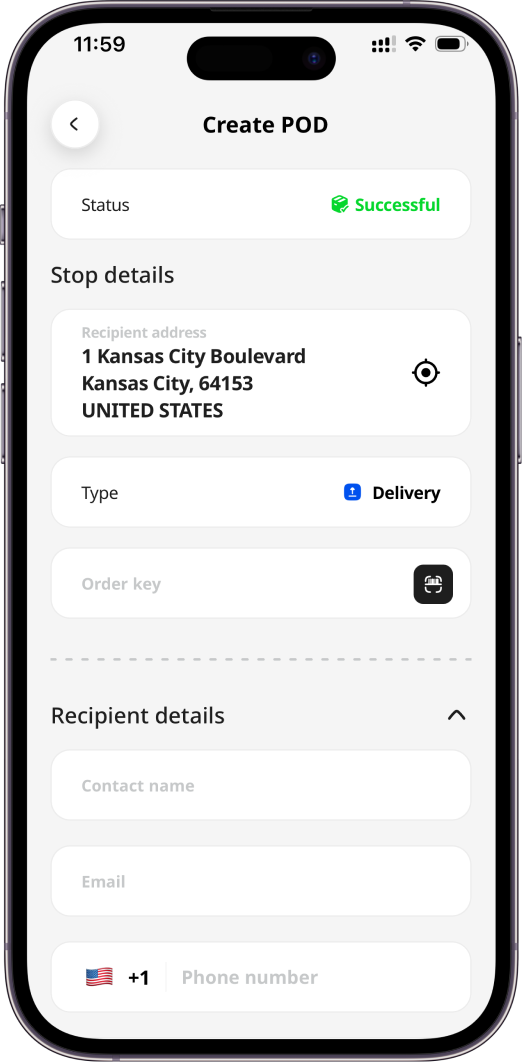
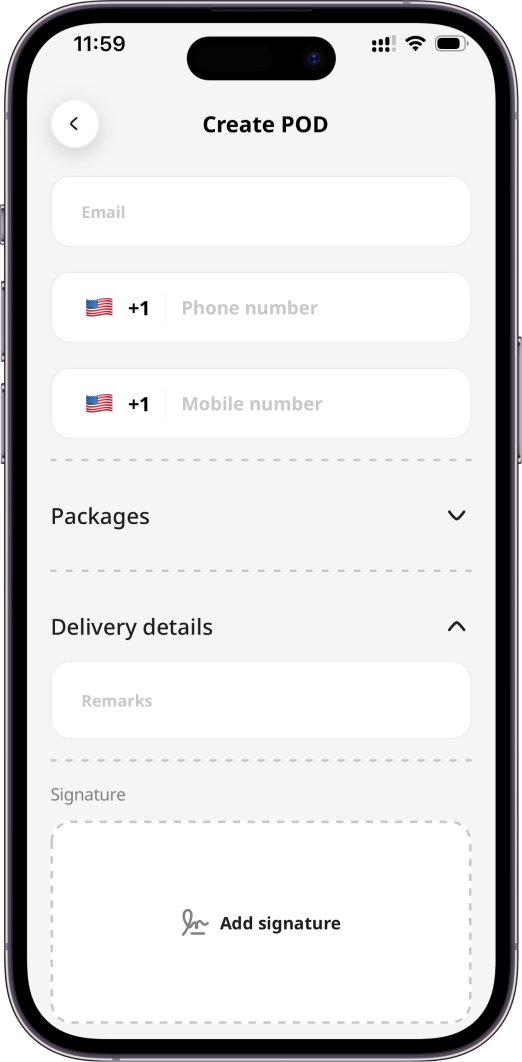
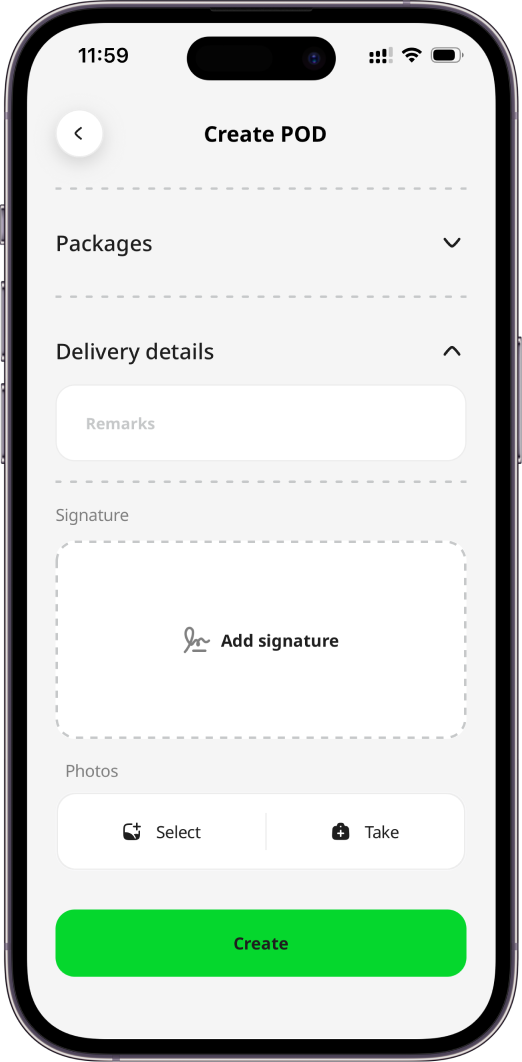
If the order does not exist yet, fill in the following fields in the Stop details section:
| Fields | Description | Required |
|---|---|---|
| Type | Delivery or Collection | Yes |
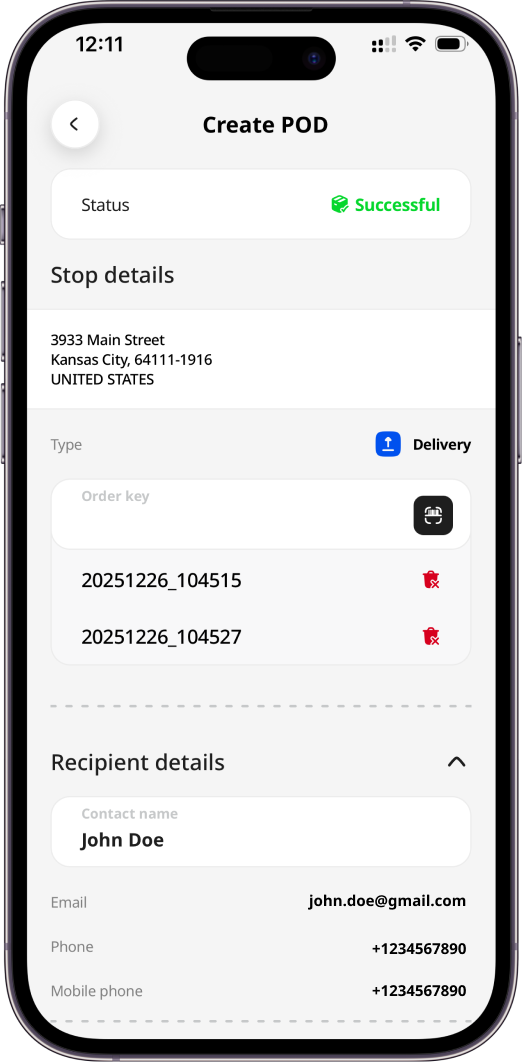
| Order key | Order identifier unique within the environment, for example, an order number 1, 2, 3, 4, etc. You can click on the Scan icon to scan the key. It is possible to provide multiple order keys. | Yes |
| Address | The app uses the current device location. This can be edited. | Yes |
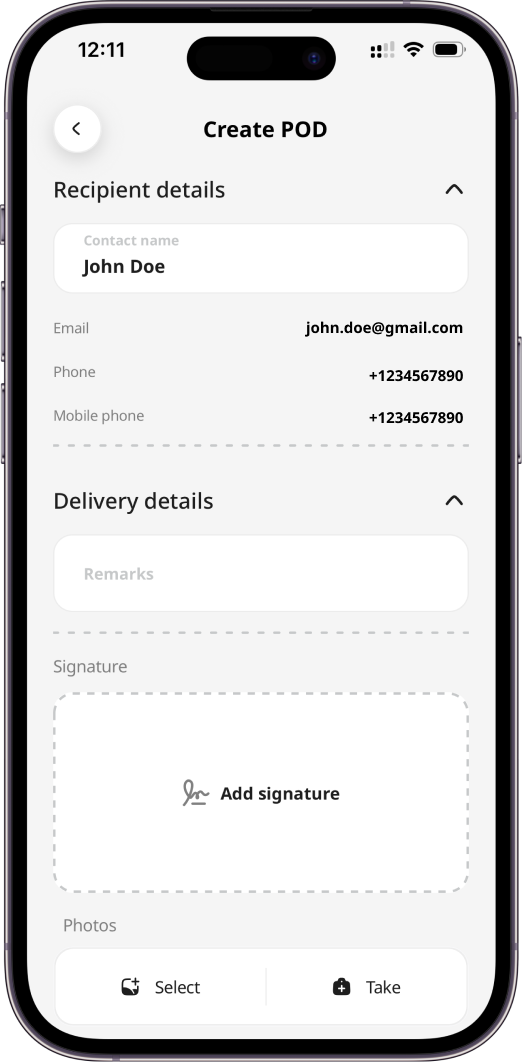
If the order does not exist yet, fill in the following fields in the Recipient details section:
| Fields | Description | Required |
|---|---|---|
| Contact name | Name of the person who received the order | Configured through Settings → Proof of delivery in the app |
| Email address for sending the proof-of-delivery email | No | |
| Phone number | Recipient phone number | No |
| Mobile number | Recipient mobile phone number | No |
In the Packages section, you can review, add, or scan packages for the stop (order), mark some of them as failed if it is needed. Packages are available only with Advanced and Enterprise subscription levels.
In the Delivery details section, you can add remarks. In the mobile app, Settings → Proof of delivery lets you configure remarks requirements for successful, partially successful, and failed PODs.
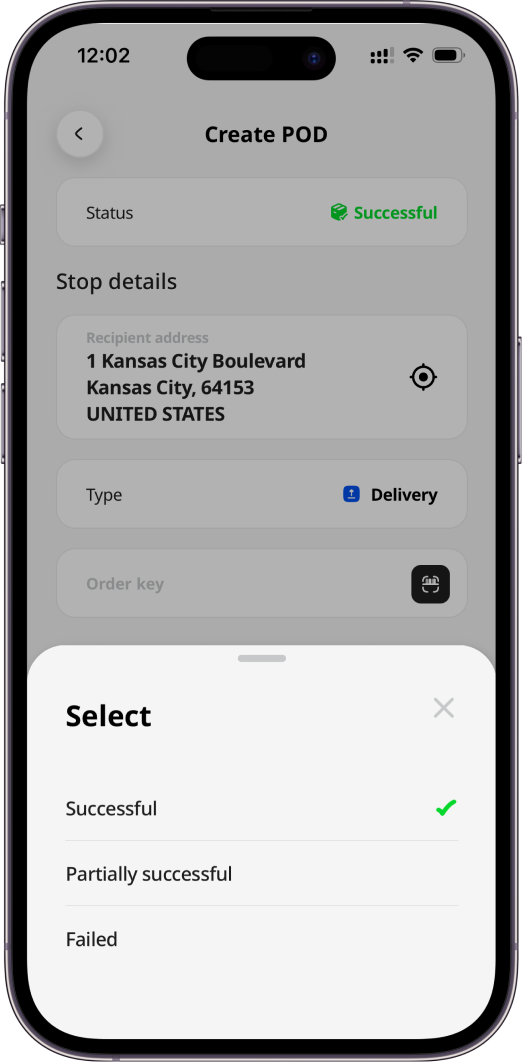
You can select the POD status:
- Successful - order has been successfully delivered/collected.
- Partially successful - part of the order has been delivered/collected.
- Failed - delivery/collection has failed.
In the Signature section, record the recipient’s signature by pressing the Add signature button and saving the recorded signature. In the mobile app, Settings → Proof of delivery lets you configure signature requirements for successful, partially successful, and failed PODs. In the Photos section, you can take or select pictures for the proof-of-delivery. As with signatures, you can configure whether photos are required for each POD status (successful, partially successful, or failed) in the mobile app under Settings → Proof of delivery.
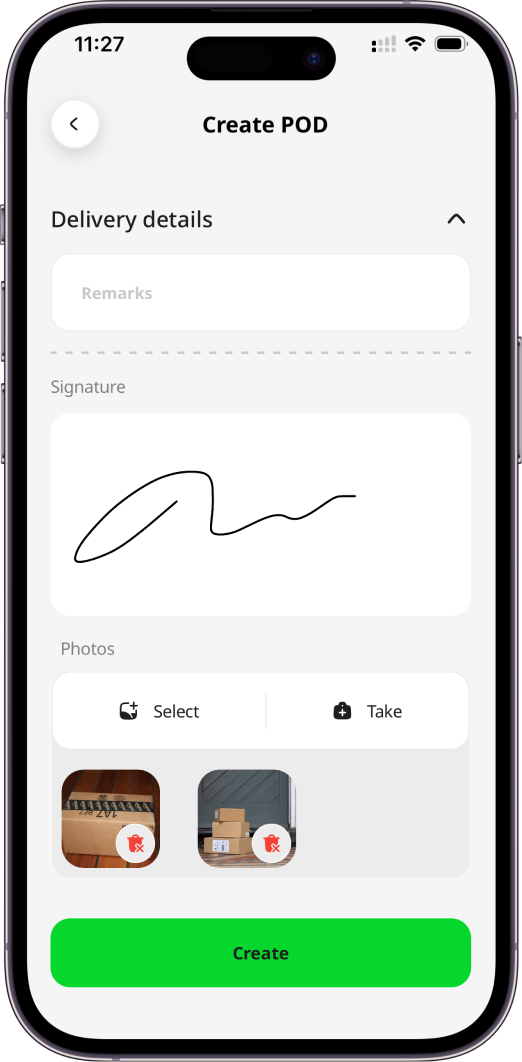
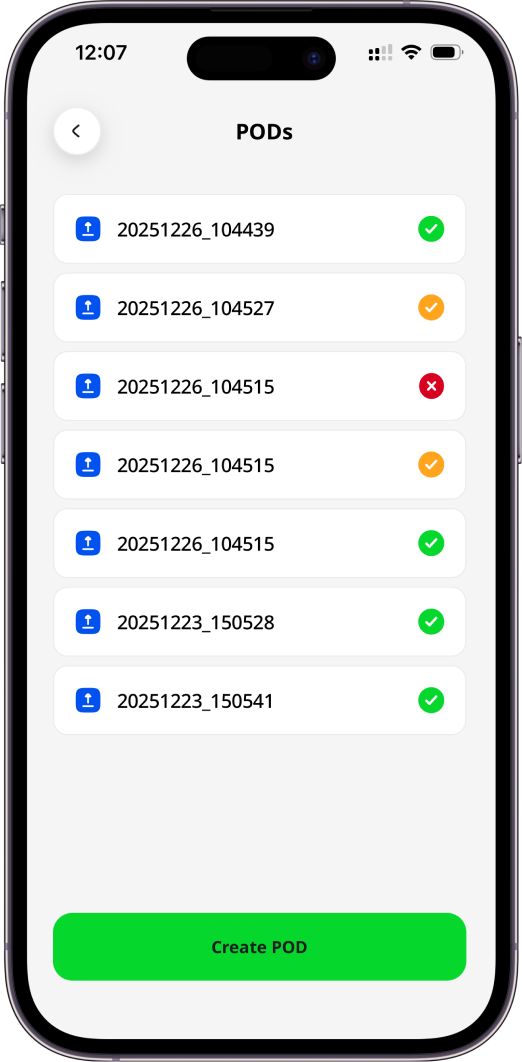
After filling in all the data, press the Create POD button to save the POD. After the POD is created, it will be saved in POD history on PODs page. Icons on the right side of each POD means:
- a green "done" icon for “Successful” POD status
- a yellow “done” icon for “Partially successful” POD status
- a red “cross” icon for “Failed” POD status
Order Packages
When the order has pre-defined packages (ad-hoc POD for existing order), they are displayed in the Packages section. On each package card, a barcode, description, height, width, depth, weight, and volume can be displayed depending on the data provided Hub: Orders, mobile app or API for an order.
Adding/scanning/marking packages as failed is available only with Advanced or Enterprise subscription level.
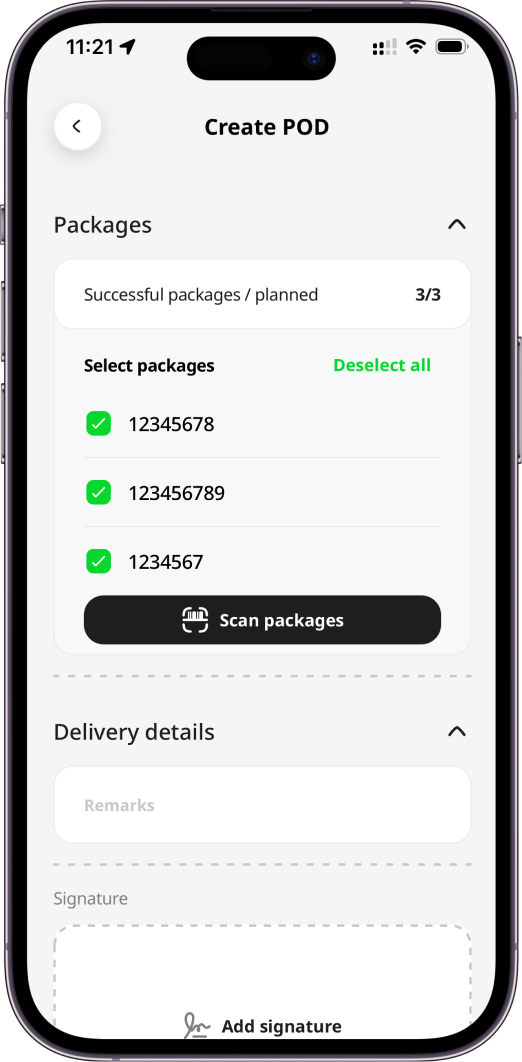
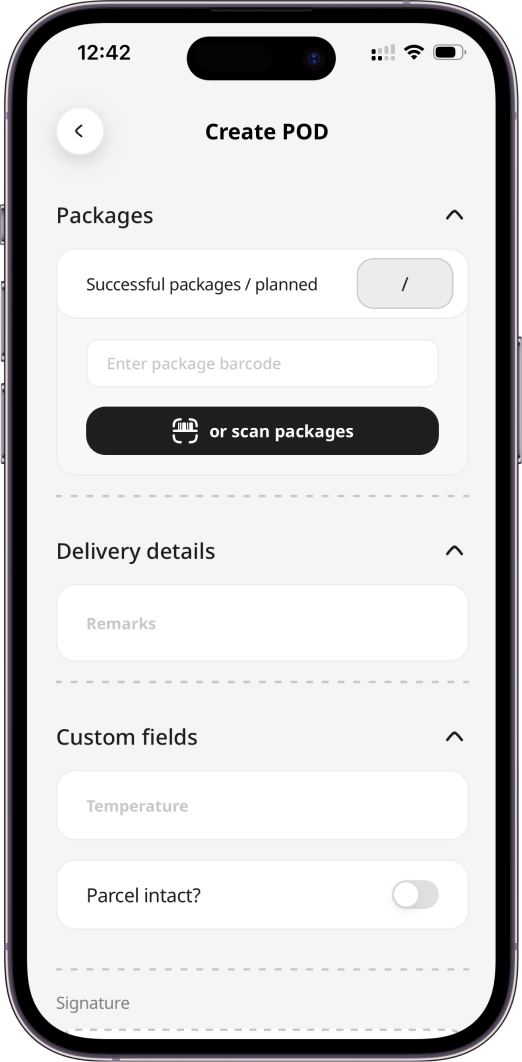
When the order doesn't have packages (ad-hoc POD for either existing order without pre-defined packages or not yet existing order), the Packages section is collapsed by default. You can expand it, provide the number of successfully delivered/collected packages out of the total planned, and add packages by typing a barcode manually or scanning package barcodes.
When you create a POD for multiple orders, the Packages section is hidden.
By default, packages are marked as delivered (checkboxes are selected). See Mobile App: POD - Proof of Deliveryon marking packages as failed.
Order Products
When the order has pre-defined products (ad-hoc POD for existing order key), they are displayed in the Products section. On each product card, a product code, description, quantity, and weight can be displayed depending on the data provided Hub: Orders or API for an order.
Adding/marking products as failed is available only with Enterprise subscription level.
When the order doesn't have products, the Products section is not displayed. It is not possible to add them via the mobile app. When you create a POD for multiple orders, the Products section is hidden.
By default, products are marked as delivered (checkboxes are selected). See Mobile App: POD - Proof of Delivery on marking products as failed.
Order Packages with Products
When the order has pre-defined products and packages linked, they are displayed in the Packages and products section. For a package, a barcode, height, width, depth, volume, and weight can be displayed depending on the data provided in Geo2 Hub, mobile app or API. For a product, a product code, description, quantity, and weight can be displayed depending on the data provided in Geo2 Hub or API. To check products added to a package, press the Products button on a package. The list of products added to the package will be displayed. Press Back to return to Create POD page.
When you create a POD for multiple orders, the Packages and products section is hidden. By default, packages with products inside are marked as delivered (checkboxes are selected). See Mobile App: POD - Proof of Delivery on marking packages with products as failed.
POD Custom Fields
In the Environment settings in Geo2 Hub, you can set up custom fields to collect additional information in POD's. Here is an example:
- Ask for the driver's name
- Ask if the parcel is intact
Custom fields are available only with Enterprise subscription level.
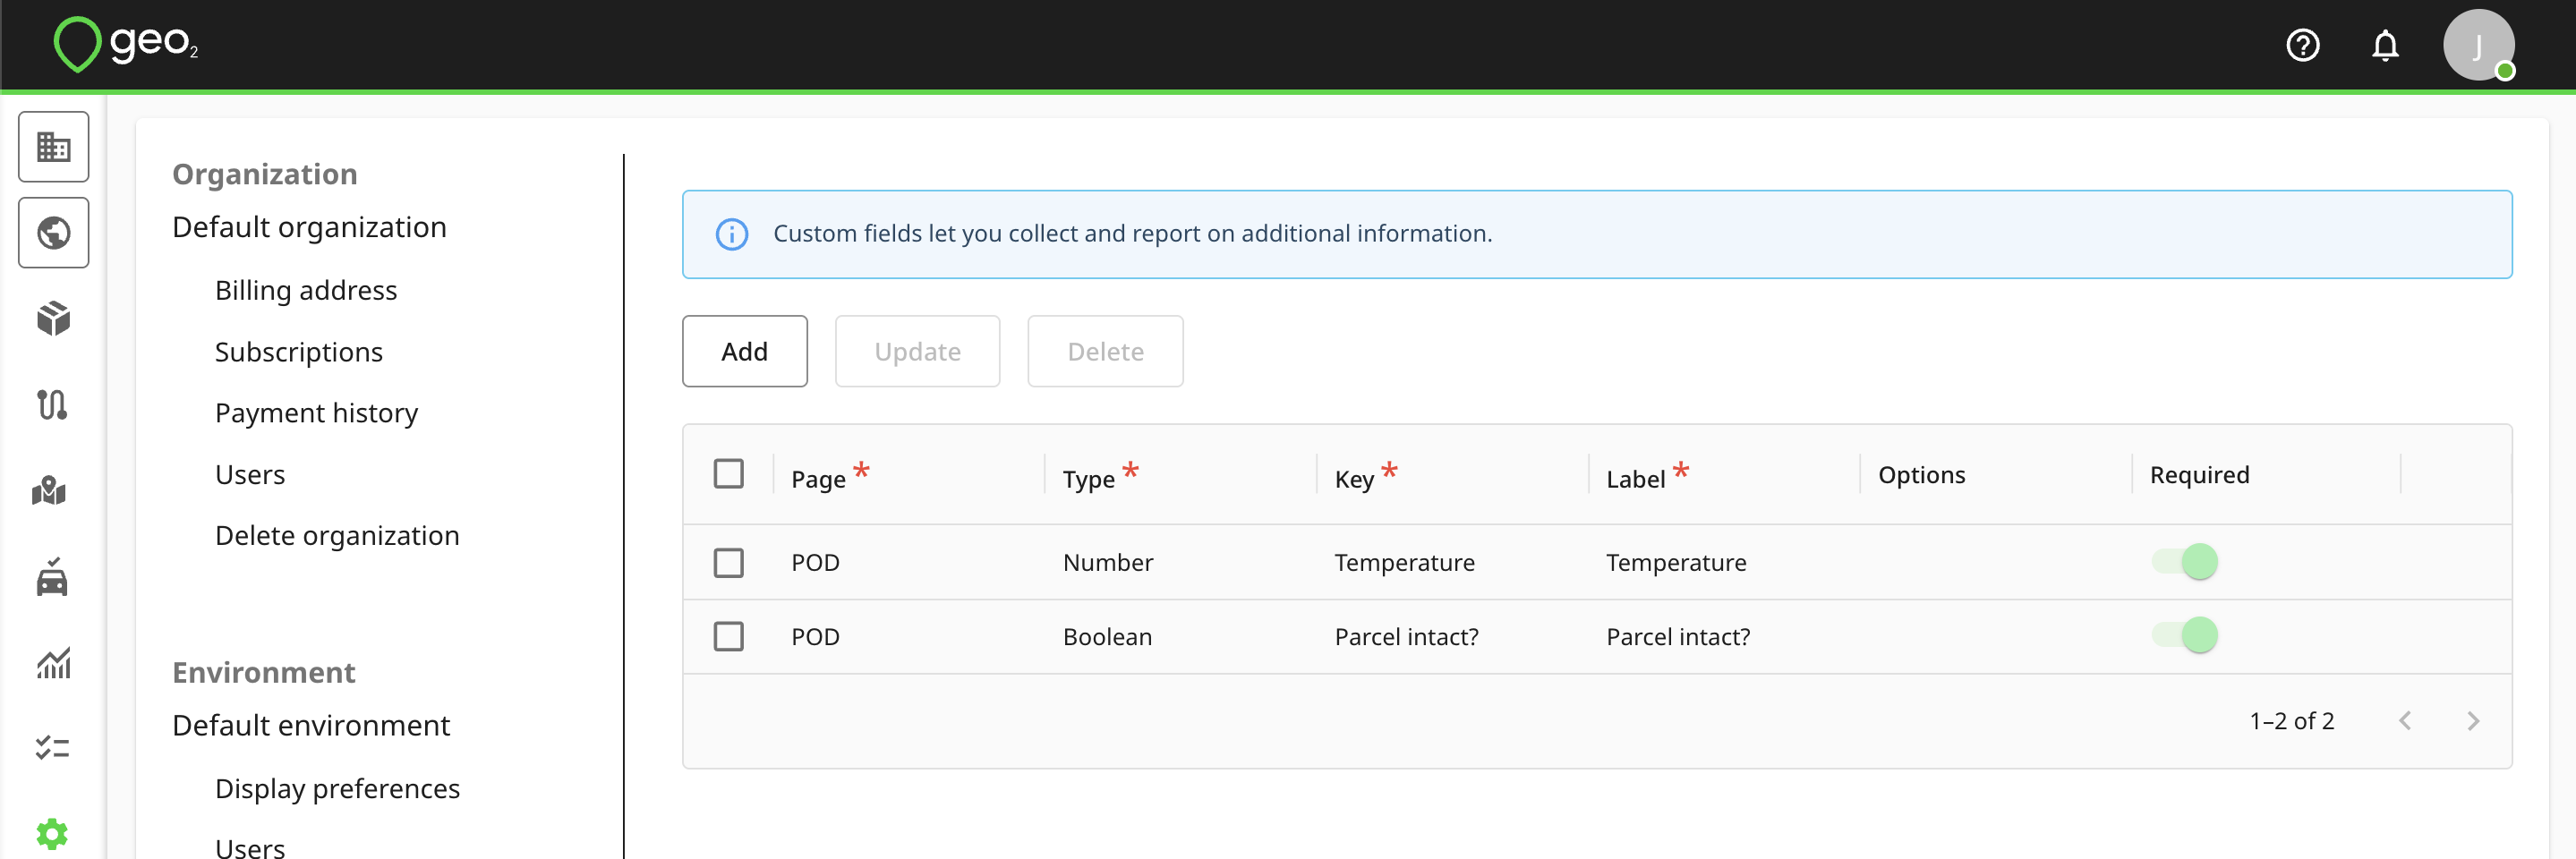
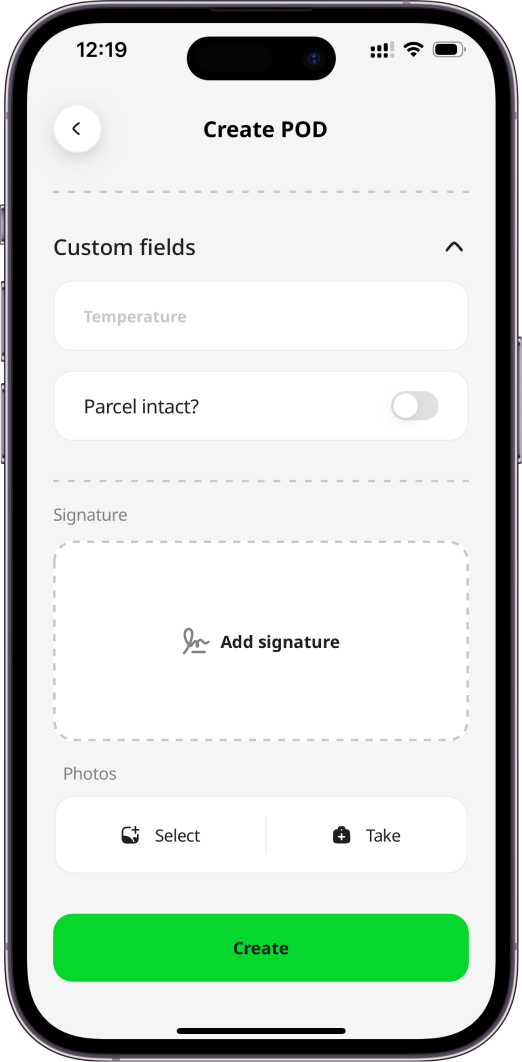
That's how the fields would look when recording a POD:
Package-level Failures
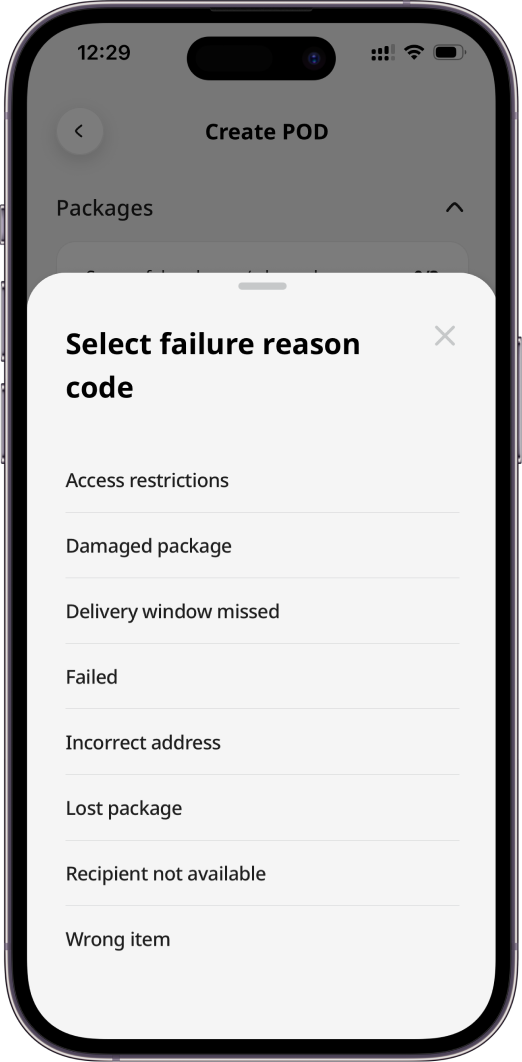
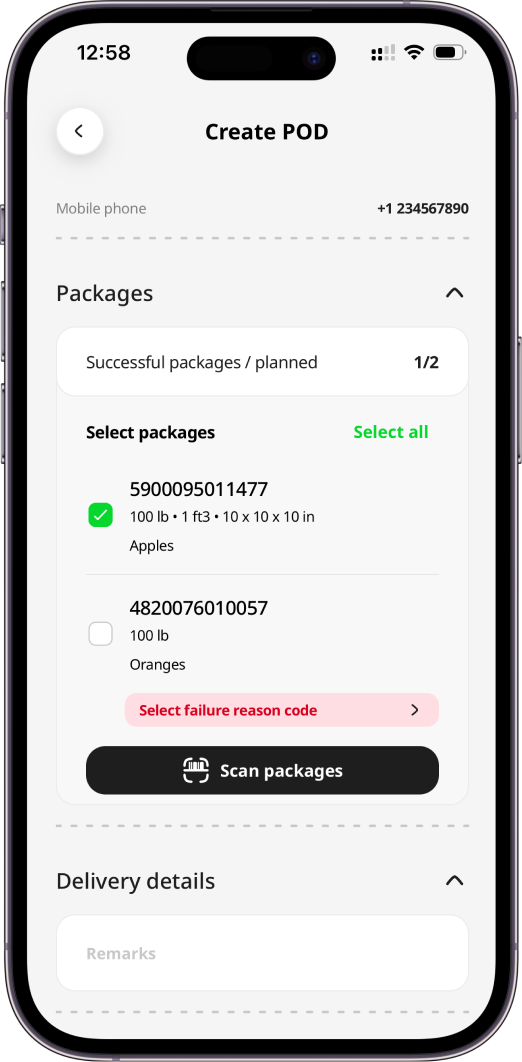
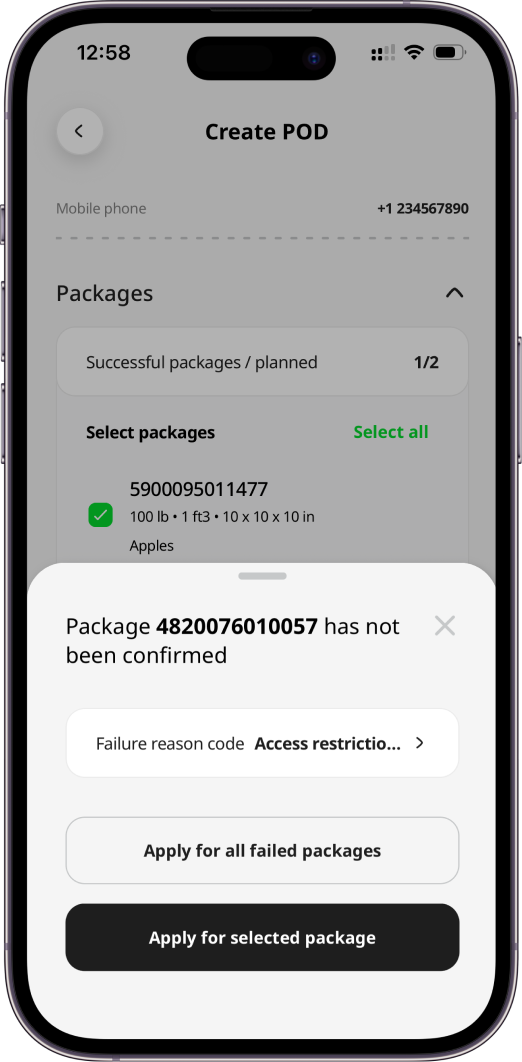
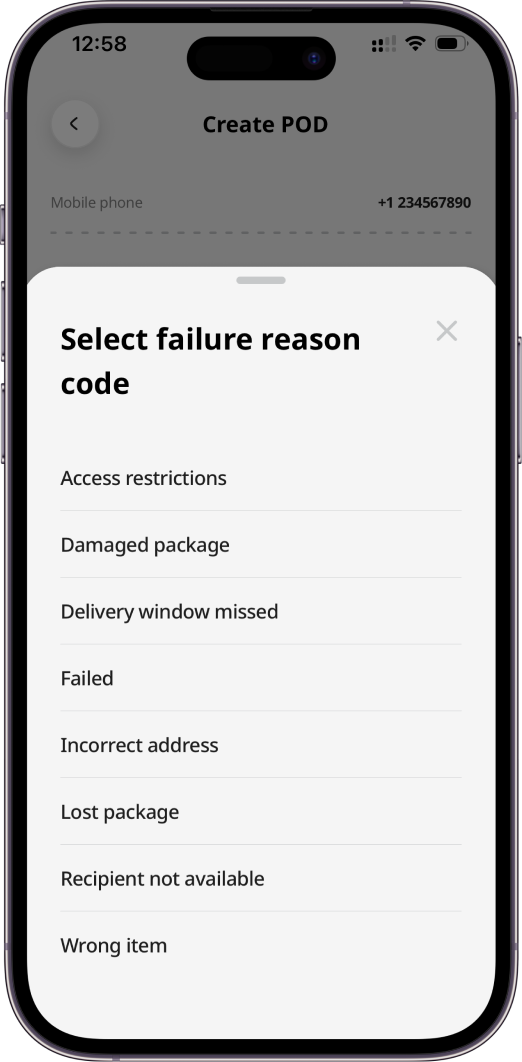
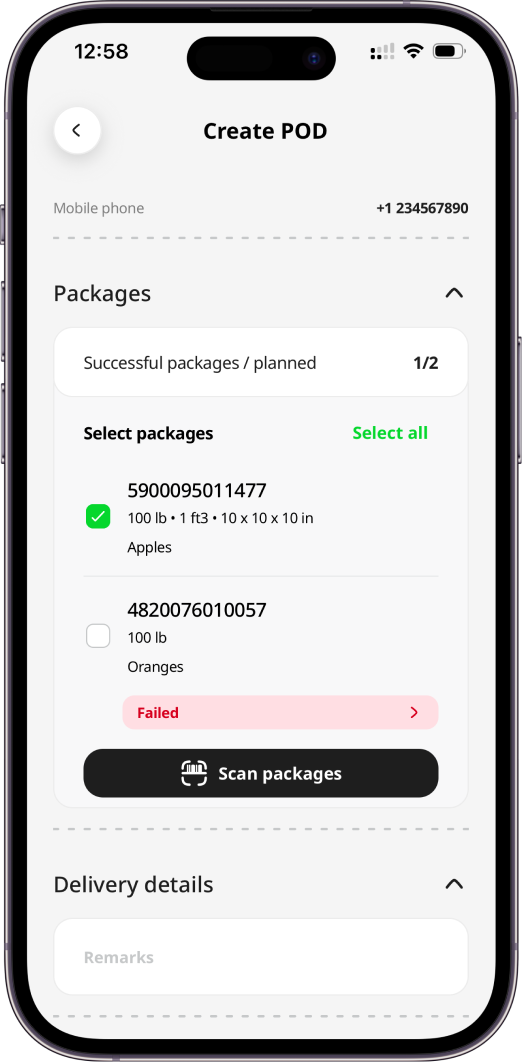
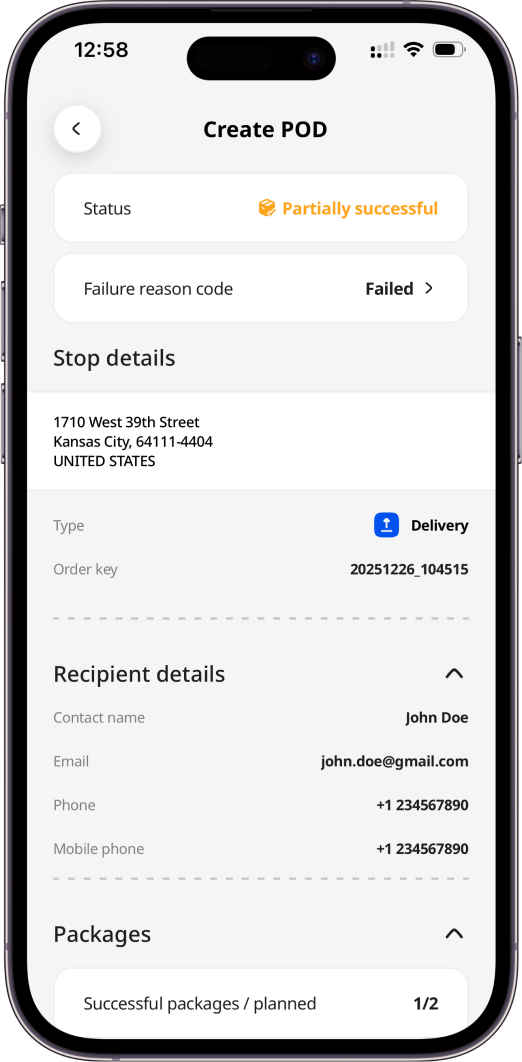
If the order has pre-defined packages, they will be displayed on Create POD page, marked as delivered by default (checkboxes are selected). You can de-select a package to mark that it was not delivered. You will see a prompt to specify the failure reason code for it. The POD status will be automatically changed from Successful to Partially successful and the failure reason code from the package level will be populated to the general POD level. The failure code for the package will be highlighted in red colour. You can press it to select another code.
You can first select the Partially successful status, a general failure reason code for the POD, and after that, de-select packages. The general failure reason code will be populated to the package level, but you can change it for each package individually.
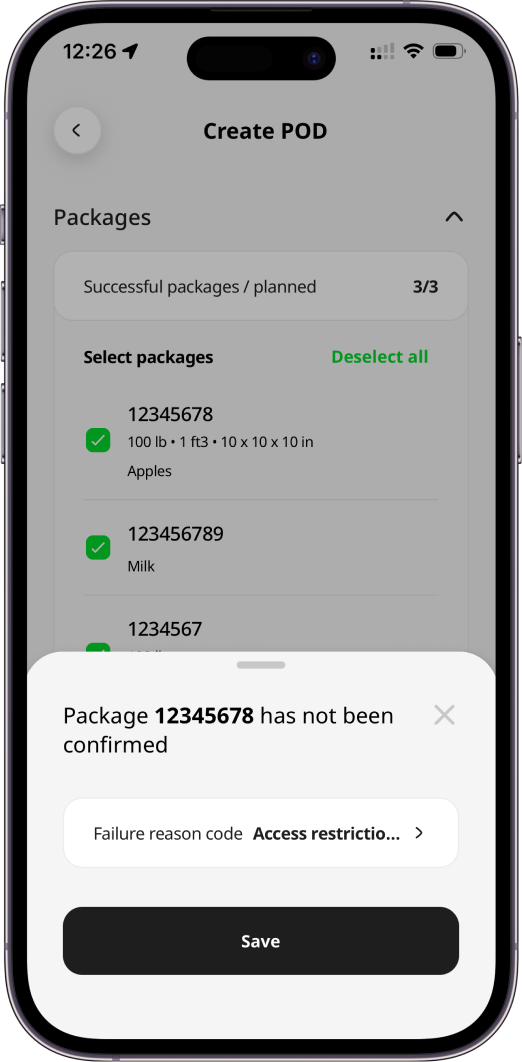
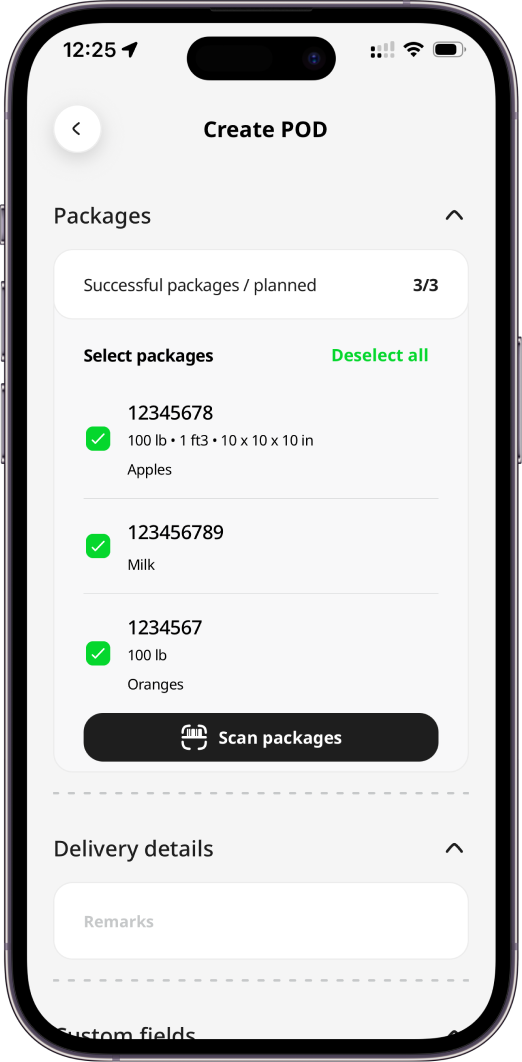
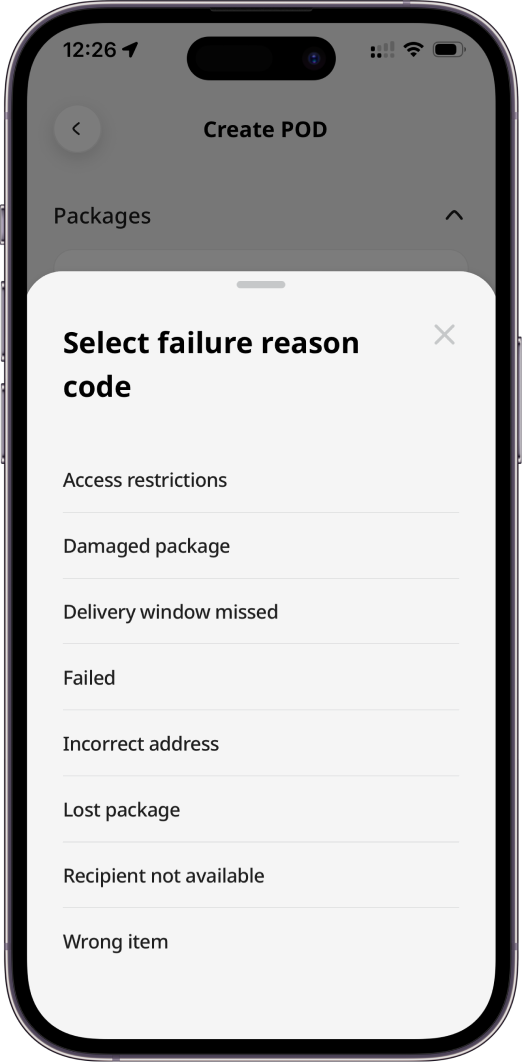
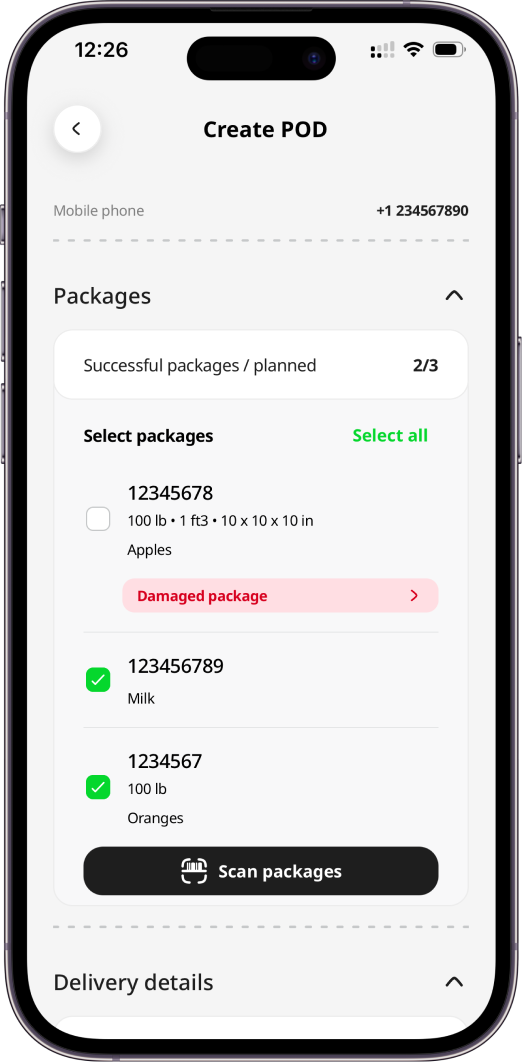
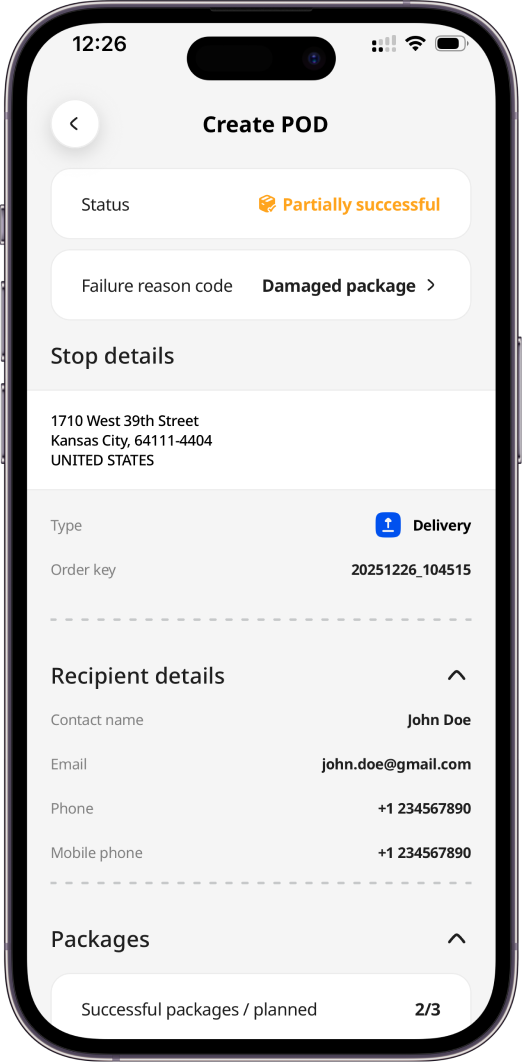
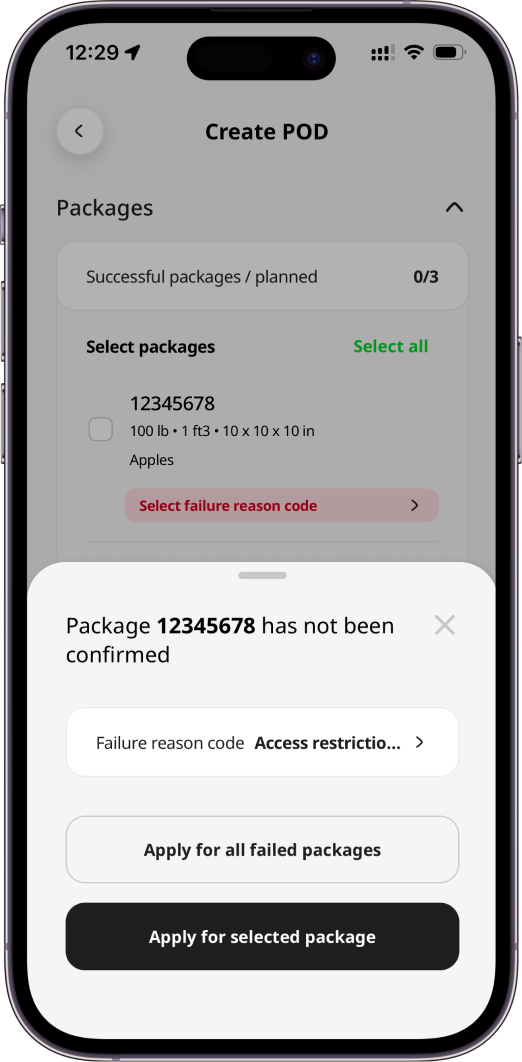
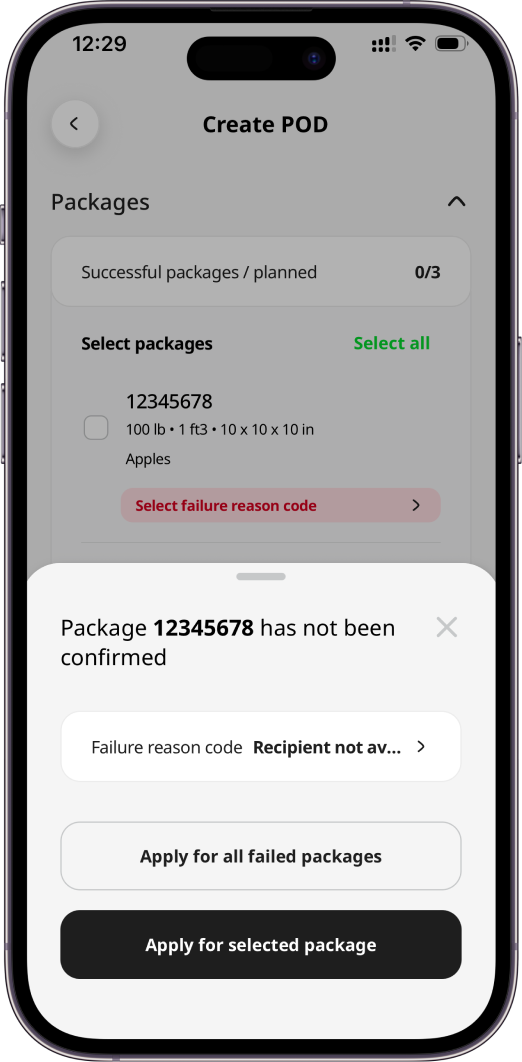
If all packages have failed, you can either de-select each manually by unticking the checkboxes or by pressing the Deselect all button. You will see the Select failure reason code button on each package to specify the failure reason code. You can press a package card to provide a failure reason code. You will see two options - Apply for all failed packages or Apply for selected package. If Apply for all failed packages is selected, the failure reason code will be populated for all packages. If Apply for selected package is selected, the failure reason code will be populated only for the selected package. You can press other package cards and select another failure reason for them. You will see the same options - Apply for all failed packages (those without a reason code so far) or Apply for selected package. The last selected failure reason code will be saved for the general POD level. The POD status will be automatically changed from Successful to Failed and the failure reason code from the package level will be populated to the general POD level. The failure code for the packages will be highlighted in red colour. You can press it to select another code (for example, to provide an individual code for each package).
You can first select a Failed status and a general failure reason code for the POD. All packages will be de-selected automatically. The general failure reason code will be populated to the package level, but you can change it for each package individually.
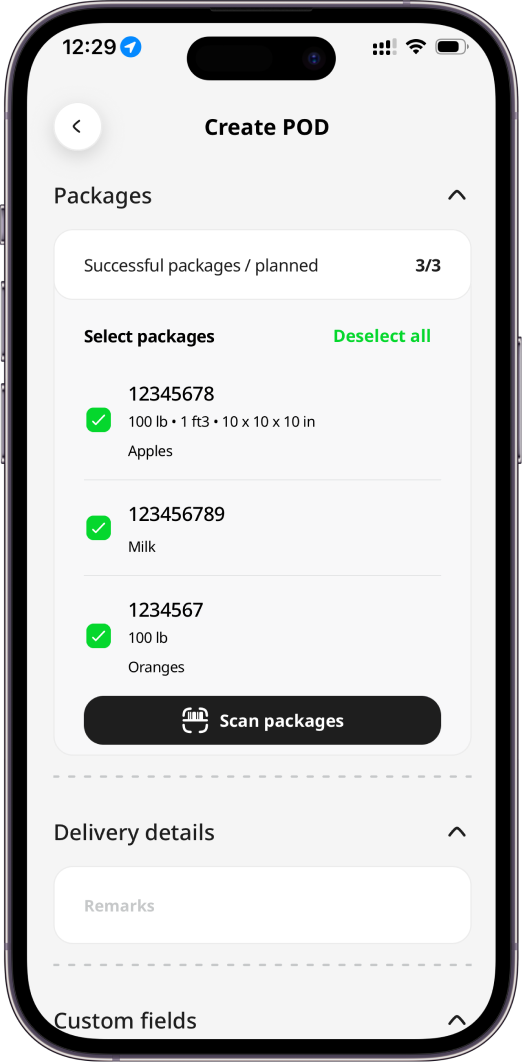
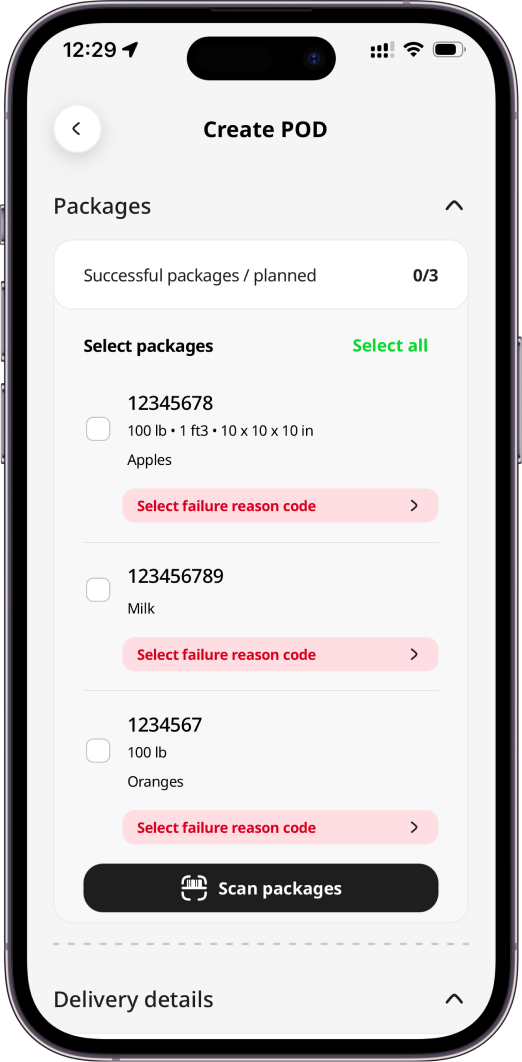
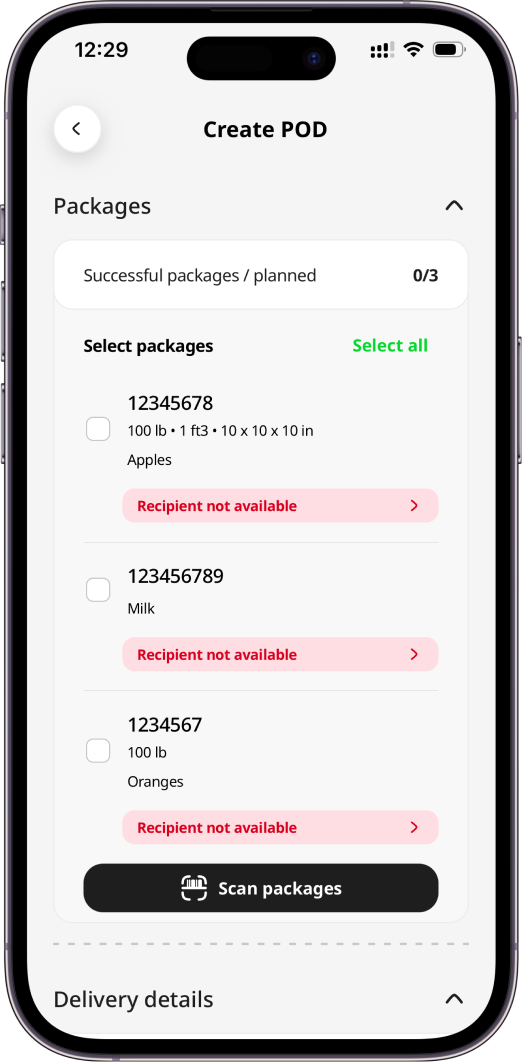
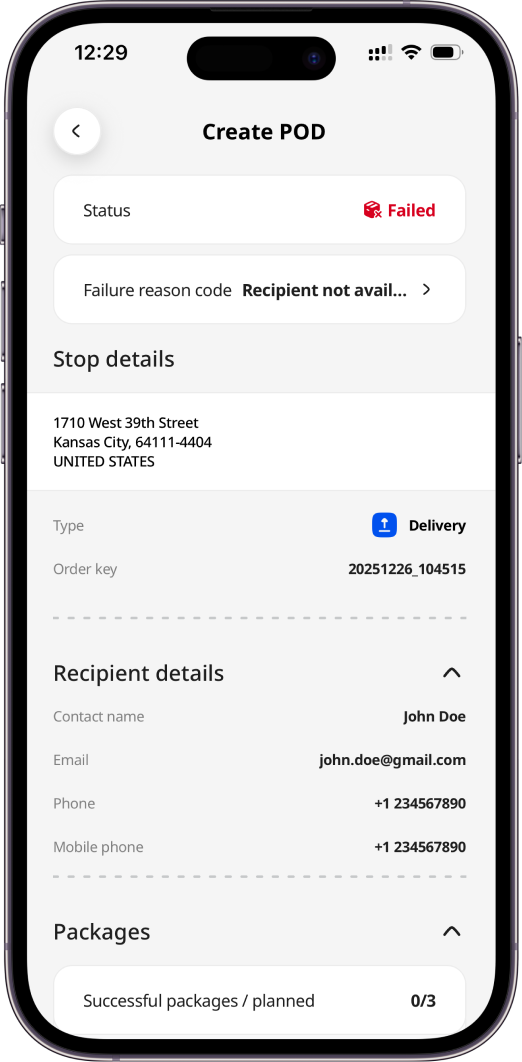
To mark all unticked (de-selected) packages as successful again, press the Select all button - the POD status will be changed to Successful as well.
Package Scanning
Package scanning serves multiple purposes:
- to add packages to an order when it does not have them yet
- to validate whether a package belongs to the order, when the order has packages pre-defined
- to specify packages that have been delivered, both when they are pre-defined and when they have just been added in the course of POD creation
Package scanning is available only with Advanced and Enterprise subscription levels.
Adding and Confirming Packages
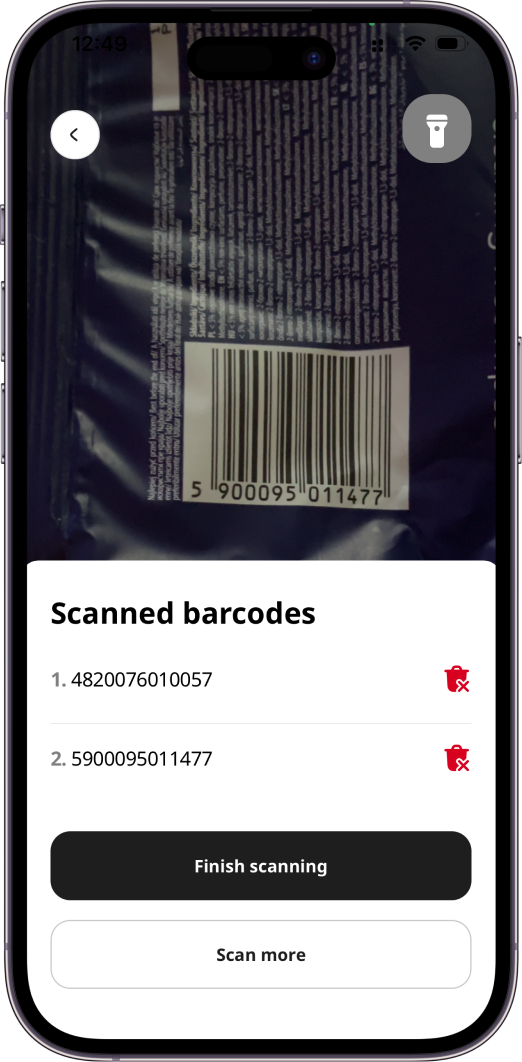
If the order has no pre-defined packages, it is possible to scan barcodes to add packages by pressing the Scan button. You will be redirected to Scan barcode page. Point your camera steadily at the barcode or QR code and it will be scanned. The scanned code will be displayed under the title Scanned barcodes. You can press:
Red minusicon to remove this barcodeScan morebutton to scan more barcodesFinish scanningbutton to complete scanning
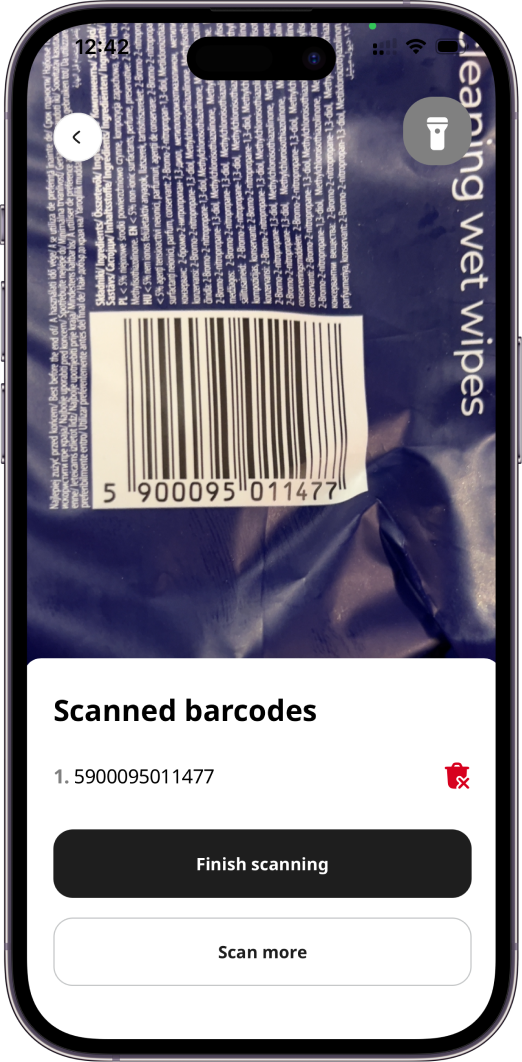
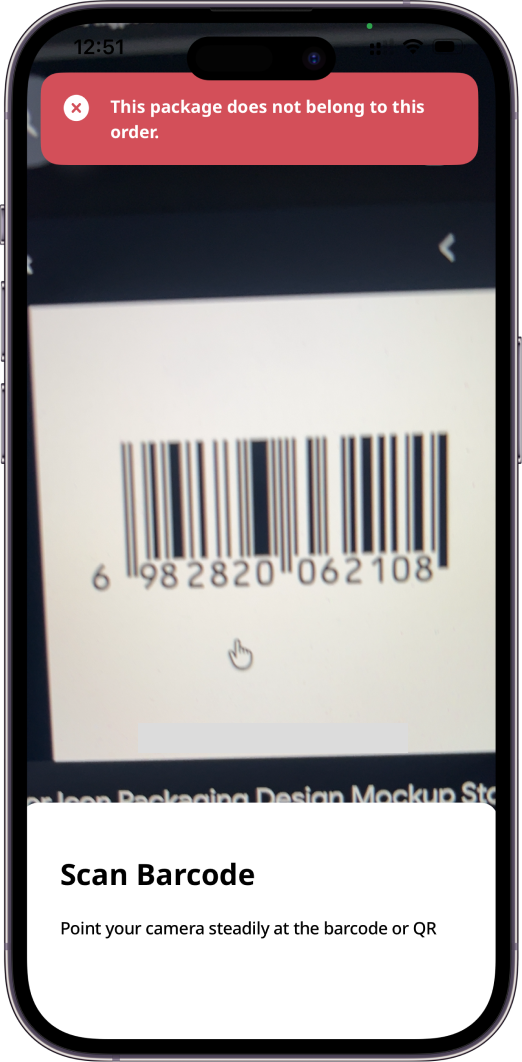
Press the Scan more button when the device camera is over a new barcode. If you try to scan the same barcode, you will get an error message.
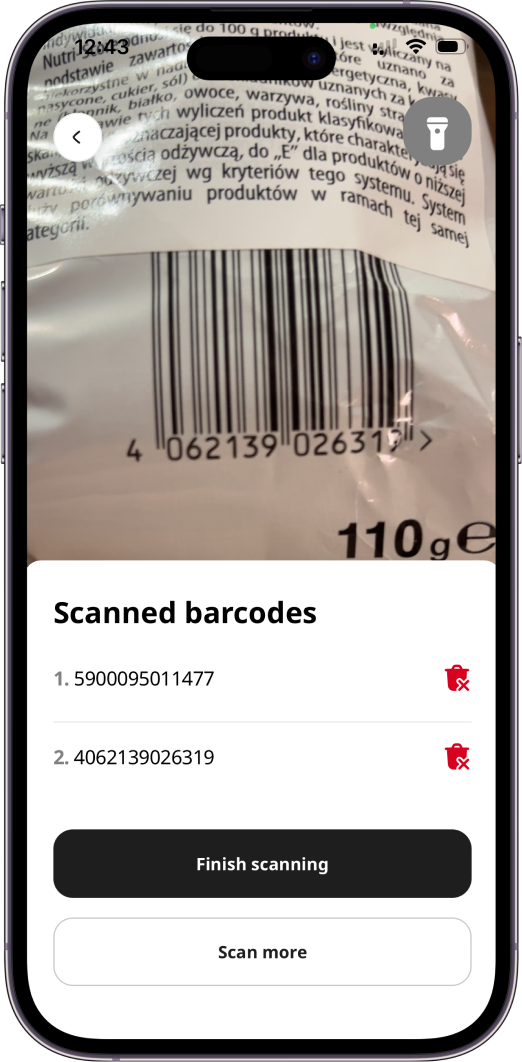
Once all required barcodes are scanned, press the Finish scanning button to be redirected to Create POD page. All scanned barcodes will be ticked (selected) as successfully delivered/collected. If some of them have not been delivered, you can untick (de-select them) and provide a failure reason code.
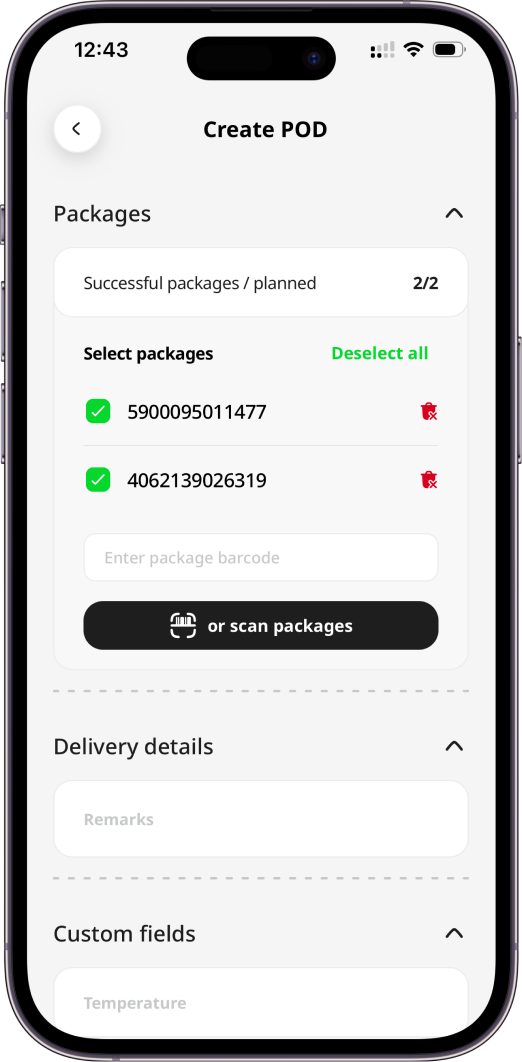
On Create POD page, you can also press the red minus icon to remove packages.
If the order has pre-defined packages, it is also possible to scan barcodes to verify packages or confirm them by pressing the Scan button. You will be redirected to Scan barcode page. Point your camera steadily at the barcode or QR code and it will be scanned. The scanned code will be displayed under the title Scanned barcodes. You can press:
Red minusicon to remove this barcodeScan morebutton to scan more barcodesFinish scanningbutton to complete scanning
If you try to scan the barcode that does not belong to this order, you will get an error message.
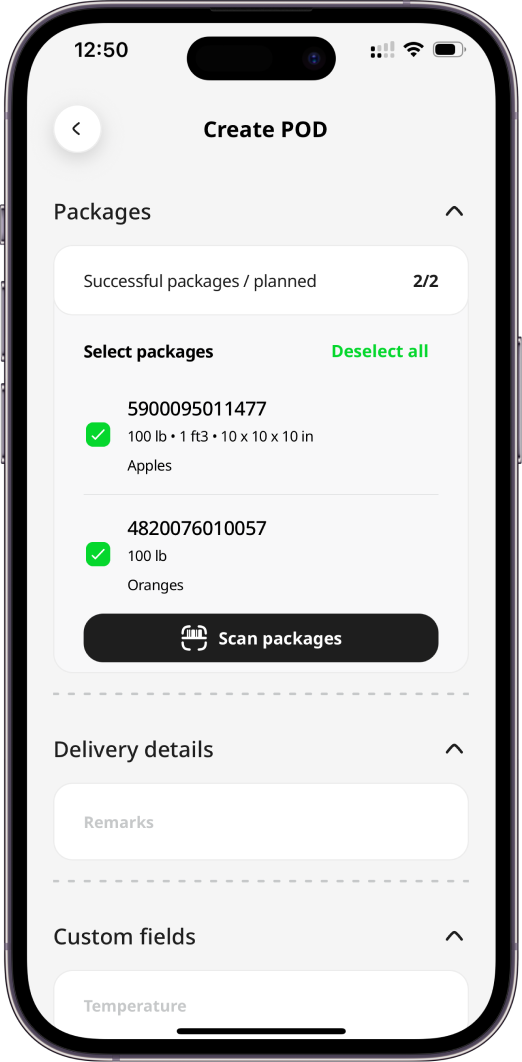
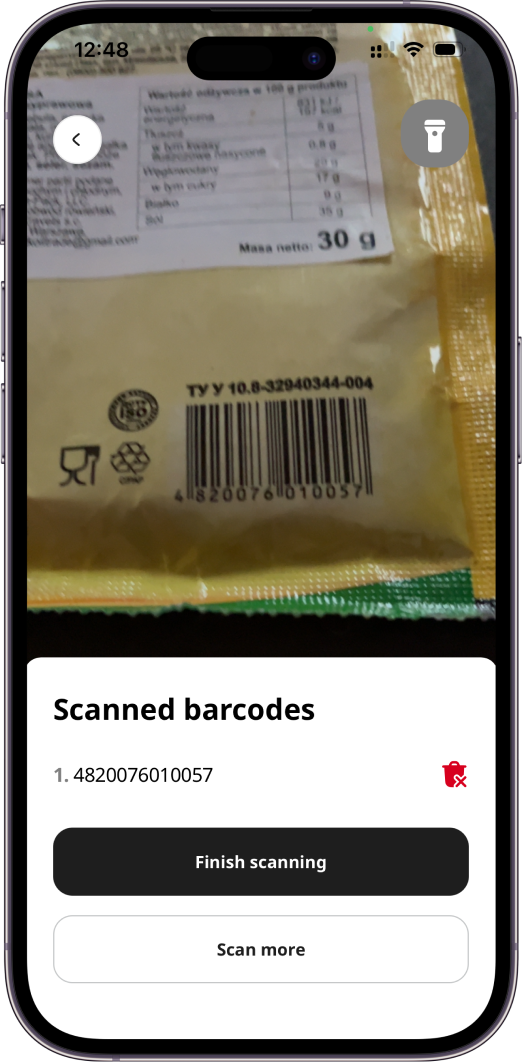
Once all barcodes are scanned, press the Finish scanning button to be redirected to Create POD page. All scanned barcodes will be ticked (selected) as successfully delivered/collected. If some of them have not been delivered, you can untick (de-select them) and provide a failure reason code.
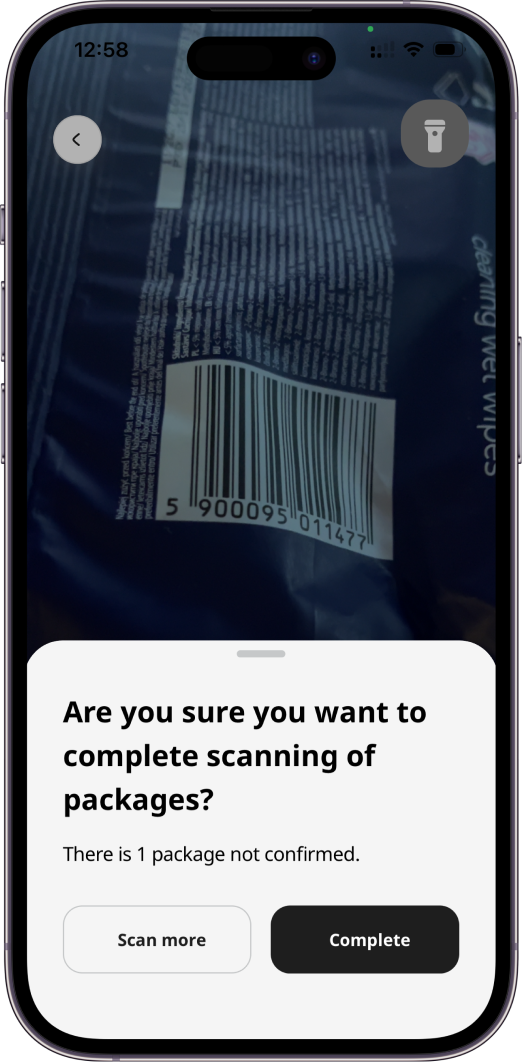
If you do not scan any of pre-defined packages, you will see a prompt asking if you want to continue scanning as there are not confirmed packages. By pressing the Complete button, you will be redirected back to POD page. Not confirmed/scanned packages will be marked as failed. You need to select a failure reason code for it.
Product-level Failures
If the order has pre-defined products, they are displayed on Create POD page, marked as delivered by default (checkboxes are selected). You can de-select a product to mark that it was not delivered. You will see a prompt to specify the failure reason code for it and the failed quantity out of the planned total. The POD status will be automatically changed from Successful to Partially successful and the failure reason code from the product level will be populated to the general POD level. The failure code for the product will be highlighted in red colour. You can press it to select another code or change the failed quantity.
You can first select the Partially successful status, a general failure reason code for the POD, and after that, de-select products. The general failure reason code will be populated to the product level, but you can change it for each product individually.
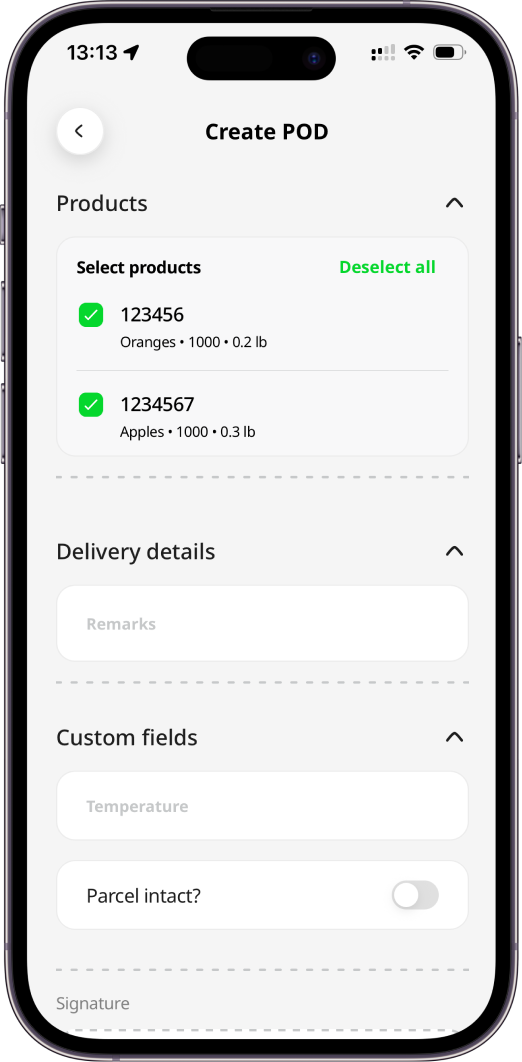
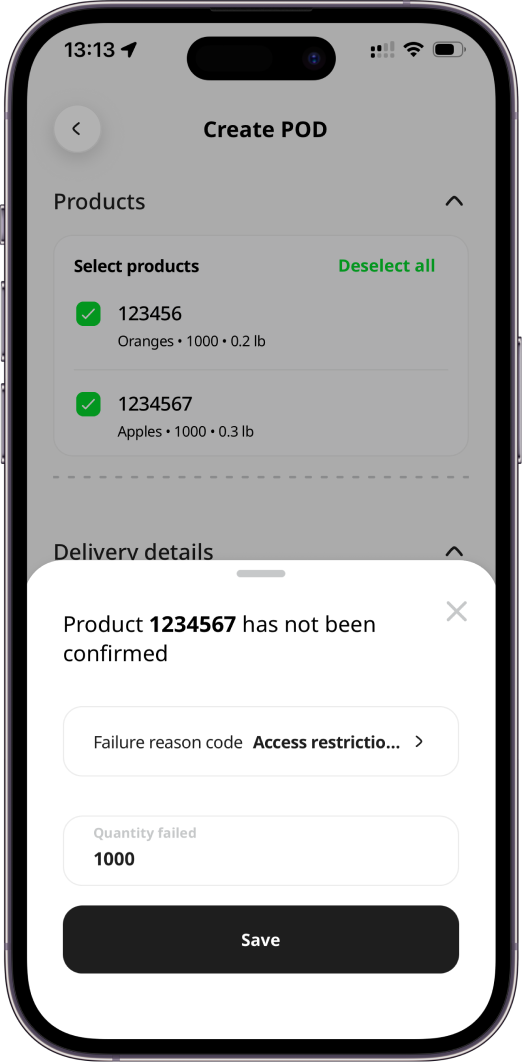
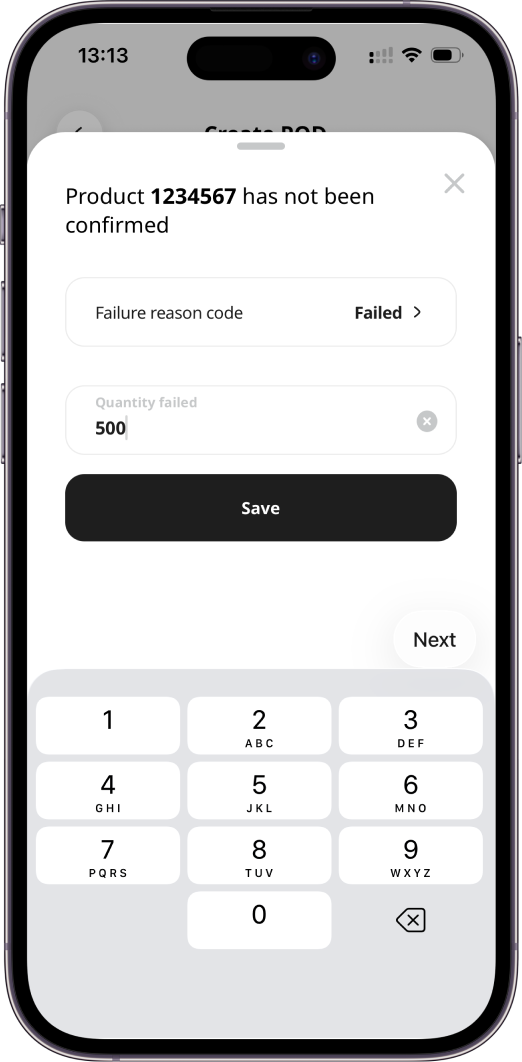
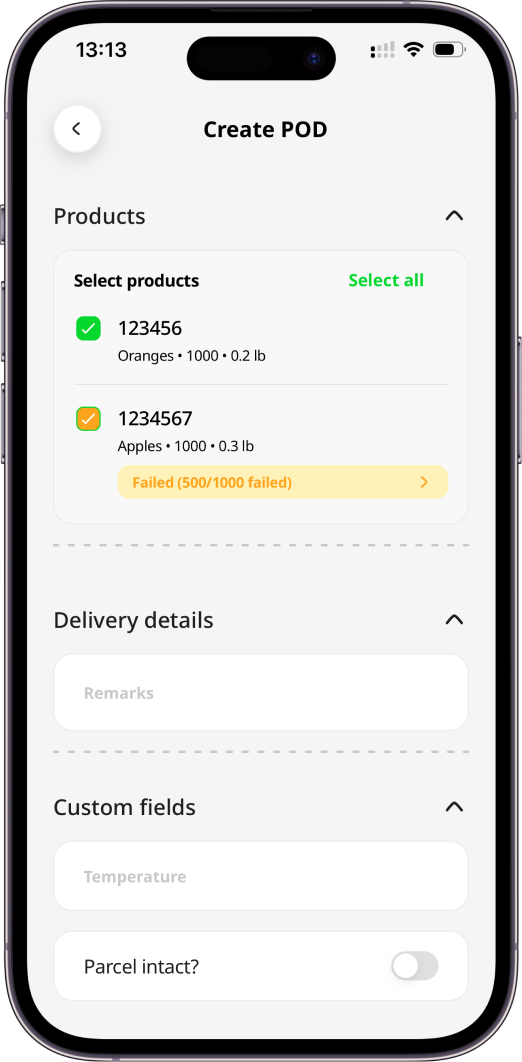
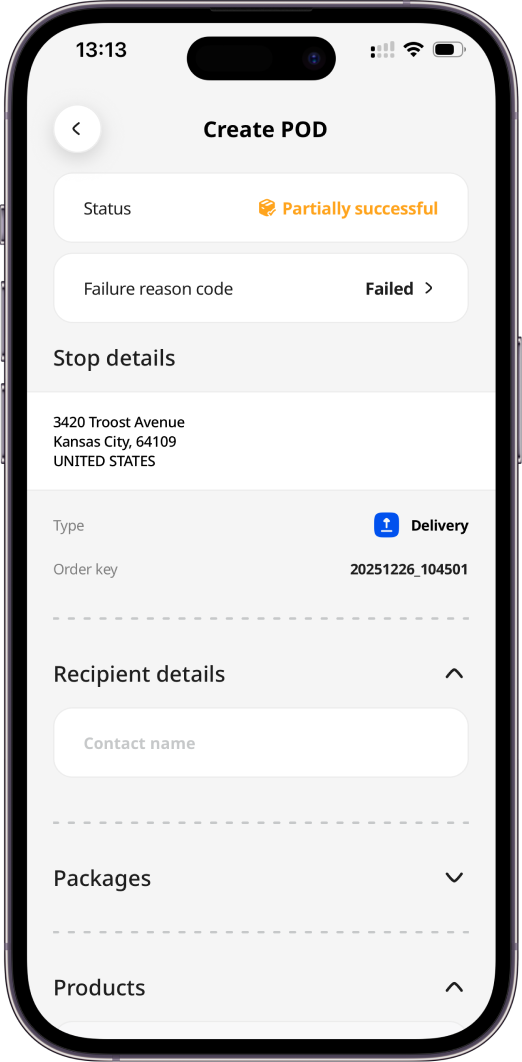
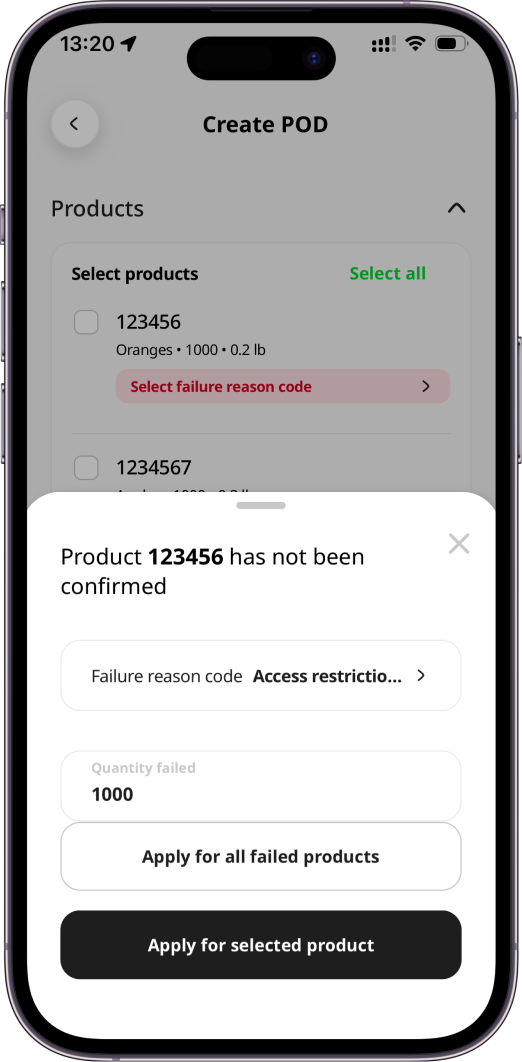
If all products have failed, you can either de-select each manually by unticking the checkboxes or by pressing the Deselect all button. You will see Select failure reason code button on each product to specify the failure reason code. You can press on it to provide a failure reason code and failed quantities. You will see two options - Apply for all failed products or Apply for selected product. If Apply for all failed products is selected, the failure reason code will be populated for all products. Full quantities of other products will be automatically failed. If Apply for selected product is selected, the failure reason code will be populated only for the selected product. You can press other product cards and select another failure reason for them and a failed quantity. You will see the same options - Apply for all failed products (those without a reason code yet) or Apply for selected product. The last selected failure reason code will be saved for the general POD level. The POD status will be automatically changed from Successful to Failed and the failure reason code from the product level will be populated to the general POD level. The failure code for the products will be highlighted in red colour. You can press it to select another code (for example, to provide an individual code for each product) and the failed quantity. If not the full quantity of the product fails, the general status will be changed to Partially successful.
You can first select a Failed status and a general failure reason code for the POD. All products will be de-selected automatically. The general failure reason code will be populated to the product level, but you can change it for each product individually.
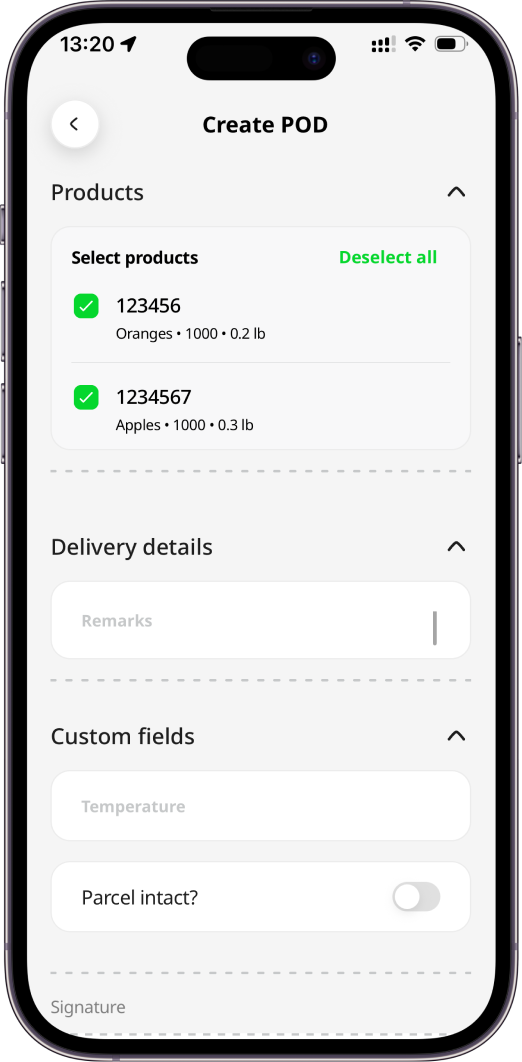
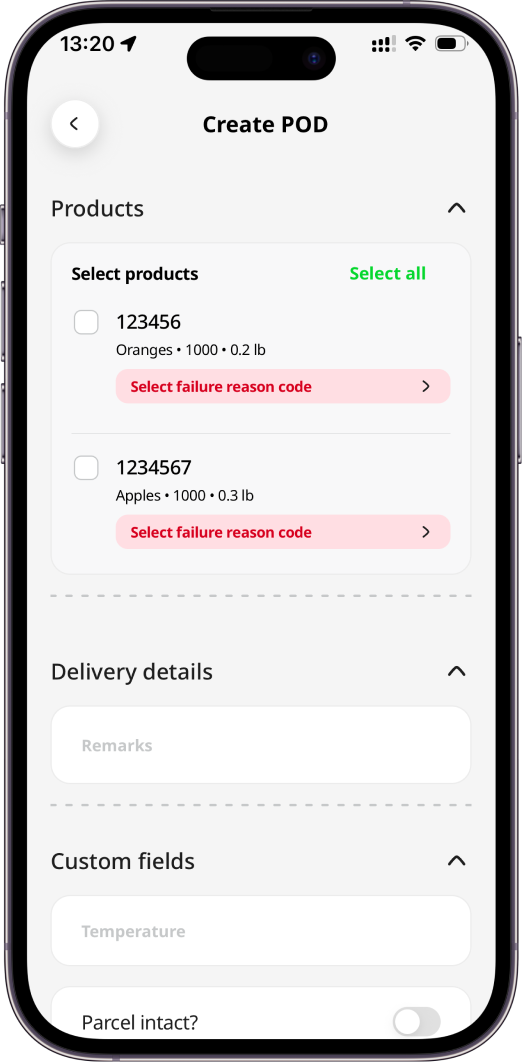
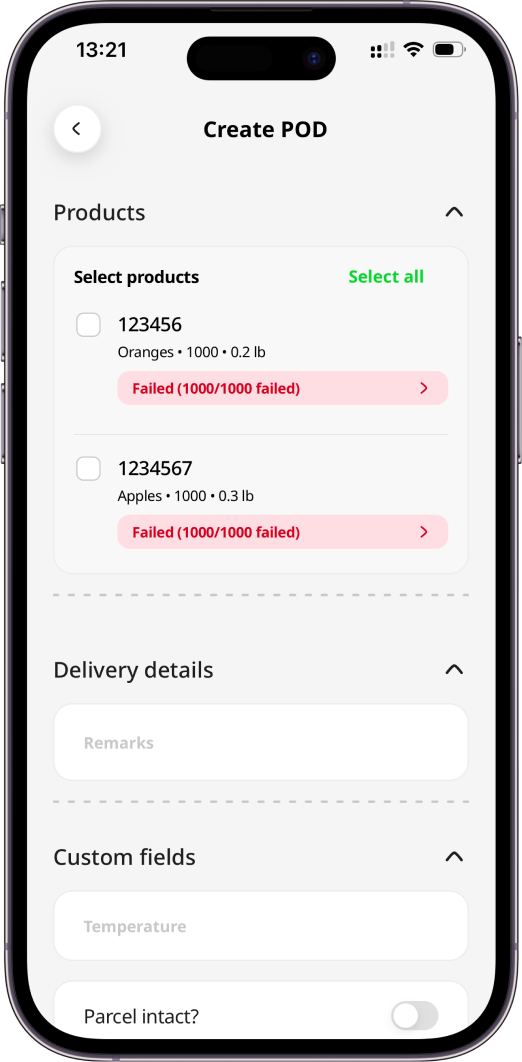
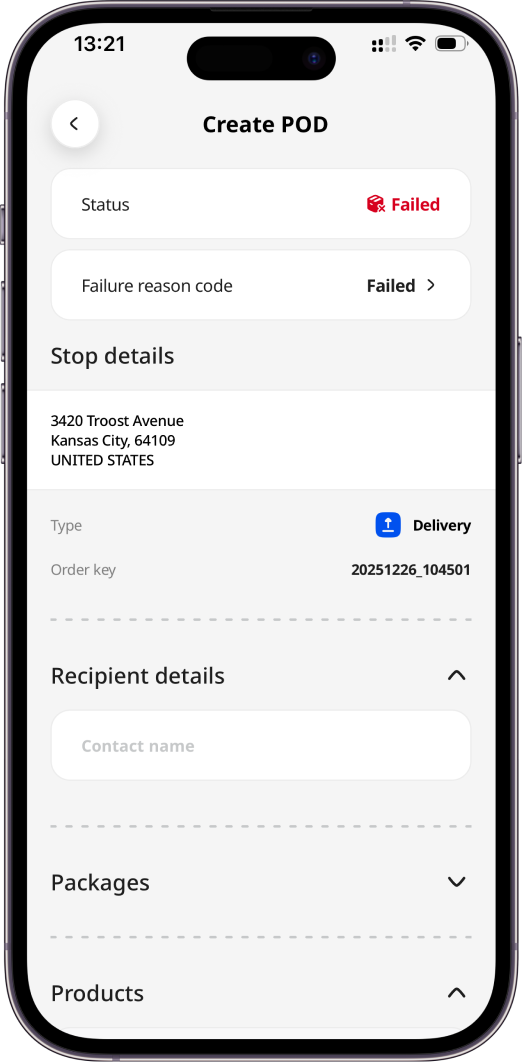
To mark all unticked (de-selected) products as successful again, press the Select all button - the POD status will be changed to Successful as well.
Package-level Failures with Products
If the order has pre-defined packages with products linked, they will be displayed on Create POD page, marked as delivered by default (checkboxes are selected). You can de-select a package to mark that it was not delivered. You will see a prompt to specify the failure reason code for it. The POD status will be automatically changed from Successful to Partially successful and the failure reason code from the package level will be populated to the general POD level. The failure code for the package will be highlighted in red colour. You can press it to select another code. All products added to the package will be marked as failed with the full quantities failed.
You can first select the Partially successful status, a general failure reason code for the POD, and after that, de-select packages. The general failure reason code will be populated to the package level, but you can change it for each package individually.
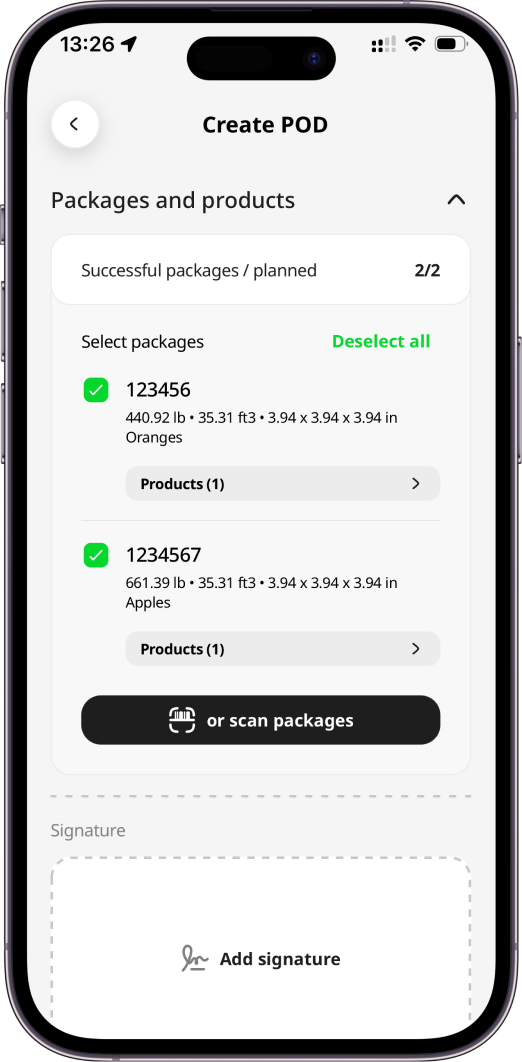
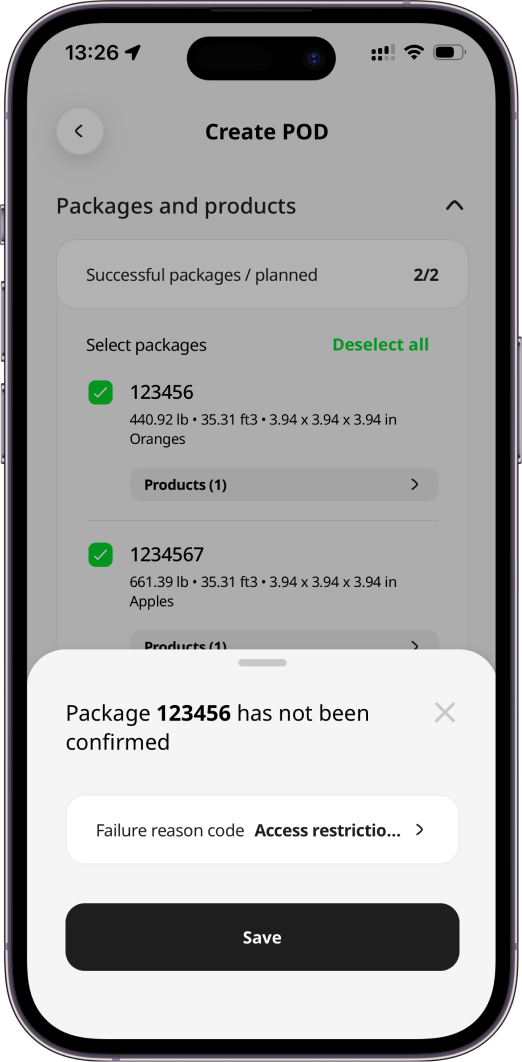
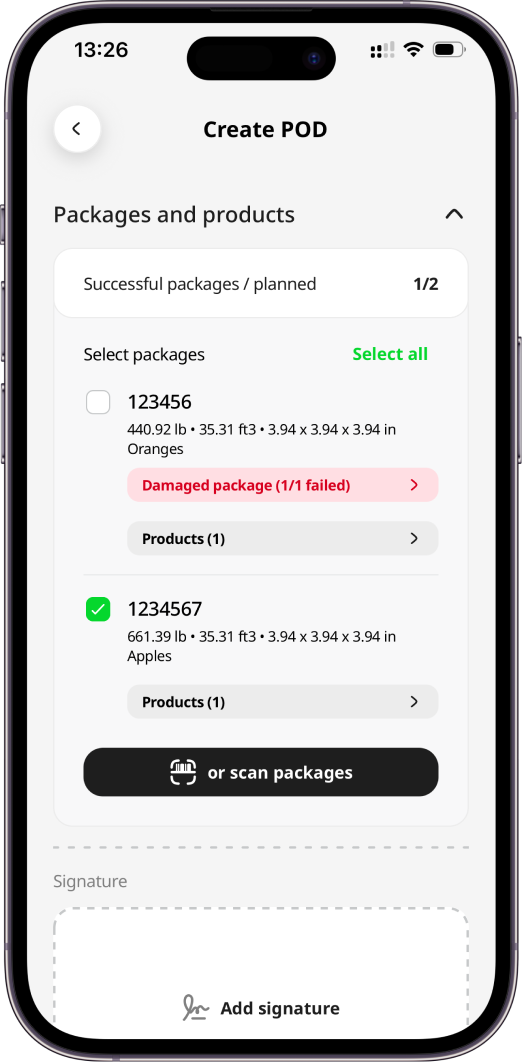
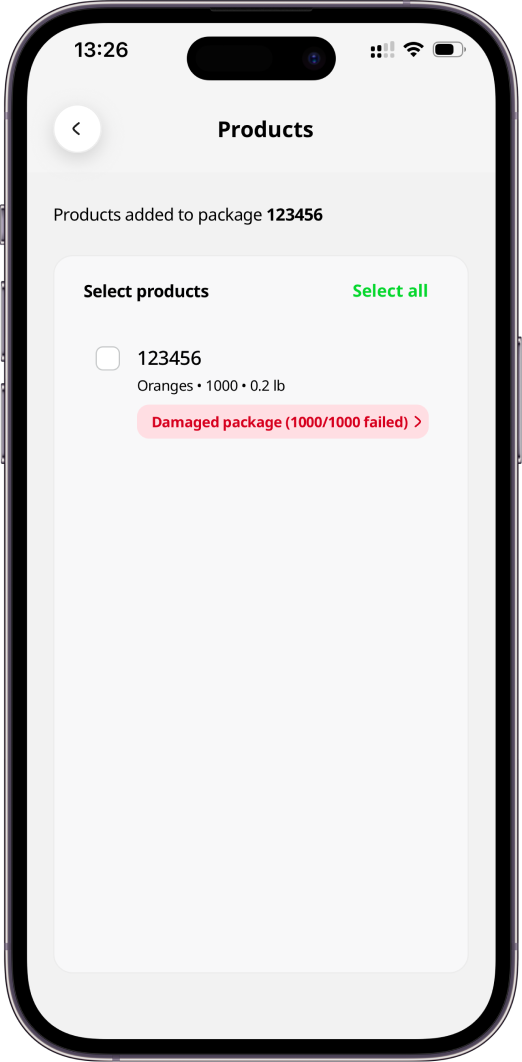
It is possible to press the Products button on a package to mark that only part of the product failed. The product will have a “Partially successful” status and a failure reason code will be highlighted in orange colour. The package status will be also automatically changed to “Partially successful”.
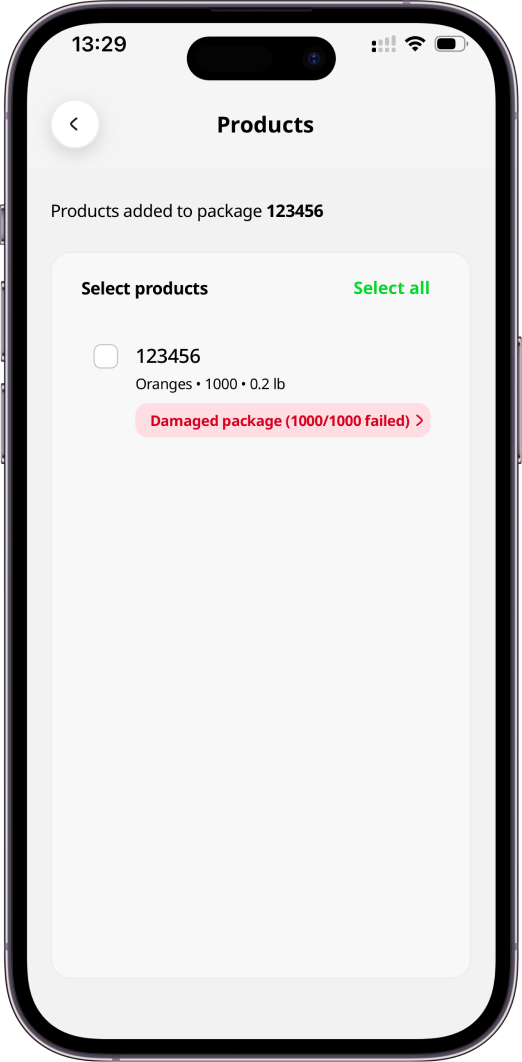
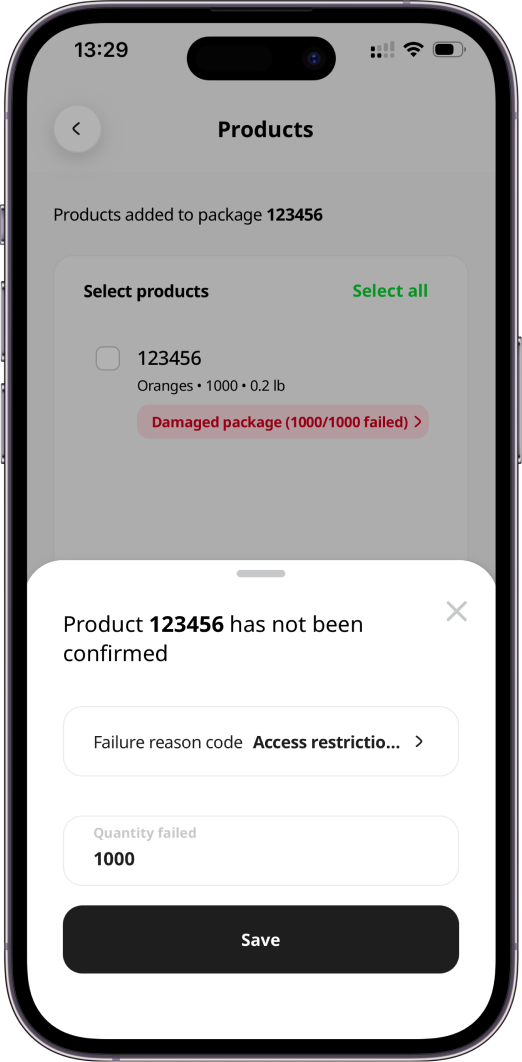
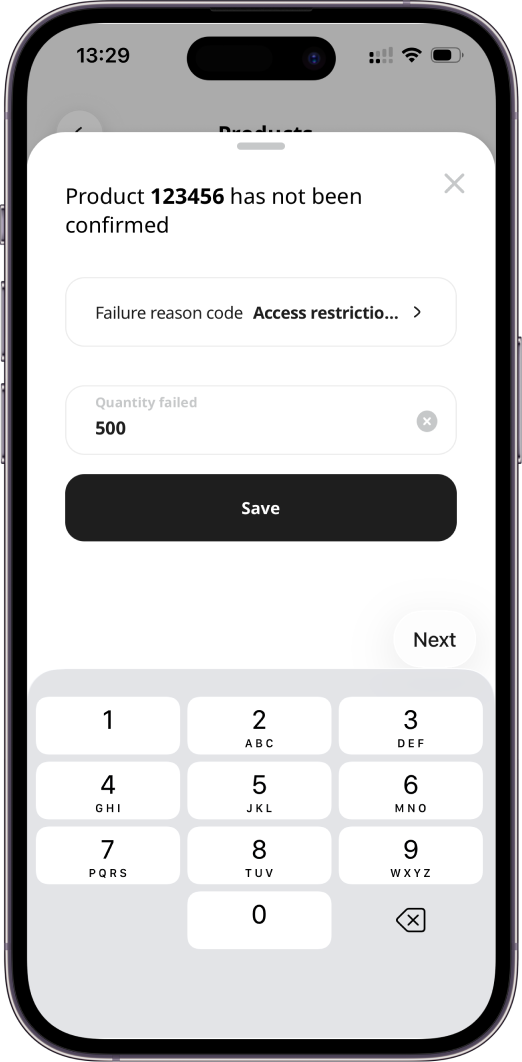
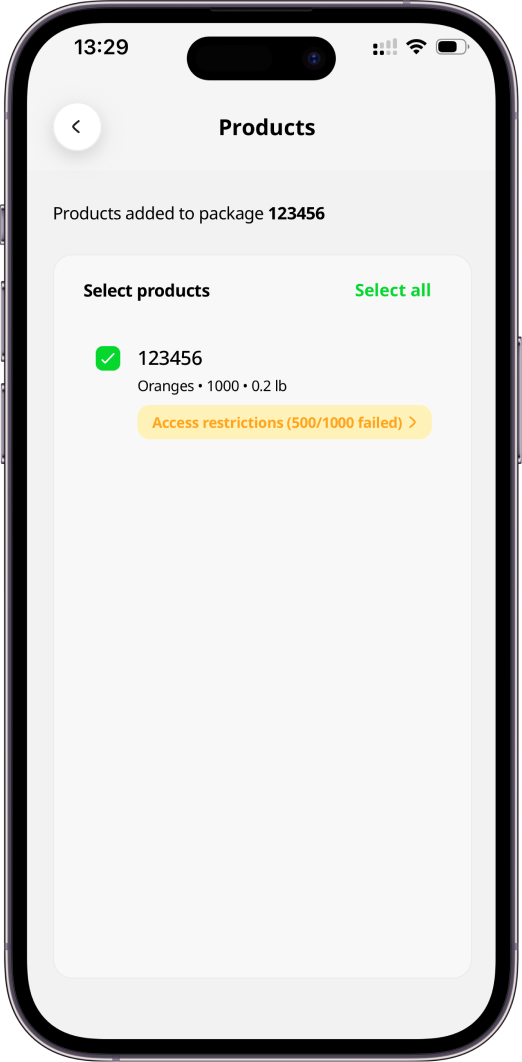
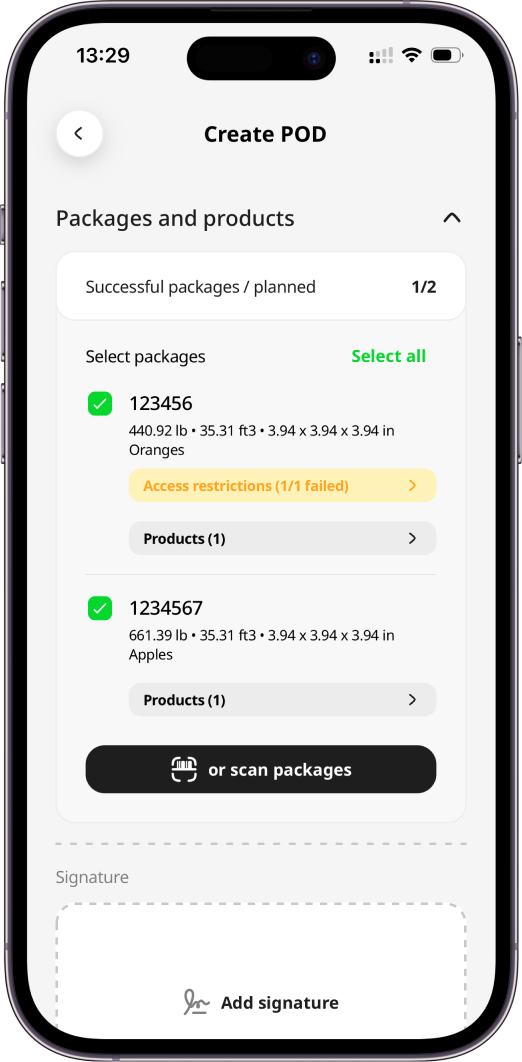
If all packages with products have failed, you can either de-select each manually by unticking the checkboxes or by pressing the Deselect all button. You will see the Select failure reason code button on each package and product to specify the failure reason code. You can press on a package to provide a failure reason code. You will see two options - Apply for all failed packages or Apply for selected package. If Apply for all failed packages is selected, the failure reason code will be populated for all packages and products linked to them. If Apply for selected package is selected, the failure reason code will be populated only for the selected package and products linked to it.
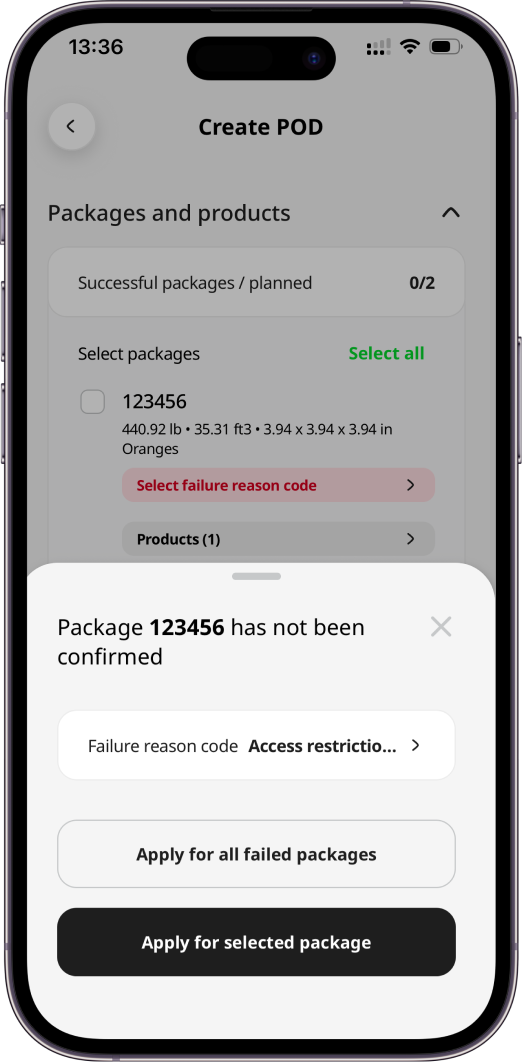
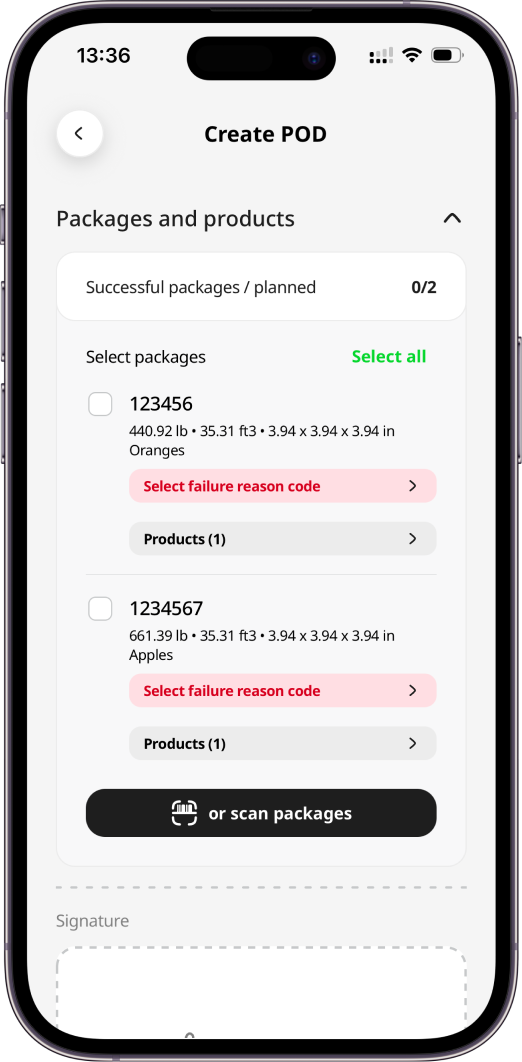
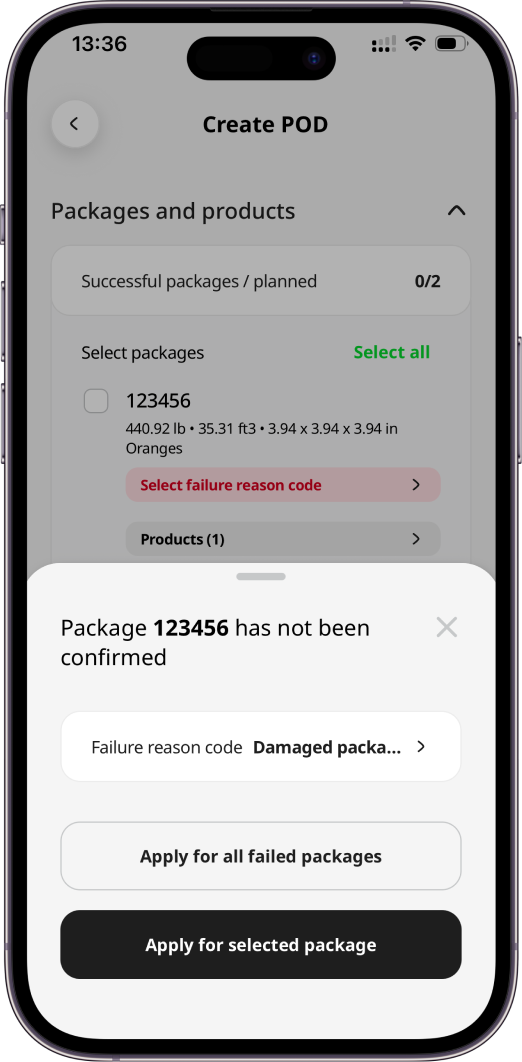
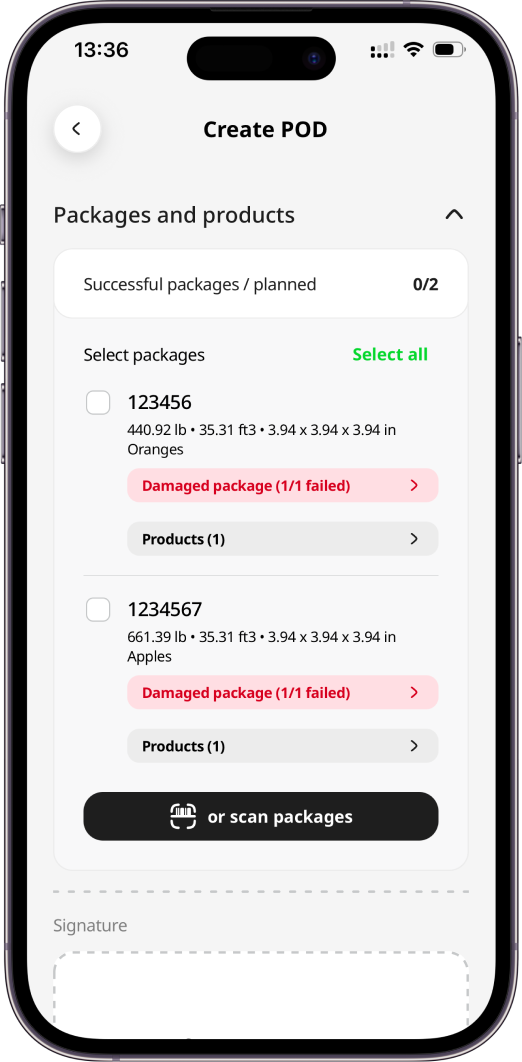
You can press other package cards and select another failure reason for them. You will see the same options - Apply for all failed packages (those without a reason code yet) or Apply for selected package. The last selected failure reason code will be saved for the general POD level.
The failure code for the packages and products inside them will be highlighted in red colour. You can press it to select another code (for example, to provide an individual code for each product) and the failed quantity. If not the full quantity of the product fails, the general status will be changed to Partially successful.
You can first select a Failed status and a general failure reason code for the POD. All packages and products will be de-selected automatically. The general failure reason code will be populated to the package and product level, but you can change it for each product individually.